| Moderated by: chrisbet, |
|
|
| Stickle Pike 360 x 180º PanoramasAttempting 360 x 180º Panoramas, Normal Panoramas and Startrails with 16mm fisheye on D3 | Rate Topic |
| Author | Post |
|---|
| Posted by Robert: Mon Oct 9th, 2017 04:57 | 1st Post |
| In my panoramas of the Duddon Estuary one peak sticks out in the landscape as distinct from it's neighbours. Stickle Pike, it's visible from many places and seems to catch my eye whenever I look that way. Yesterday I intended to visit it with Christopher, just for a shufti, unfortunately time ran out but today I'm planning to go see what it looks like close up. This is a panorama taken with my iPhone of the stainless steel viewpoint elevation of the fells to the North of the Duddon Estuary. Stickle Pike is roughly North from that point, depending on which North you use! 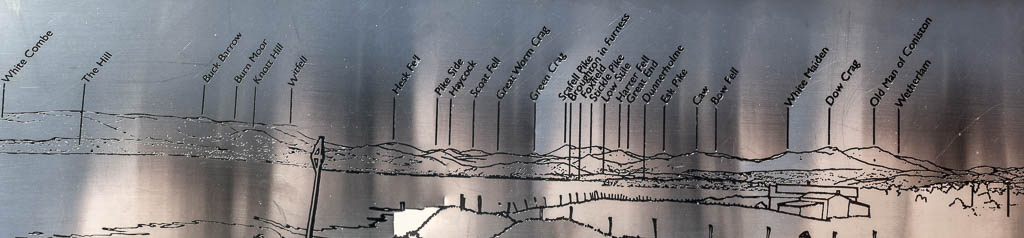
____________________ Robert. |
| Posted by Robert: Mon Oct 9th, 2017 10:54 | 2nd Post |
| Well, I made it, a rather soggy D3 on my desk to prove it. Have found a wonderful location for star trails and mountain scenery. Not too far from home, should be reasonable low light pollution, although Sellafield isn't that far away... The downside is it's very close to Seathwait, reputedly the wettest place in England with 3552mm to rainfall a year and 314.4mm in a single 24 Hr period. Compared with King's Lynn @ 382.6 mm per year average (https://www.timeanddate.com/weather/uk/kings-lynn/climate). Alicante 49.3 mm per year, according to the same source... I have made some exposures and one set of 360º panorama images to experiment with. It was raining persistently by that time so I just went for it, nothing spectacular but something to play with. One has to start somewhere!  Photo's to follow.
____________________ Robert. |
| Posted by Robert: Tue Oct 10th, 2017 04:10 | 3rd Post |
| I have created a spherical panorama from the viewpoint, not quite perfect, I need to get used to the coverage of the 16mm fisheye. I took six exposures which included the bottoms of the tripod legs, I also took two exposures to cover the zenith and two to cover the nadir (The bottom of the image where the tripod was). In fact my six radial exposures almost covered the zenith only leaving a small hole. Unfortunately PTGui didn't know what to do with the two images I took of the zenith and inserted them about the middle left, completely in the wrong place. The two I took for the nadir were perfectly inserted. I am wondering if I have to take the images in a particular order. In the tutorials I have seen the photographer takes the radial exposures first then the zenith and finally after removing the tripod takes the nadir exposure. I am thinking I may only need three radial exposures and one nadir if I tilt the camera very slightly higher, I am using landscape mode. Alternatively If I use portrait mode and take six radials and one nadir with the tripod removed that will fix the zenith without tilting the camera up too far. More experimenting required. I am working on the techniques for creating the spherical panorama, then I have to understand how to save the image to export it for further use like making it viewable here or on 360Cities.net. All new and complicated stuff! In the meantime here is the view I was greeted with when I arrived... D3, Nikkor 24-120 f4.0 @ 38mm, 1/250sec at f5.6, ISO 320 Whoops! Just noticed the dust bunnies... 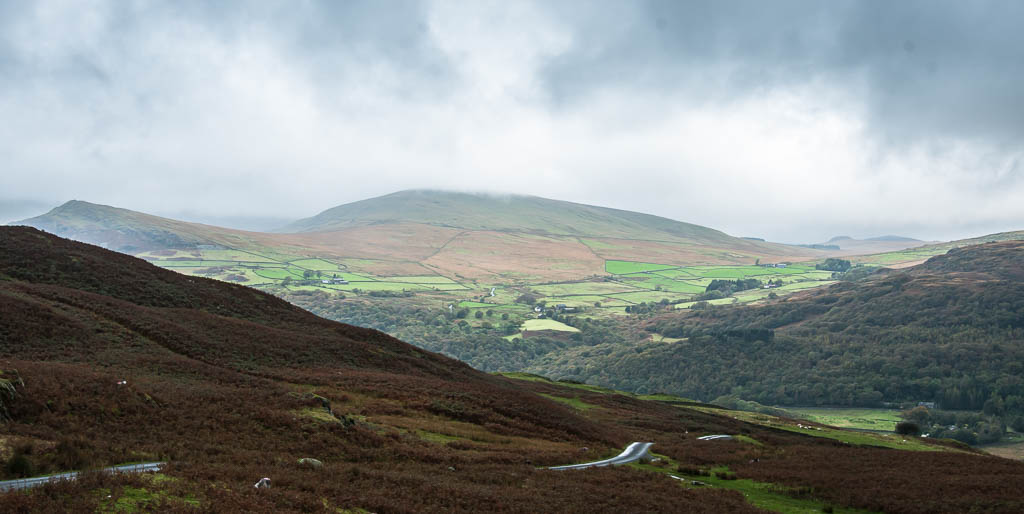
____________________ Robert. |
| Posted by Eric: Tue Oct 10th, 2017 04:15 | 4th Post |
It's raining in Kings Lynn today.
____________________ Eric |
| Posted by Robert: Tue Oct 10th, 2017 04:30 | 5th Post |
Eric wrote:It's raining in Kings Lynn today. Make the most of it. No rain here, YET! Off out to experiment...
____________________ Robert. |
| Posted by Robert: Tue Oct 10th, 2017 15:18 | 6th Post |
| Today I climbed Stickle Pike, not quite as momentous as Everest but was a very pleasant afternoon. This is a photo of the actual peak from fairly close up. D3 Nikkor, 70-300 f4.5-5.6 @ 300mm, 1/1000sec at f6.3, ISO400 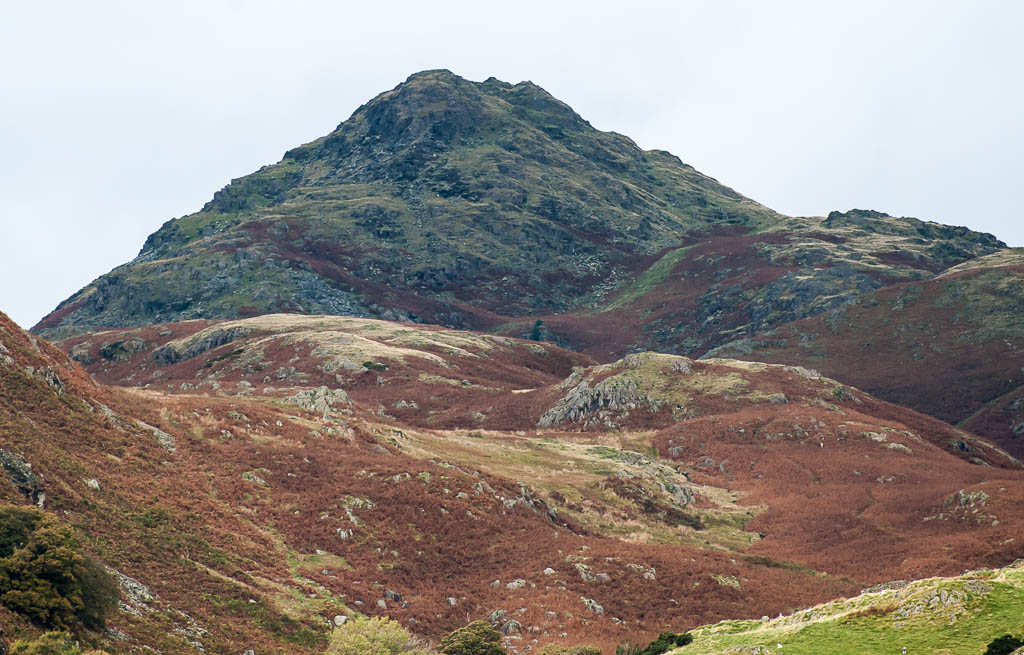 I have taken countless sets of 360º panorama images, I made well over 500 exposures today. I spent over three hours to the top of Stickle Pike and Stickle Tarn which is just below the summit, to the right as you see it in the above image. I'm too tired to tackle the Pano sets now but I have processed some of the pix I made on the way home. The light wasn't perfect, it was fading fast. I spotted some of these yesterday but it was raining hard and the light was non existent. Here are some of them, all taken in the Duddon valley, Dunnerdale. D3, 24-120mm f4 @ 44mm, 1/125sec at f7.1 ISO 250 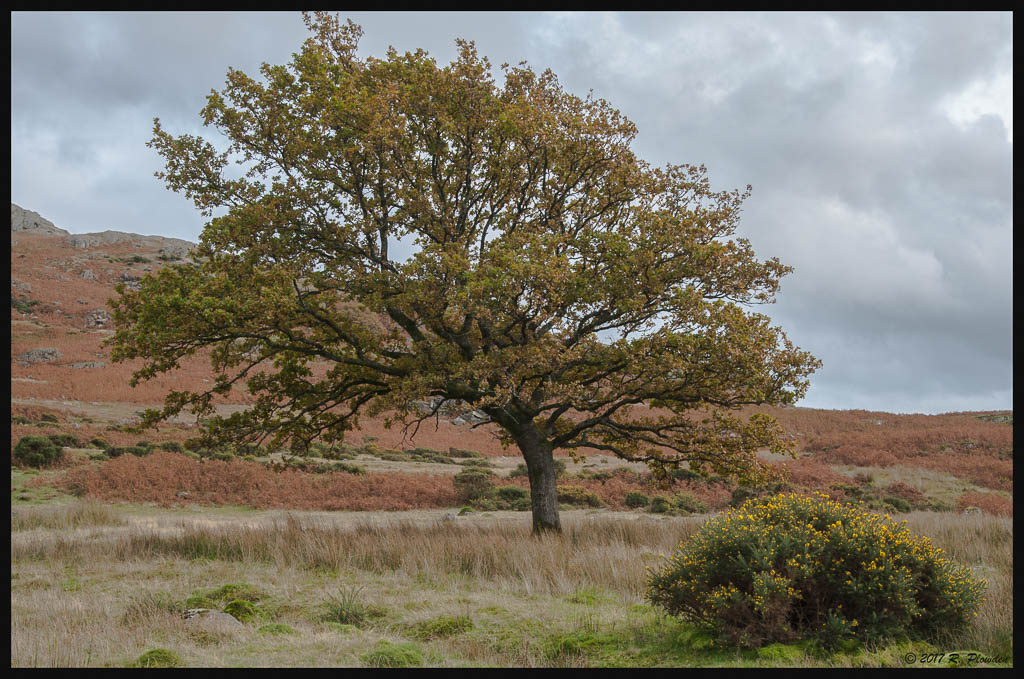 This is a departure from my usual process, the lighting was difficult. I used the HDR feature of Lightroom, I took several sets of 5 exposures, varying the exposure compensation and the steps. This is the result of one of the sets. The trees stood out despite the failing light, the problem was trying to lift the dark shaded areas of the image without making the brighter areas too bright. D3, 24-120mm f4 @ 52mm, nominally: 1/200sec at f7.1 ISO 250 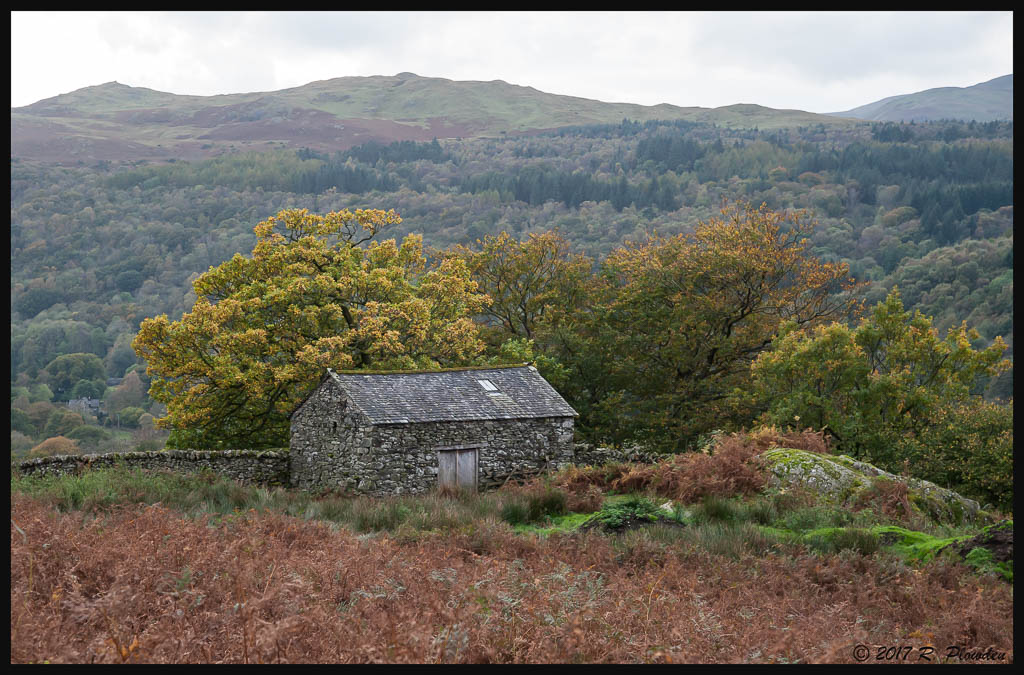 The other was a bit more of a challenge but I got this. D3, 24-120mm f4 @ 78mm, nominally: 1/125sec at f6.3 ISO 500 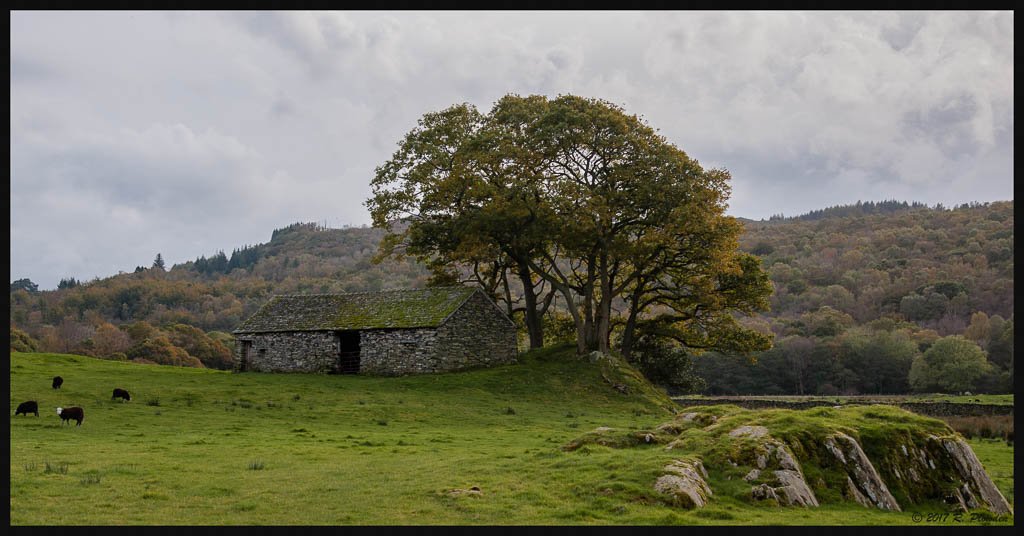 Now for the Pano's...
____________________ Robert. |
| Posted by Eric: Wed Oct 11th, 2017 04:53 | 7th Post |
| Robert wrote: Some lovely scenes there Robert. This last one would also look good in IR.....with some more sun and broken clouds 
____________________ Eric |
| Posted by Robert: Wed Oct 11th, 2017 06:40 | 8th Post |
Eric wrote:Some lovely scenes there Robert. This last one would also look good in IR.....with some more sun and broken clouds Thank you Eric, this is a spectacular corner of the Lake District which seems very quiet. I didn't see a single soul after I left the car to climb Stickle Pike, I was up there for over four hours, really peaceful. I already have it mentally bookmarked for next year... Or would it be OK on a sunny day, even with the leaves turning? I plan to revisit when the leaves have become golden but one slight issue is that it's taken from the North East in a fairly deep valley, I thought a very early, dawn visit in mid summer might get the best light... This location isn't much more than half an hour from home so it's easy to pop up if the light looks right.
____________________ Robert. |
| Posted by jk: Wed Oct 11th, 2017 07:22 | 9th Post |
| Great set of images Robert. The last one will work well in IR as Eric says. The 2nd and 3rd in the four image set are very nice. Add some warmth and light to the bracken and it will really lift the image.
____________________ Still learning after all these years! https://nikondslr.uk/gallery_view.php?user=2&folderid=none |
| Posted by Robert: Wed Oct 11th, 2017 11:04 | 10th Post |
| Thanks JK, my main concern with the third and forth images was to preserve the glow from the trees, which was what attracted me to the scene in the first place. The third and forth images are both HDR in order to try to preserve the lights and yet boost the darks without resorting to trickery and pushing the boundaries (I guess HDR is a trickery of sorts!!!). Really just trying to preserve the natural feel of the image. I take your point about the bracken but in reality it is pretty bleached, much more so than the picture suggests. I agree boosting it a little more would probably bring more life to the overall image. The third image I took 89 mainly bracketed exposures and only one set of five exposures came close to getting something near what I saw. Will revisit the processing, I know there is more to be had from those NEF's. I haven't even applied graduated controls yet and that's what the bracken needs. The second image, the bent tree, I think it's an Oak, really screams the direction of the prevailing wind and the power of nature. It's one of the nicest examples of the phenomenon I have seen. There are still more potential subjects along that road, the three sites I stopped at were all within a one mile stretch. I have included a screenshot of the Lightroom Map showing the locations of the photos, I haven't processed some water flow shots I took of the river Duddon, I wasn't particularly happy with them. I bet it's a lot more spectacular today! I have encircled the roadside locations, the others upper right are the Stickle Pike locations. Attachment: Ulpha Photos.jpg (Downloaded 27 times)
____________________ Robert. |
| Posted by Robert: Thu Oct 12th, 2017 07:02 | 11th Post |
| Last night was forecast clear skies and excellent visibility so I ventured back to Stickle! Armed with the D3 and 16mm f 2.8 fisheye, coffee and some snacks to keep me sustained through the night! After negotiating branch strewn roads with quite deep flooding. I arrived about midnight, very strong winds and soggy underfoot. I waited a while to see if the clouds would shift, eventually they seemed to thin somewhat so I set the camera up where I thought it would be relatively sheltered. The landscape is extremely craggy, I wanted to include some of the craggy features in the picture, I had already had a shufty on my previous visits in daylight so I had a good idea where I wanted to set up. If I had somebody with me I would have been more adventurous but no wish to be up there on my own if I got stuck. Mindful of the banding issue from my last star-trail session of the lighthouse, I decided to set the camera to one minute intervals and initially a 25second exposure, for my second batch I increased the exposure to 30 seconds. That meant the sensor had 28 seconds to cool between exposures (a 30 second exposure is actually 32 seconds). There was no sign of banding last night so next time I may reduce the interval to 50 seconds. For star trails the interval needs to be kept as short as possible else the stars trails appear as a series of dots rather than a continuous line. By 3am the clouds started to return so I packed up and came home. I loaded the images into Lightroom and made one somewhat crappy star-trail image. Refreshed this morning I reprocessed the images, the second batch were best so I made this: D3, Nikkor 16mm f2.8 Fisheye lens, 30 seconds at f3, ISO 500. 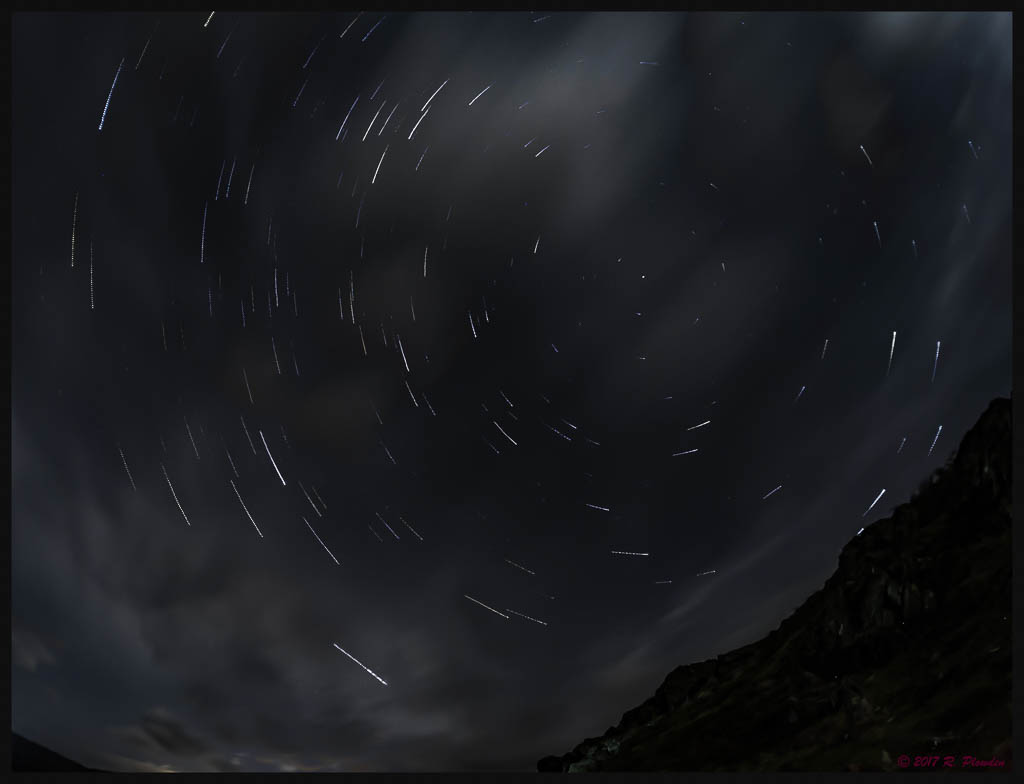 The original reason for visiting Stickle Pike was to make 360º panoramas. I have tons of material but am struggling to assemble a satisfactorily aligned image. The PTGui software seems to take the vertical centre of the main images and place them around the 'equator' of the panorama leaving a great gaping hole at the top. My intention when I made the exposures was that the main images overlapped at the top and I took a nadir image for the bottom. I didn't use a tripod, just hand held because the subject was so far away the parallax error is negligible. So I simple took one more exposure of where I had been standing. This seems to be another problem, PTGui stitching software takes exception to mixing portraits and landscape images in one panorama. Even for the nadir. The camera seems to insist on classifying an exposure pointing downwards as landscape orientation. From what I have read, rotating the image in Lightroom won't fool PTGui because it somehow knows (thinks?) it was originally taken in landscape orientation. I have created many matching control points and the software confirms the control points are satisfactory. I am beginning to get to the exasperated stage! I plan to approach the PTGui forum for assistance because I am sure there are just some silly points I am missing. It's frustrating because I know I have some good material. The main issue is the image for the nadir. I have had some success relocating the main images to meet at the top as intended. Here is another image, to the small tarn, Stickle Tarn and the summit of Stickle Pike in the background. This is a panorama about six portrait exposures. Looking at it now it's missing one more image to the left, it looks a bit truncated... D3, 24-120mm f4 @24mm 1/800sec at f7.1, ISO 400 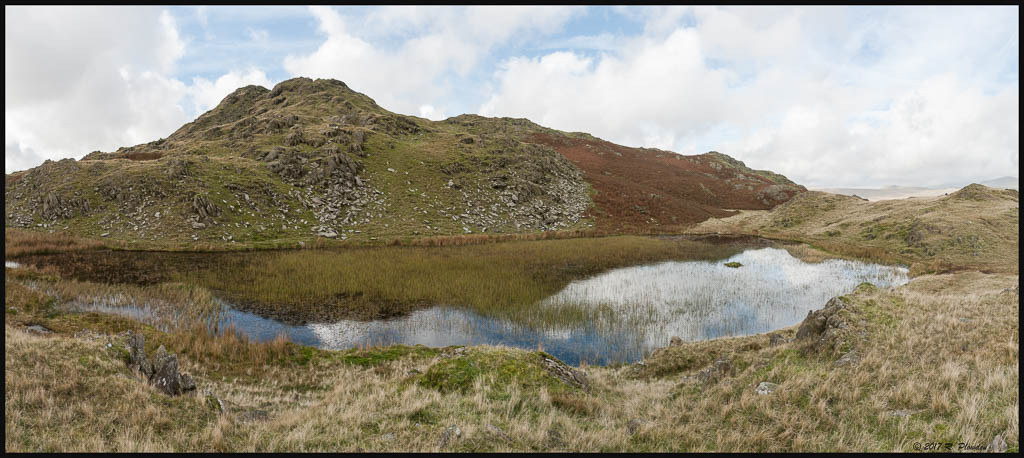
____________________ Robert. |
| Posted by Robert: Thu Oct 12th, 2017 16:12 | 12th Post |
| Well, I have managed to create a passable 360x180 spherical panorama. It's not quite perfect but not bad either. I'm a very happy camper right now. It's currently uploading to 360Cities website. If that succeeds I will post the URL here. It's a lot to learn, 3D with knobs on!
____________________ Robert. |
| Posted by Robert: Thu Oct 12th, 2017 17:32 | 13th Post |
| The URL for my pano of Stickle Pike is here: https://www.360cities.net/image/stickle-pike-and-stickle-tarn-english-lake-district Hope it works, the arrow keys seem to do the movement but you can also zoom, it zooms with my trackpad... Once I buy the licence I should be able to replace it with a watermark free version. 
____________________ Robert. |
| Posted by Eric: Fri Oct 13th, 2017 08:27 | 14th Post |
Robert wrote:The URL for my pano of Stickle Pike is here: That's outstanding Robert! What a great location for your experiment!! 
____________________ Eric |
| Posted by jk: Fri Oct 13th, 2017 09:02 | 15th Post |
| Dont expect the weather to improve you have tailend of hurricane coming in over Ireland up to Scotland!
____________________ Still learning after all these years! https://nikondslr.uk/gallery_view.php?user=2&folderid=none |
| Posted by Robert: Fri Oct 13th, 2017 15:43 | 16th Post |
| Thanks Eric, I'm chuffed to bits. Both with the panorama and the location. I'm decorating at the moment so hurricanes don't bother me right now but it was blowing some when I took the star trails and my location was comparatively sheltered. Posted from my iPhone.
____________________ Robert. |
| Posted by Robert: Tue Oct 31st, 2017 09:04 | 17th Post |
| I have decided to make a proper panorama head. I have looked at numerous specialised panoramic heads at astronomical prices. I found several quite adequate heads on You Tube made of wood. The reason the likes of the Manfrotto heads are so expensive is they are made to be adjustable for almost any conceivable lens and camera combination. To make the adjustments rigid that involves precision slides and adjustments which must be fairly rigid. The machining of the precision slides and adjustment mechanisms must be very expensive. I don't intend using a wide range of cameras or lenses for panoramas so I don't need adjustments, except for the 'least parallax error' movement, which is easy enough to create with a simple slot. I am gathering the materials to make the pano head from aluminium, but plan to make a prototype of wood just for a start to figure out the measurements and any snags I may encounter.
____________________ Robert. |
| This is topic ID = 1469 | ||
| Nikon DSLR Forums > Photography > Photography Expeditions & Travel > Stickle Pike 360 x 180º Panoramas | Top | |
Users viewing this topic |
||
Current theme is Blue
| A small amount of member data is captured and held in an attempt to reduce spammers and to manage users. This site also uses cookies to ensure ease of use. In order to comply with new DPR regulations you are required to agree/disagree with this process. If you do not agree then please email the Admins using info@nikondsl.uk Thank you. |
Hosted by Octarine Services
Copyright © 2008-2024 Data 1 Systems
Page processed in 0.1518 seconds (68% database + 32% PHP). 119 queries executed.
Copyright © 2008-2024 Data 1 Systems
Page processed in 0.1518 seconds (68% database + 32% PHP). 119 queries executed.