| Moderated by: chrisbet, | Page:   |
|
|||||||
| Night Sky Photography - Page 8 | |
| An Equatorial Mount: My lucky day! | Rate Topic |
| Author | Post |
|---|
| Posted: Fri Apr 12th, 2019 10:56 |
|
71st Post |
Robert

|
Thanks JK, I have numbered the images for ease of reference. In image 7 (and others), the silver dial around the Polar scope is numbered 1-24 effectively, that relates to hours, when locked to the running motor, the arm rotates at 24 hours per revolution. That dial can be turned independently of anything else and can be set to time of day. The graduations on the original mount which is green Hammerite are used to set the rotary adjustment of the polar scope, in combination with the hours on the movable disk AND a mark etched on the polar scope itself. This is a screenshot of the Vixen Manual, page#12. It explains the procedure in detail.  [/url] [/url]My brain is going into meltdown with that description. I think that this also requires star charts as well as the hardware. The movement of Polaris is also indicated in the final figure, #10 at bottom right. It's not as much as I thought. The applicable procedure starts at item 6 I think but I very quickly get lost in the nonsensical text/reality. My EQ mount is not exactly the same as the one illustrated but in essence near enough. The one below is 1986, the one in the manual is 1995, nine years newer. Mine is older than both. 
____________________ Robert. |
||||||||
|
| |||||||||
| Posted: Sat Apr 13th, 2019 05:04 |
|
72nd Post |
Robert
|
OK, I have success!  Last night I went out again set up at Stickle Pike and took three series of images, firstly the Moon, just to test a theory, then I selected a bright object to the North West, not too high in the sky, then another bright object to the South East. I set the Polar scope as best I could then rotated the mount arm around 360º which caused the polar star to appear to describe a circle around celestial North, by eye it seems pretty well centred on the celestial North marking. After I took the Moon exposures I again checked alignment, there was slight Polar drift so I corrected that and went for the first set of a star, may have been a Planet, I don't know... I took about 70 exposures, 30 second intervals, checked alignment again, the Polar drift was so slight I left it alone. Then I made a second star set, same settings. Going through the sets the results are variable, some exposures are crisp and clean, others are mush. At the end of the session I again checked the Polar alignment and drift was very slight, Polaris had drifted from the centre of the tiny locating circle to the edge, which is measurable but insignificant for my purposes, in fact Starry Sky Stacker suggests a little drift is beneficial because it helps to cancel any noise. I have processed star 1 images and they are below. I have used Lightroom and Starry Sky Stacker free trial. https://drive.google.com/file/d/18CE7amExArYwIvF5h0K0SBaEwjKrXSGb/view Initially I tried to use Starry Landscape Stacker, by the same developer but it recognised that I was using an astro mount and warned by using the wrong version it could freeze the software because the algorithms are not intended to deal with that type of image. Amazing! The composite image produced by SSS was made with ten selected 'best' images from 72, the images used spanned a period of 18 minutes of exposures, the first few exposures were not very good, I assume the mount needed to settle down. Firstly the worst individual image from the set. These are at 100% crop.  The best individual image from the set.  The best individual image uncropped.  This is the final, cropped image made by Starry Sky Stacker from my ten selected best images.  As you may imagine I am delighted. I still need to more clearly understand how to get Polar alignment without groping in the dark! I will now go forward and finish the machining of the mount and refine some little niggles but essentially I have cracked it. Will process Star 2 images later and post the results.
____________________ Robert. |
||||||||
|
| |||||||||
| Posted: Sat Apr 13th, 2019 06:47 |
|
73rd Post |
chrisbet

|
Absolutely great photos, well done!
____________________ If it is broken it was probably me .... |
||||||||
|
| |||||||||
| Posted: Sat Apr 13th, 2019 06:52 |
|
74th Post |
jk

|
Well done Robert. Looks like you are almost there.
____________________ Still learning after all these years! https://nikondslr.uk/gallery_view.php?user=2&folderid=none |
||||||||
|
| |||||||||
| Posted: Sun Apr 14th, 2019 14:14 |
|
75th Post |
Robert
|
Thanks, I am very pleased. I went through the second set of images but they are somewhat mundane, the same image quality is there but they are just boring plain star pix. However, just for fun this morning I stacked them in photoshop and blended them that way. I aligned them manually although they were very close, the error was well less than half a small star between any of them. The 11 images I selected for star 2 were chosen from about 70 exposures, The 11 images were taken over 22 minutes, so any error could have been much greater. This is my setup 'in the field'. Note the kneeling pad, just the right height to view through the DR-3 fitted to the Polar scope. 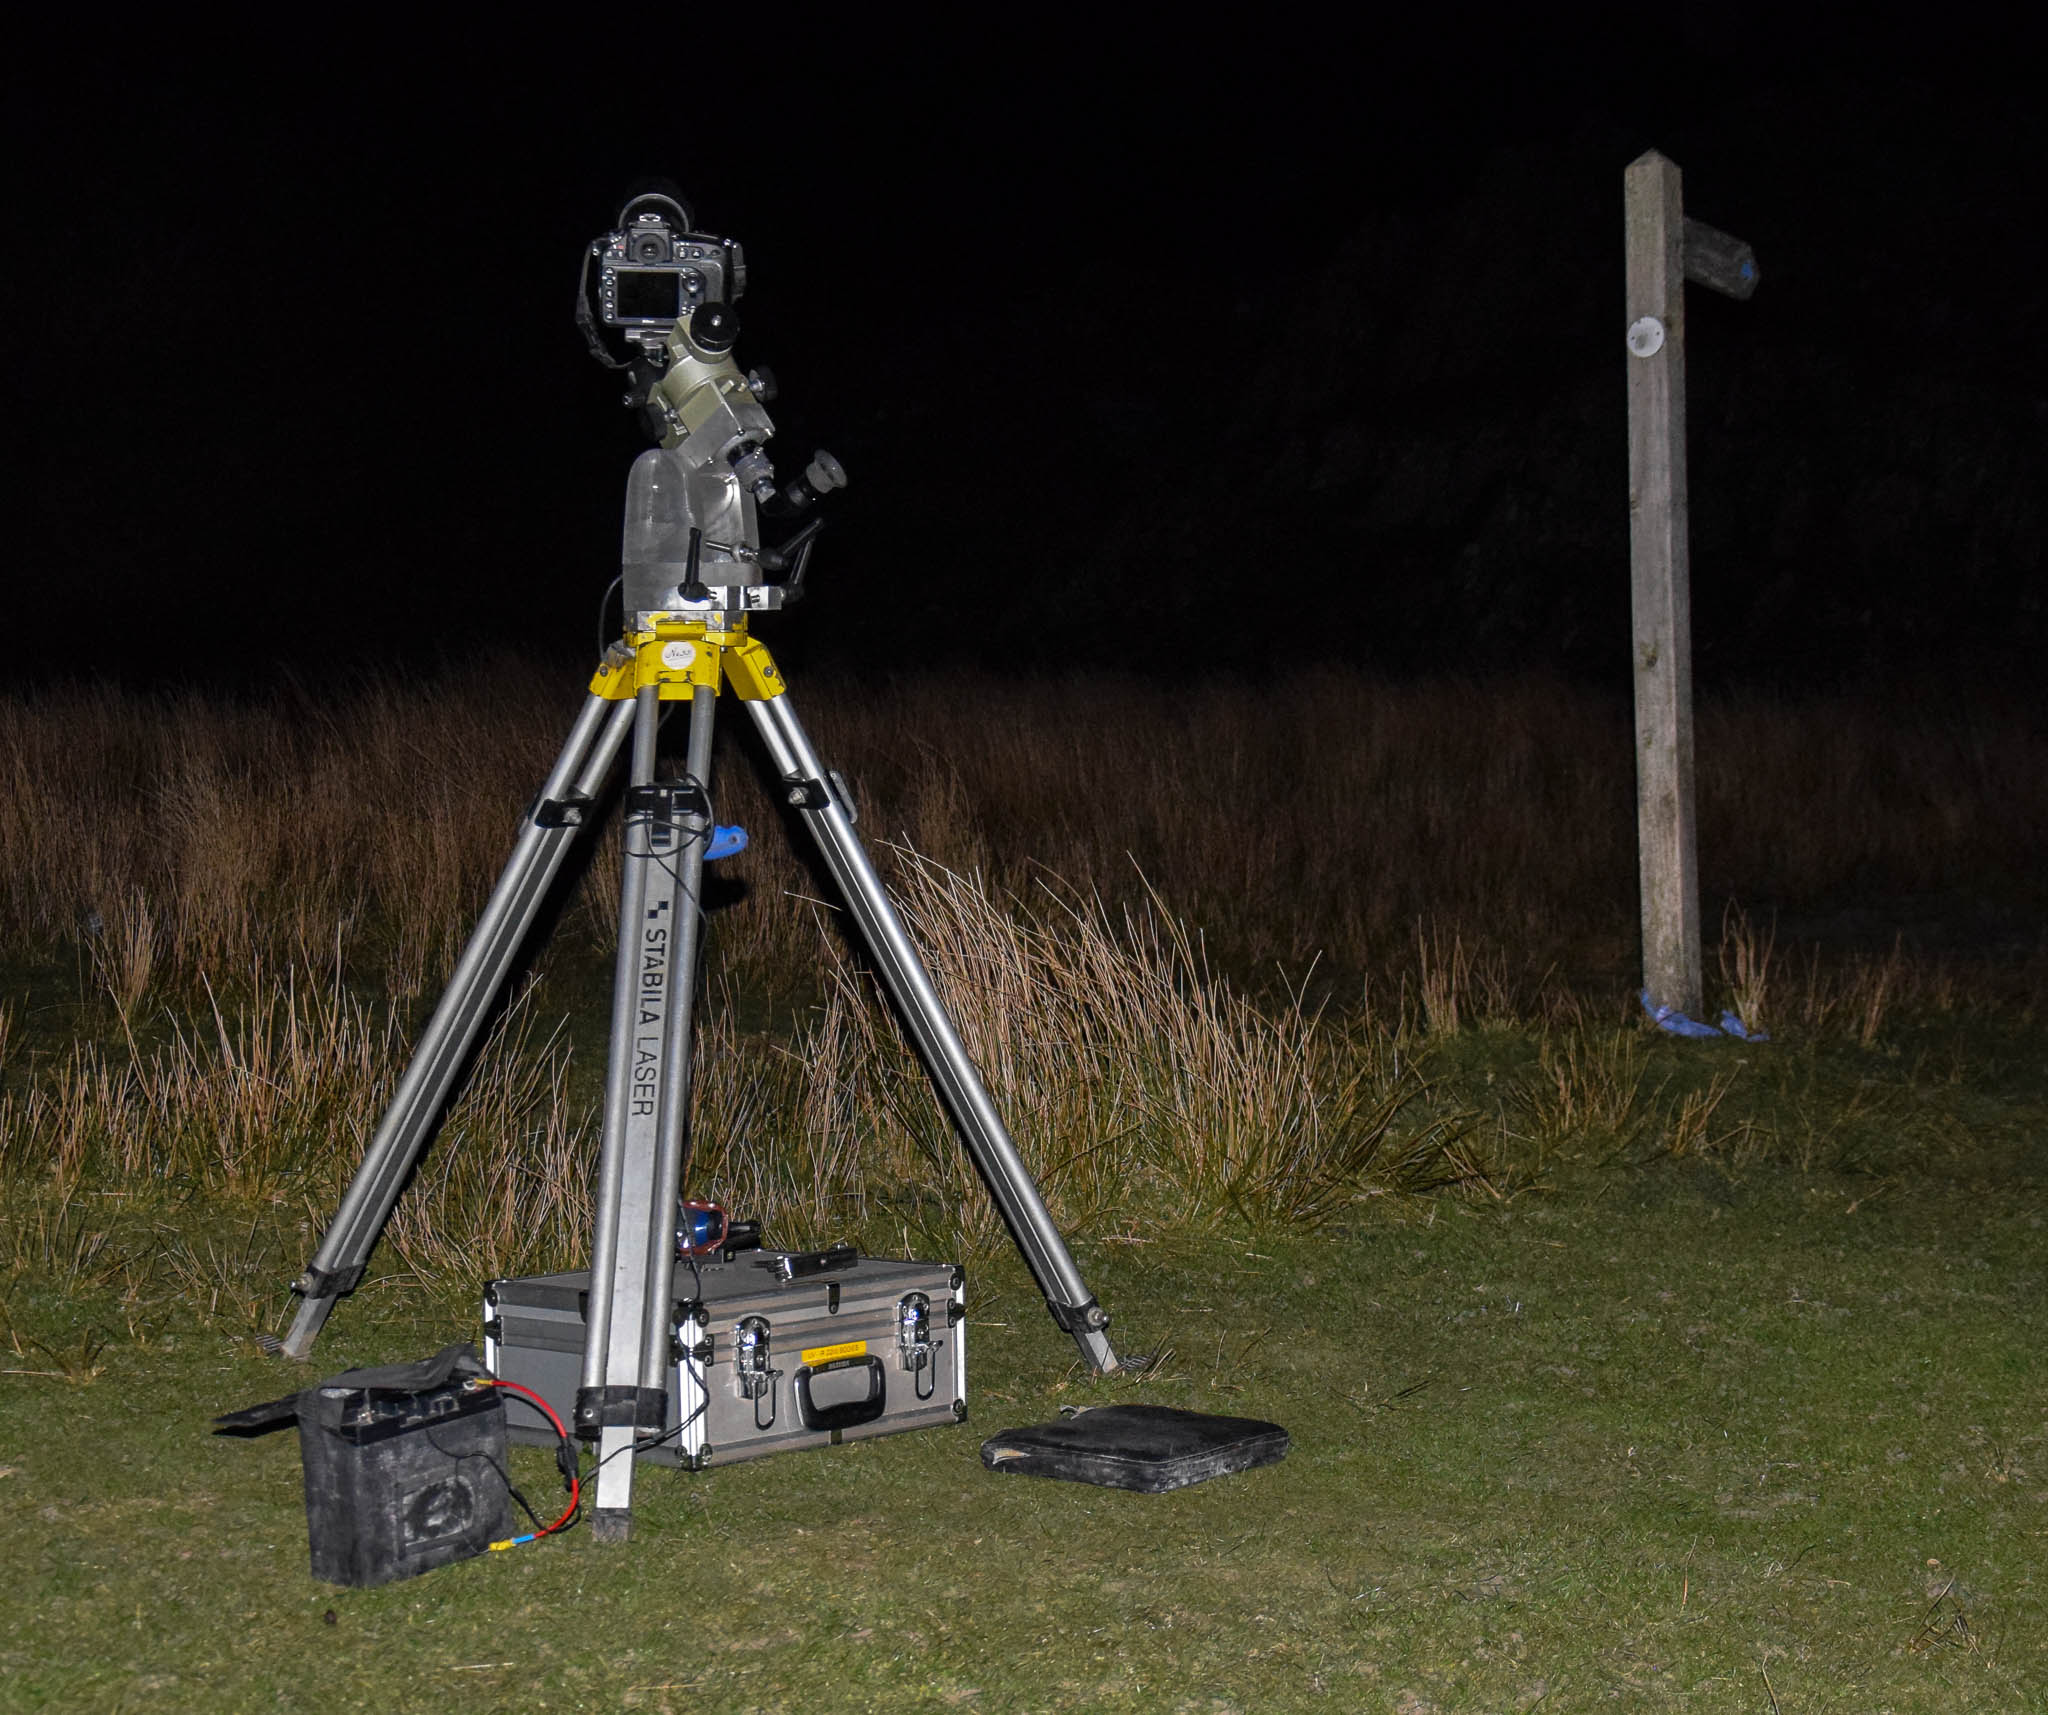 This is the combined 11 exposures stacked in Ps CC. Taken towards the South East, lowish in the sky, a bright star. The light pollution to the south is worst aspect at that site, Lancaster, Morecambe, Ulverston and Barrow all contribute to making a low contrast sky.  This is a 100% crop from the above full frame image, there are no noticeable signs of elongation of the stars due to Earth rotation. 
____________________ Robert. |
||||||||
|
| |||||||||
| Posted: Fri Apr 19th, 2019 12:34 |
|
76th Post |
Robert
|
The final piece in the jigsaw... https://itunes.apple.com/gb/app/polar-scope-align/id970157965#?platform=iphone I came across this by a rather circuitous route of exploring a lot of dead end avenues, which mainly ended in obsolete PC software. The particularly appealing factor with this 'app' is it knows about my Vixen equatorial mount and more especially the peculiarities of the Vixen Polar scope. The app makers suggest my scope isn't the best, most accurate design for a Polar scope but by using their app properly it can in fact bring it up to excellent accuracy. I am off out again tonight, good forecast for clear skies. Hopefully I will mount the 300mm f/2.8 lens on the D800 and run off some test exposures. If the full Moon allows I will try to get some of the Orion nebula.
____________________ Robert. |
||||||||
|
| |||||||||
| Posted: Sat Apr 20th, 2019 06:12 |
|
77th Post |
Robert
|
Well I didn't get to try it last night, too much cloud. This is what I saw: Pennington reservoir. 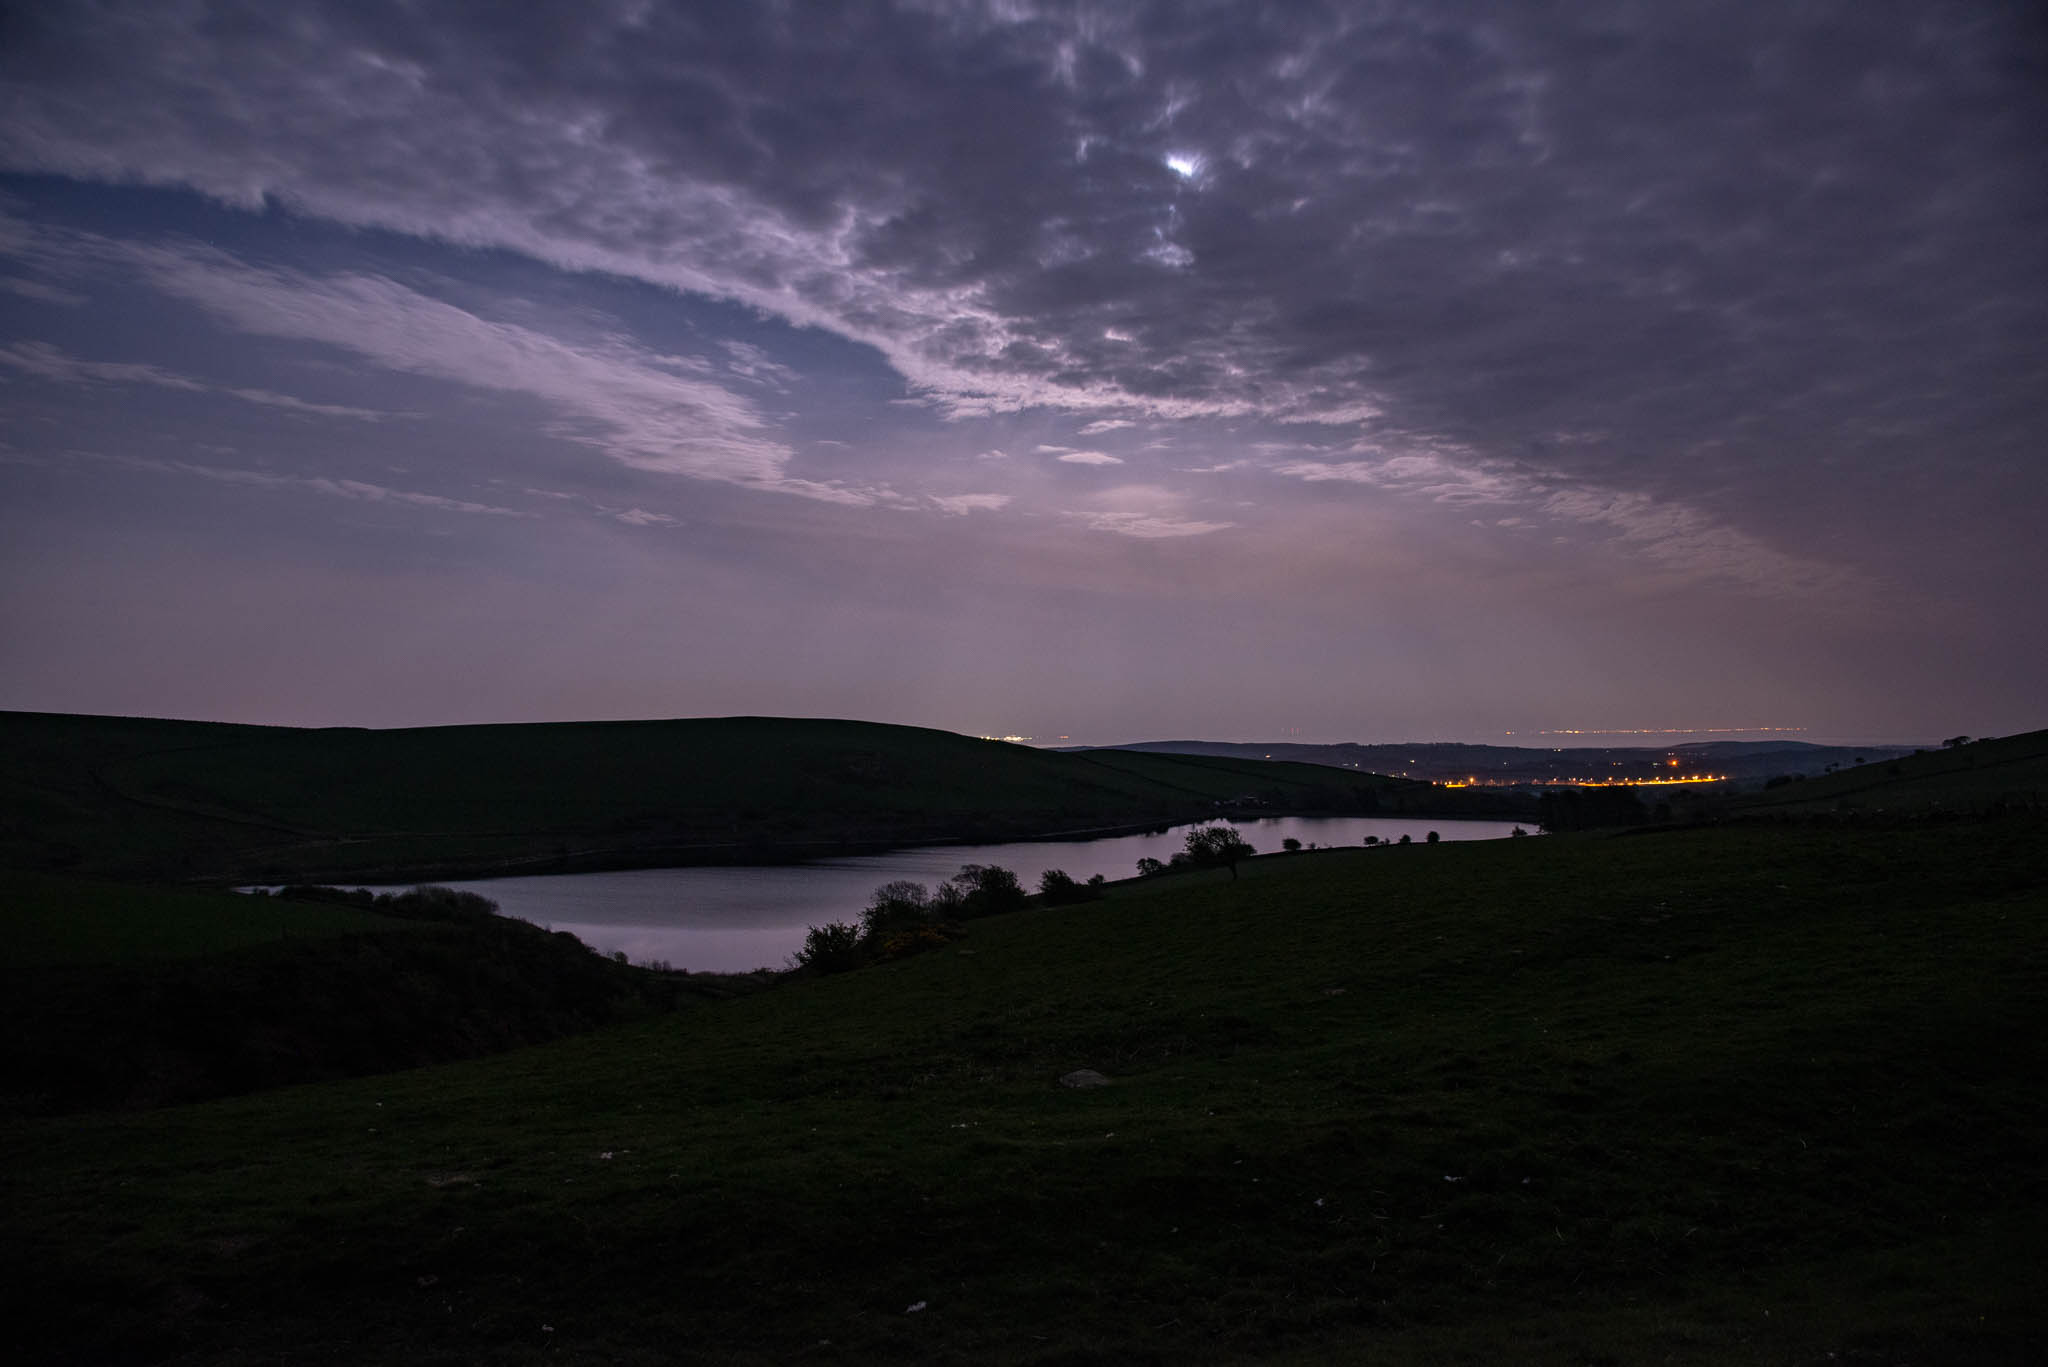 This is what the camera saw:  This was at full focal length, 120mm with the 24-120 on the D800 Morecambe across the bay. 
____________________ Robert. |
||||||||
|
| |||||||||
| Posted: Sat Apr 20th, 2019 06:42 |
|
78th Post |
jk
|
Like the darker version Robert. Lots of light pollution for your sky shots!
____________________ Still learning after all these years! https://nikondslr.uk/gallery_view.php?user=2&folderid=none |
||||||||
|
| |||||||||
| Posted: Sat Apr 20th, 2019 07:26 |
|
79th Post |
Robert
|
It was like a sort of misty haze, the light pollution is from Ulverston and Barrow to the South East, I forgot to mention it was a full Moon, a Pink Moon no less. To the North it's much darker.
____________________ Robert. |
||||||||
|
| |||||||||
| Posted: Sun Apr 21st, 2019 09:39 |
|
80th Post |
Robert
|
I have finally been able use the Equatorial (EQ) Mount with my Nikkor 300mm f2.8 lens. Last night was reasonably clear but the 'pink' Moon was almost full, only having waned very slightly. My newly acquired app for making the rotation setting of the Polar scope to obtain better accuracy of tracking worked well, I still have to perfect it but that's down to refining my technique, I now have the tools I need and an understanding of what's needed to get very close tracking of the night sky. While waiting for the sky to get darker I tried some Moon pix. This is Knottallow tarn above Ulverston, with Morecambe Bay in the background, the GSK factory can just be seen to the left, together with the Sir John Barrow monument, a replica of the Eddystone Lighthouse, caught in a blue moment. http://www.ulverstoncouncil.org.uk/education/john-barrow-monument D800 and Nikkor 24-120 f/4.0 - 2.5 sec @ f/5.6  This was made with the Nikkor 16mm f/2.8 fisheye - 2.5sec @ f/4.0  This is Pennington reservoir, not far from Knottallow tarn. This is where the Ospreys have been seen fishing. Taken about an hour after the previous images, the Moon having risen above the mist and become less pink.  Next is the EQ Mount image no idea what star it was, location to the North West. Made with the best 11 images of 15, taken at 30 second intervals. Nikon D800, Nikkor 300mm f/2.8 ED Ai lens (MF) - 25sec @ f8, ISO 400. Processed in Starry Sky Stacker. 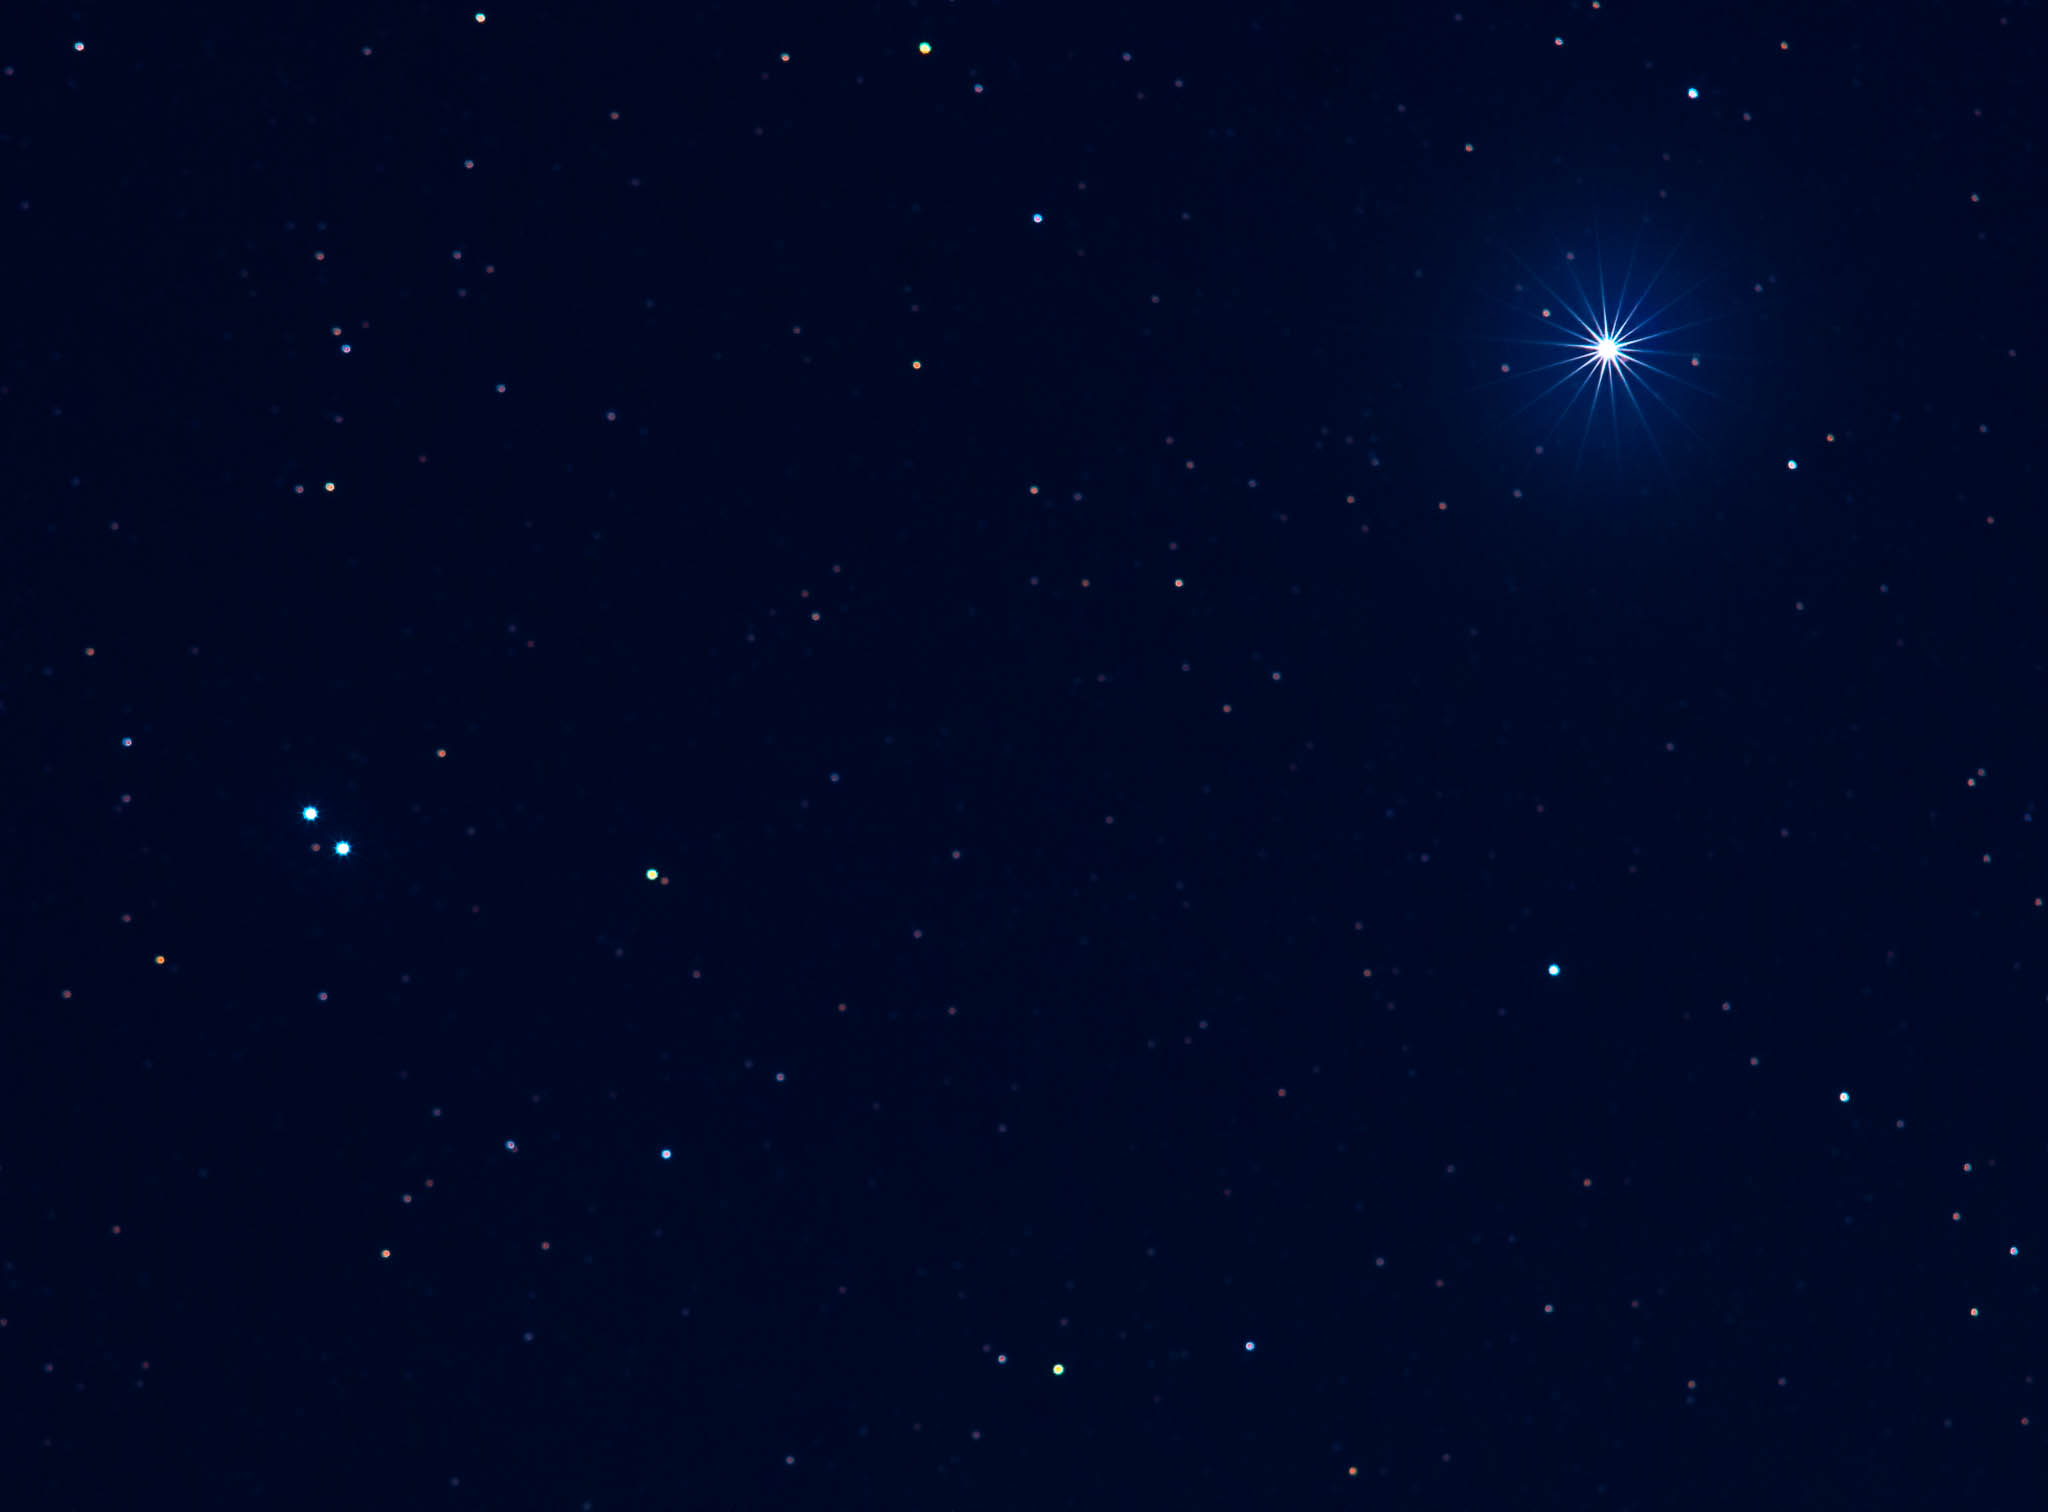 This is a star trails image using the same frames as the stacked image above, showing the movement from slight tracking error. I did not balance the weight of the heavy f/2.8 lens and camera for this test, partly because I need to make a better balancing arrangement and also because I wanted to see how badly the lack of balancing affected the tracking. It seems to have given an error of about one star diameter over 7 minutes. There wasn't as much air turbulence last night, almost all the exposures were pretty well perfect once the EQ Mount had settled down after a couple of minutes. 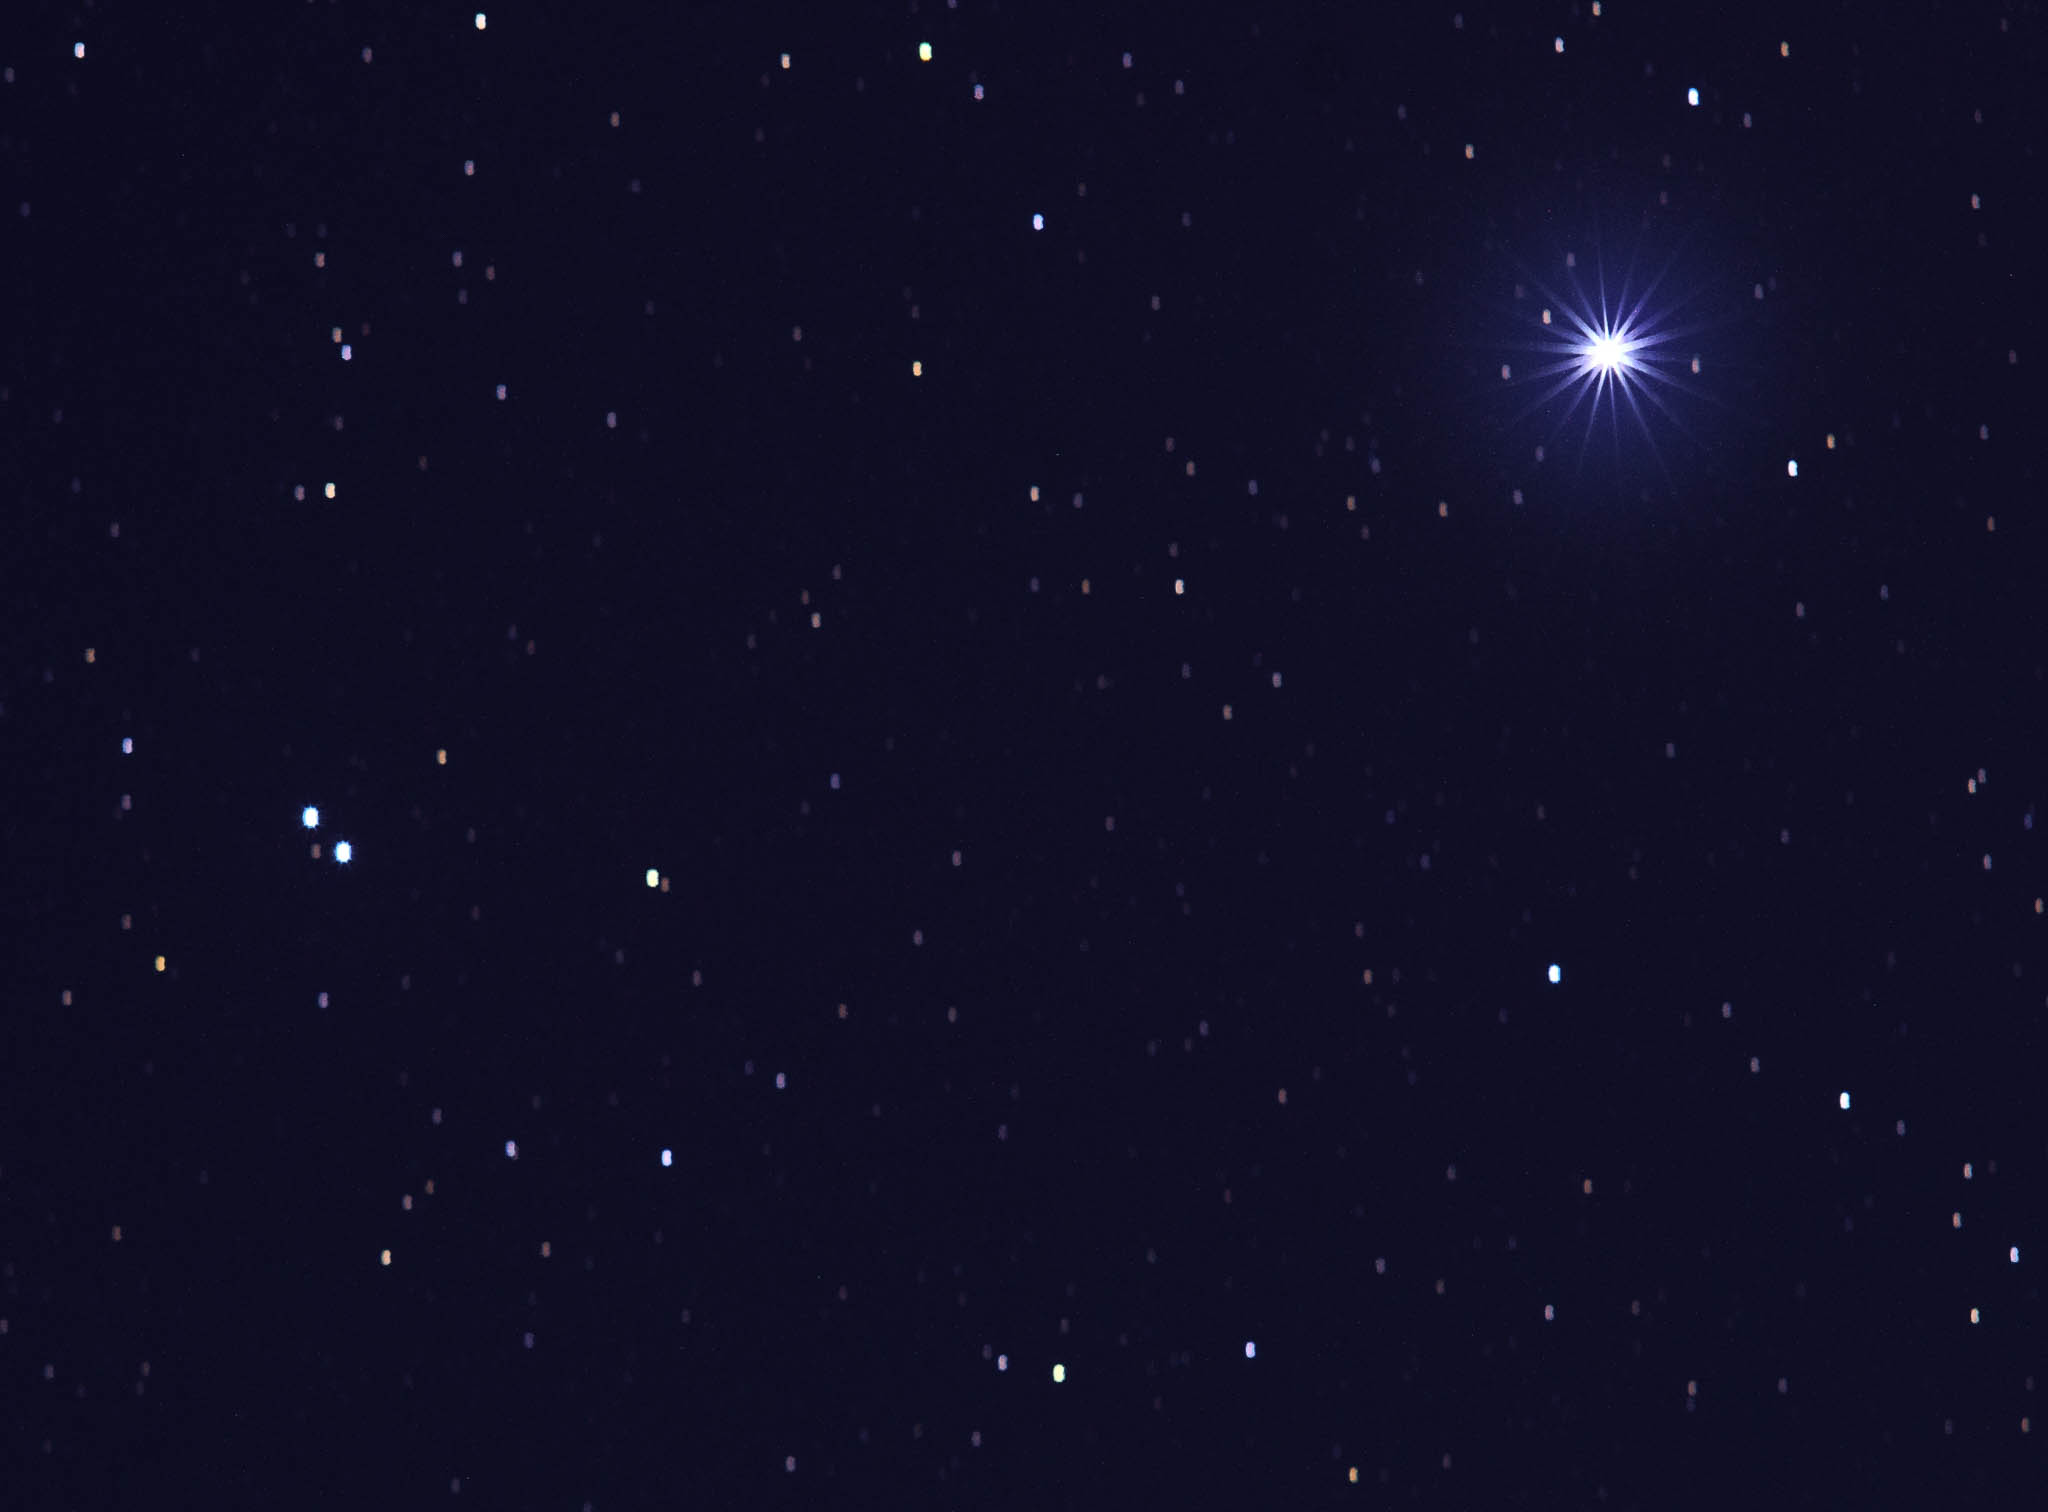 It's been quite a long journey but I have learnt a lot, I need to refine the mount and my technique but I am confident I have an outstanding combination with the D800 - 300mm f/2.8 and the EQ Mount. Roll on the autumn and darker skies. EDIT: Looking at these last two images there appears to be some banding effect visible, I don't have that on my processed images at my end, need to investigate that
____________________ Robert. |
||||||||
|
| |||||||||
| This is topic ID = 1677 Current time is 18:00 | Page: | |
| Nikon DSLR Forums > Photography > Photography Projects > Night Sky Photography | Top | |
Users viewing this topic |
||
Current theme is Modern editor
| A small amount of member data is captured and held in an attempt to reduce spammers and to manage users. This site also uses cookies to ensure ease of use. In order to comply with new DPR regulations you are required to agree/disagree with this process. If you do not agree then please email the Admins using info@nikondslr.uk Thank you. |
Hosted by Octarine Services
UltraBB 1.173 Copyright © 2008-2025 Data 1 Systems
Page processed in 0.0698 seconds (69% database + 31% PHP). 80 queries executed.
UltraBB 1.173 Copyright © 2008-2025 Data 1 Systems
Page processed in 0.0698 seconds (69% database + 31% PHP). 80 queries executed.