| Moderated by: chrisbet, |
|
|
| Night Sky PhotographyAn Equatorial Mount: My lucky day! | Rate Topic |
| Author | Post |
|---|
| Posted by Robert: Wed Mar 6th, 2019 14:03 | 1st Post |
| One of the inconveniences of dark sky photography is the Earth keeps moving, nothing new I know but still a nuisance when trying to take a still picture of a particular part of the sky. I mentioned this to a friend because I was considering utilising an old mixer worm drive gearbox to create my own rotating mount with which to track the stars. My friend called after a few days and asked if I was interested in a motor which moved 15º every hour, the penny didn't drop but I'm always interested in anything mechanical so I agreed. Cutting long story short, I now have my own somewhat old, equatorial mount. The price? 50 used paving bricks. At first the mount wouldn't work, the motor drive lead was broken and the control unit wouldn't power up. I figured out the pinouts for the six core cable myself, little or no info on-line. The mount is a Vixen Optics Photo Guider, apparently good for a 15 Lb payload, provided it's counterbalanced. What I didn't realise at first was the motor is a stepper motor, I was expecting a synchronised DC motor regulated by a timer circuit. These devices sell for between £500 and £10,000, depending on size and power. Eventually I discovered the reason why the controller wouldn't work, somebody had reversed the polarity of the voltage regulator inside the controller.  I now have it running beside me as I type. I started it at 10:00pm last night, I am interested what it will say at 10:00pm tonight, it has clock calibrations on the head which you use to help with tracking. It has a polar scope which has to be aligned with Polaris with an offset because as well as spinning, we are drifting in space compared with Polaris. I need to create a red LED illuminator to illuminate the polar scope, the calibration markings are clearly visible in daylight but not in the dark. I am considering a fibre optic bonded with a small red LED in shrink sleeving, with a small button cell battery and switch, it's only needed when setting up the tripod at the beginning or after making adjustments to the setup. I am hoping it will handle my 300mm f/2.8 lens on the D800. As soon as I get a clear sky I will try it out. This was the battery pack:  This is the mount, with the Nikkor 300mm f/2.8 and D800 mounted.  I am investigating various forms of power supply, the controller will handle from about 6Volts to 30Volts but the higher the voltage the more heat it dissipates, so I am working on a maximum of 12 nominal. I do have ideas for using EN-EL4 D3 batteries which are nominal 10.8Volt, 2600mAh or perhaps some racing pack batteries. It's been a very interesting few days. I need to make a new 'wedge' mount to adjust the elevation, the one which was fitted wasn't fit for purpose, too small and seized up. I intend to craft one from solid aluminium bar, with a fine tune adjustment for Polaris alignment. I also need to create a counterbalance bar so I can slide a weight into the correct position to counter the weight of the camera and lens.
____________________ Robert. |
| Posted by chrisbet: Wed Mar 6th, 2019 14:36 | 2nd Post |
| That's my sort of challenge - well done. I love rescuing equipment - my wife hates me cos I keep repairing the washing machine instead of buying a new one! I fitted an MGA with a red top racing battery - made up a special cage to mount it in the engine bay ( they usually live in inaccessable cages by the rear axle! I was very impressed with its power for such a small battery - you could hold it in one hand easily!
____________________ If it is broken it was probably me .... |
| Posted by jk: Wed Mar 6th, 2019 15:04 | 3rd Post |
| Nice mount. The motor will drive well off the powerpack that you made for use for your Nichai UV light. Double utility.   You can use an LED off that powerpack as well but you will need a dropper circuit to reduce to 3v for the LED. You might be able to use a direct feed off an additional Lion battery (3.7v) but that seems huge overkill for that. There are some nice torches on ebay. https://www.ebay.co.uk/itm/Rechargeable-USB-Mini-Ultra-Bright-LED-Torch-With-Beam-Focusing-Flashlight-UK/153232085887?ssPageName=STRK%3AMEBIDX%3AIT&_trksid=p2060353.m2749.l2649 I got one of these recently. Great little torch. Needs one of the Lion batteries that we use for D3 replacement battery.
____________________ Still learning after all these years! https://nikondslr.uk/gallery_view.php?user=2&folderid=none |
| Posted by Robert: Wed Mar 6th, 2019 15:28 | 4th Post |
| Have now set it up in back bedroom, abandoned the 24Hr test because I had moved it several times and even switched it off, so hardly a valid test. I have the D800 clicking away every 15 minutes taking a photo of a clock, the mount is zero'd in on the hub of the second hand. I intend to leave it running for 24Hrs to see how it performs with weight on the arms, I have a crude counterbalance to offset the camera and lens (Nikkor 105mm f/2.5) intentionally not perfectly balanced to see what happens. The UV power pack uses 18650 cells, the output for the LED is current regulated. I could modify it to provide a full current output via an XLR socket or similar. I need to keep weight down because I intend to use this kit on mountain tops. The camera, lens and tripod with the mount will be heavy enough without adding heavy lead acid batteries. I don't expect sessions longer than a couple of hours, the current draw for the motor is 300mA so well less then 1Ah for two hours use (I think!). I could do with a right angle viewfinder for the polar scope. I'm told the Nikon DR-3 (about £25 on eBay? a little more for DR-4 ) works with this setup and is easy enough to fit. A modified Nikon DK-22 can provide the threads for the adapter that the DR-3 screws into.
____________________ Robert. |
| Posted by Robert: Wed Mar 6th, 2019 15:52 | 5th Post |
| Thanks Chris and JK for commenting. Nothing I love more than making something work, or creating something from nothing. I just spent the last week making a block cutting saw for cutting paving blocks. It works perfectly and has reduced the probability of my cutting off my toes! I also get better cuts. I visited a friend the other day and he is resurrecting a 1935 Triumph 250 motorbike, he is fitting a 500cc JAP speedway racing engine into it, making a wonderful job. When it\'s finished he will have something really special. He intends to speed hillclimb it. Not outstanding iPhone images in mixed lighting... 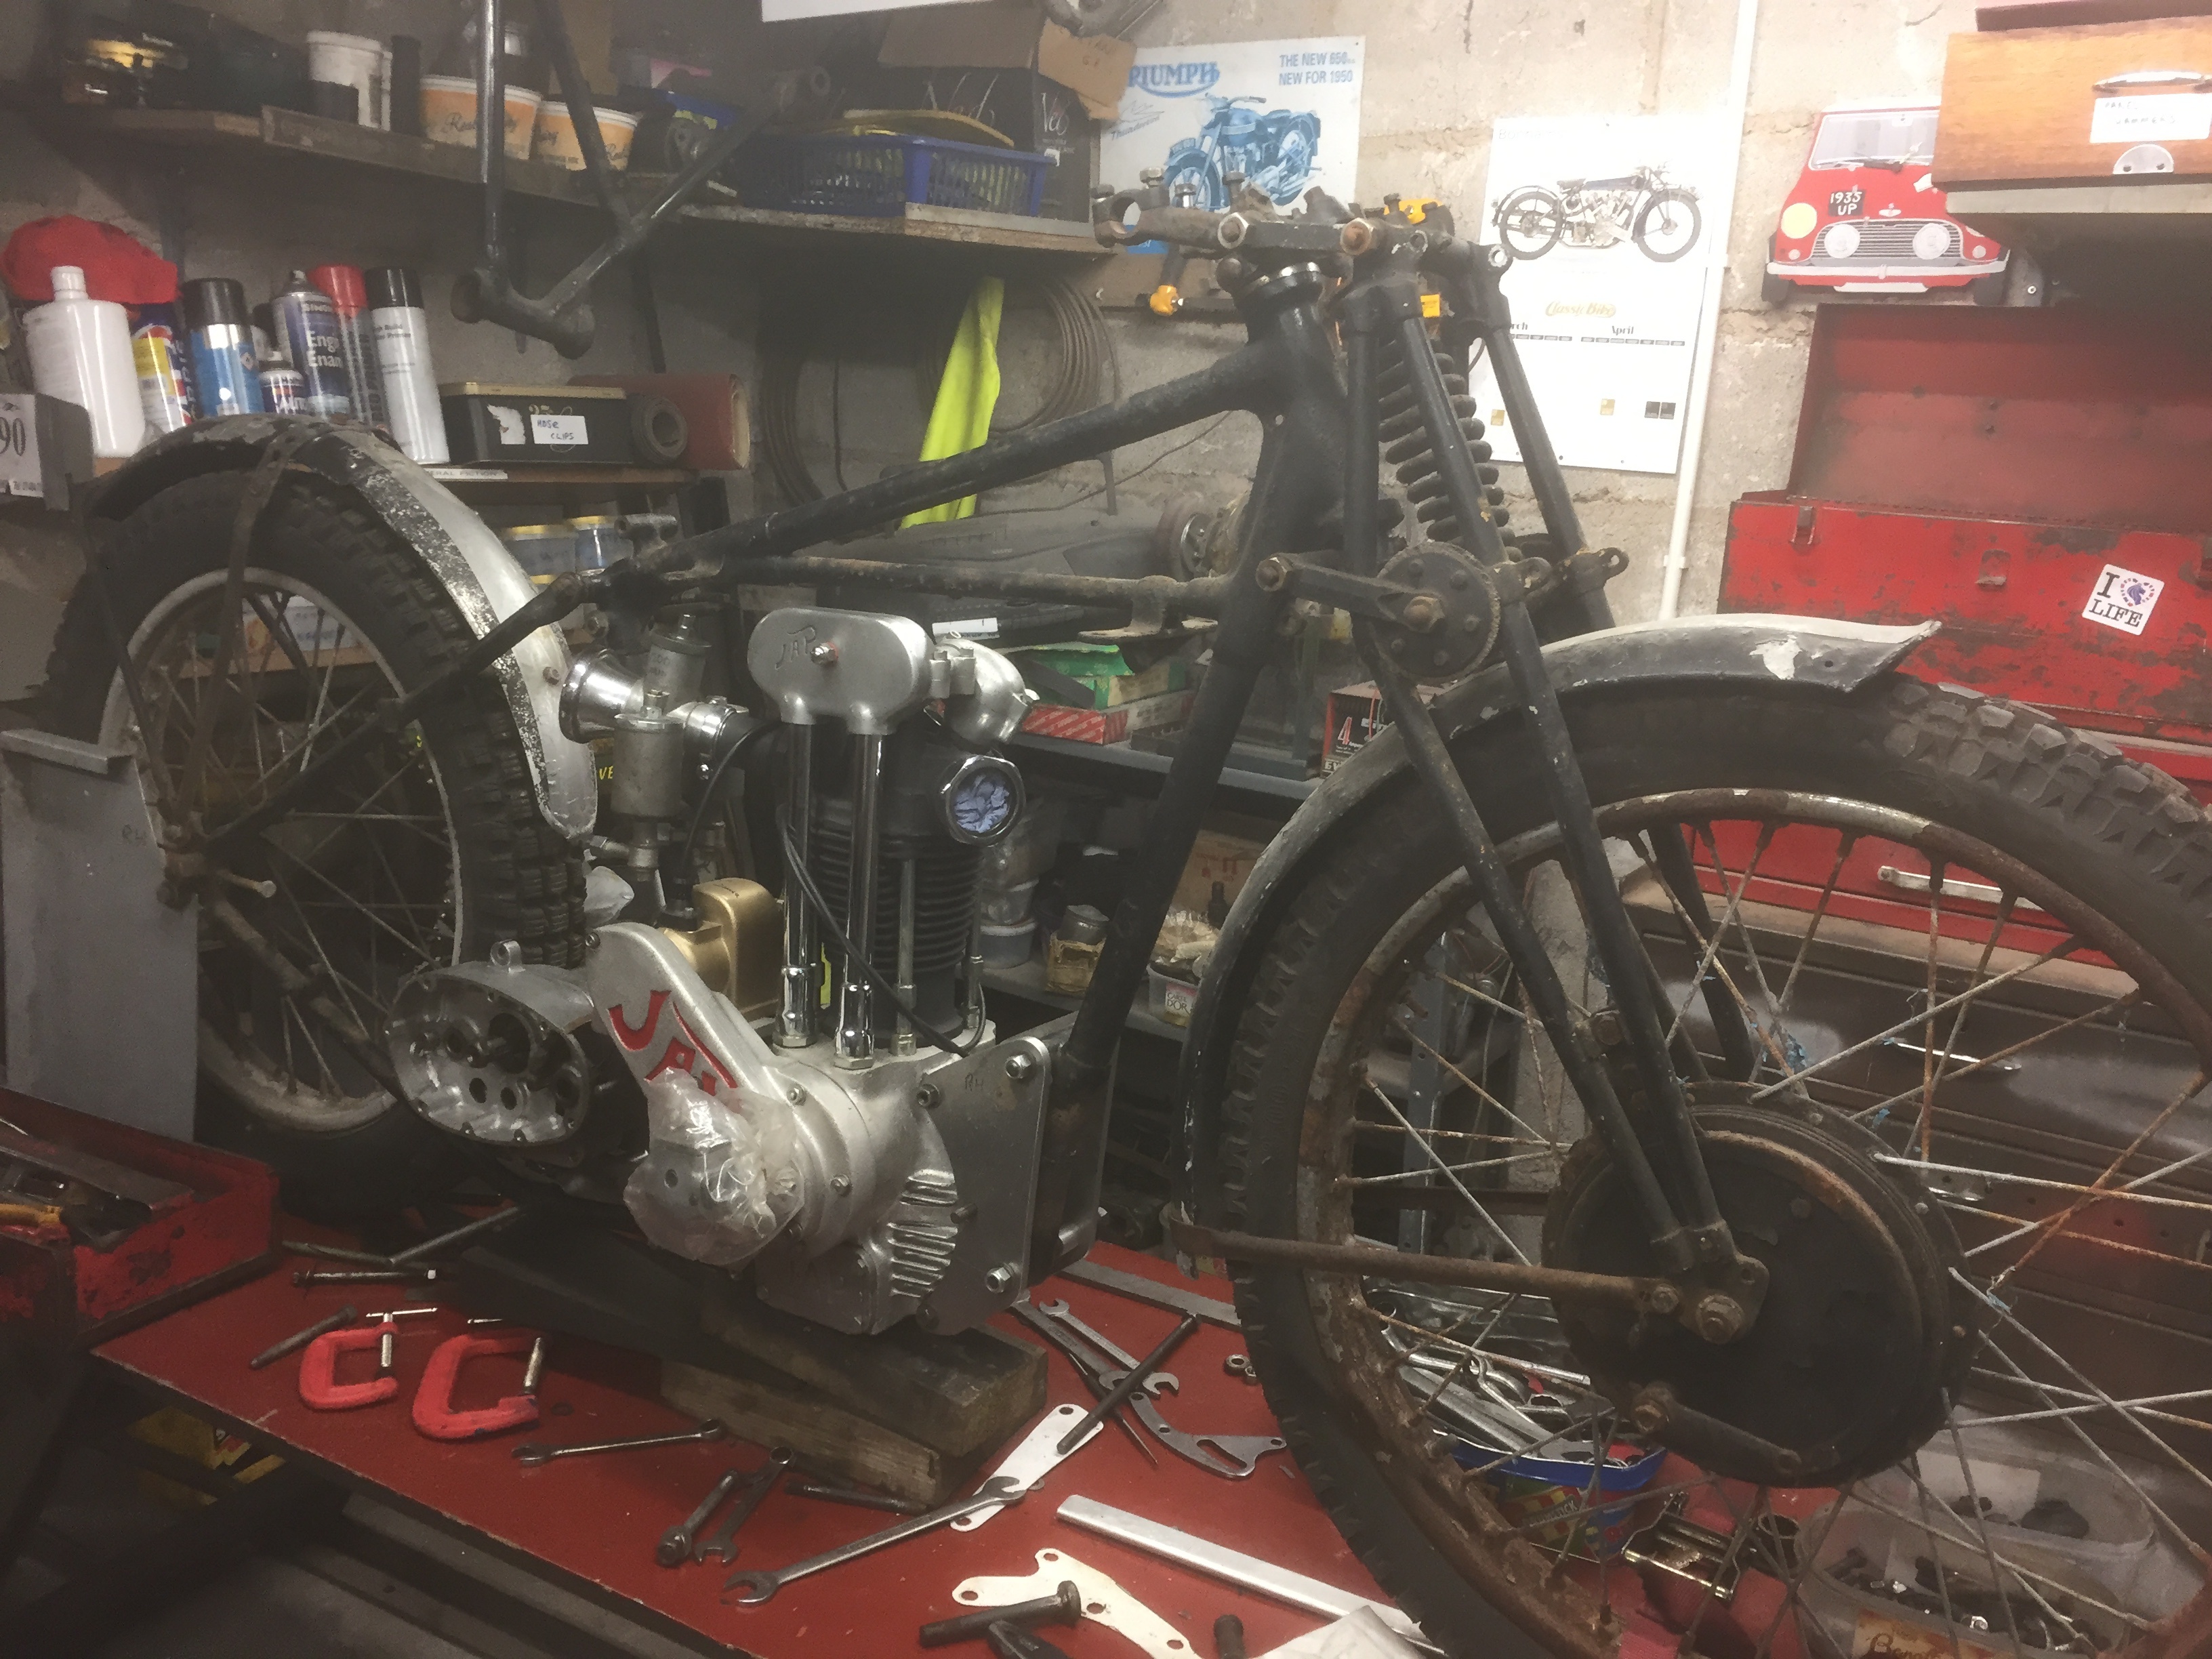 
____________________ Robert. |
| Posted by jk: Wed Mar 6th, 2019 17:03 | 6th Post |
Robert wrote:I thought you were using 18650 batteries. Four of those in series will power the motor. There are Seagull magnifying right angled eyepieces that also work on D3. I have one in Spain. Great for macro work. https://www.ebay.co.uk/itm/Seagull-1-2X-Right-Angle-View-Finder/323719897956?hash=item4b5f35a364:g:81AAAOSwo8NceVDr
____________________ Still learning after all these years! https://nikondslr.uk/gallery_view.php?user=2&folderid=none |
| Posted by Robert: Wed Mar 6th, 2019 17:36 | 7th Post |
jk wrote:I thought you were using 18650 batteries. Four of those in series will power the motor.Have just looked, it consists of two pairs of 18650 batteries, the way I have configured it it's entirely possible to add another socket for the Equatorial mount, which can be switched from the current limited UV LED outlet to a separate outlet which could be unrestricted. I will check out the link you have given me. I could do with one for close up work with the D800 anyway. It can be hard to get one's head in the position needed when the camera is on a stand. Not a great fan of live view if I can avoid it.
____________________ Robert. |
| Posted by Robert: Fri Mar 8th, 2019 18:03 | 8th Post |
| Well, the mount is up and running. I ran the first test revolving with a clock for 24 Hrs, it was within half a second in time, accurate on rotation over 24 hrs. I took it out after the test finished at midnight Thursday, night I got up there about ten to one, set the Vixen mount up and tried to zero it on Polaris. Initially the lenses of the finder scope misted up and internally as well. Eventually I started to get somewhere when it all went dim. I couldn't understand it the stars were so dim, I thought the finder scope was defective, I looked up at the sky and realised a herd of clouds had wandered in and obscured the stars so I went and had a sandwich and a coffee in the hope it would clear. I was almost ready to pull sticks and head home for bed when suddenly the clouds melted and I was back to a lovely clear sky. The gear had cooled nicely and after a break, everything kind of fell into place. I made a few trial exposures, set the Vixen mount motor running and left the D800 clicking away with the 70-300 VR lens, AF and VR turned off of course. I went with 25second exposures, f/5.6 and ISO3,200, intervalometer set to take an exposure every 40 seconds. I should have left it at 30 seconds but it was OK. The 25 second exposures produced an almost round star with very little elongation, I haven't got my head around the slightly erratic movements but it's WAY better than anything I have seen before. Room for improvement of gear and technique but that's to be expected. I never handled an equatorial mount before, I need to get used to setting it up to align with Polaris. I will post some images tomorrow, too tired right now. Quite amazing, really pleased, it's better than I hoped with a ton of scope to improve.
____________________ Robert. |
| Posted by jk: Sat Mar 9th, 2019 03:04 | 9th Post |
| Sounds like you have found a treasure. Look forward to seeing some of your images when you get up and running. I never like the streaky stars effect that comes with long exposures made without an equatorial mount. At least I now know a man who can work one of these things. Will be interested to follow the story and learn more.
____________________ Still learning after all these years! https://nikondslr.uk/gallery_view.php?user=2&folderid=none |
| Posted by jk: Sat Mar 9th, 2019 03:09 | 10th Post |
| I am interested in your exposure time. From some of my reading it seems that they recommend 20-25sec maximum to eliminate movement abberations. I guess that drives you towards a 2 frames per minute rate. Limitations are (I guess): How fast can the camera process in between frames? How much does the camera heat up working continuously? How long does your battery last?
____________________ Still learning after all these years! https://nikondslr.uk/gallery_view.php?user=2&folderid=none |
| Posted by Robert: Sat Mar 9th, 2019 03:45 | 11th Post |
| It's a massive challenge, I know a little about the stars but really getting into it with a proper mount, albeit old, I reckon it's about 1985 ish. It must have been very advanced in it's day because it uses stepper motors, even now there are manufactures who are still using DC synchronous motors nearly 35 years on. Think 'star drift' is a factor, I couldn't lock on to Polaris because I couldn't see it clearly enough so I used the Ursa Minor group instead right next to Polaris, which is also etched into the polar finder. in the 35 years since the mount was etched I believe the stars have drifted. I also need to do tests to check the alignment of the scope. Given the polarity of the motor had been swapped I don't take anything at face value. There seems to be a regular deviation in the mount which I need to understand, it may be caused by hard grease on the worm wheel having solidified and causing a regular change in resistance. I am hoping it will be 1/144 of a day interval because thats the worm gear ratio, it might also be the meshing of the 40 tooth drive wheels between the motor and the worm shaft. For a delicate mechanism it's a pretty crude drive, with an open pair of gears and one imprecise bolt to secure the motor in position, you can't turn the motor shaft because it's geared back by 1/120th down-gearing, unless somebody has in the past and bent something in the motor drive. Anything is possible, it might even have been dropped. Given the use of stepper motors, I could make my own driver controller, I have all the bits with an Arduino programmable controller right here. Will post pix later.
____________________ Robert. |
| Posted by jk: Sat Mar 9th, 2019 04:34 | 12th Post |
| Try NightSky Pro on iphone. It is excellent.
____________________ Still learning after all these years! https://nikondslr.uk/gallery_view.php?user=2&folderid=none |
| Posted by Robert: Sat Mar 9th, 2019 11:14 | 13th Post |
| I do use Night Sky, not pro, yet... It was that app which helped me locate Polaris in the end. Here are some images from my first attempt with the Vixen Polar mount. The first is a 100% crop (that is one sensor pixel to one screen pixel, these are all screenshots from Lightroom, hosted on Flicker) this is with the polar mount doing it's thing, nor perfectly set up but pretty near. 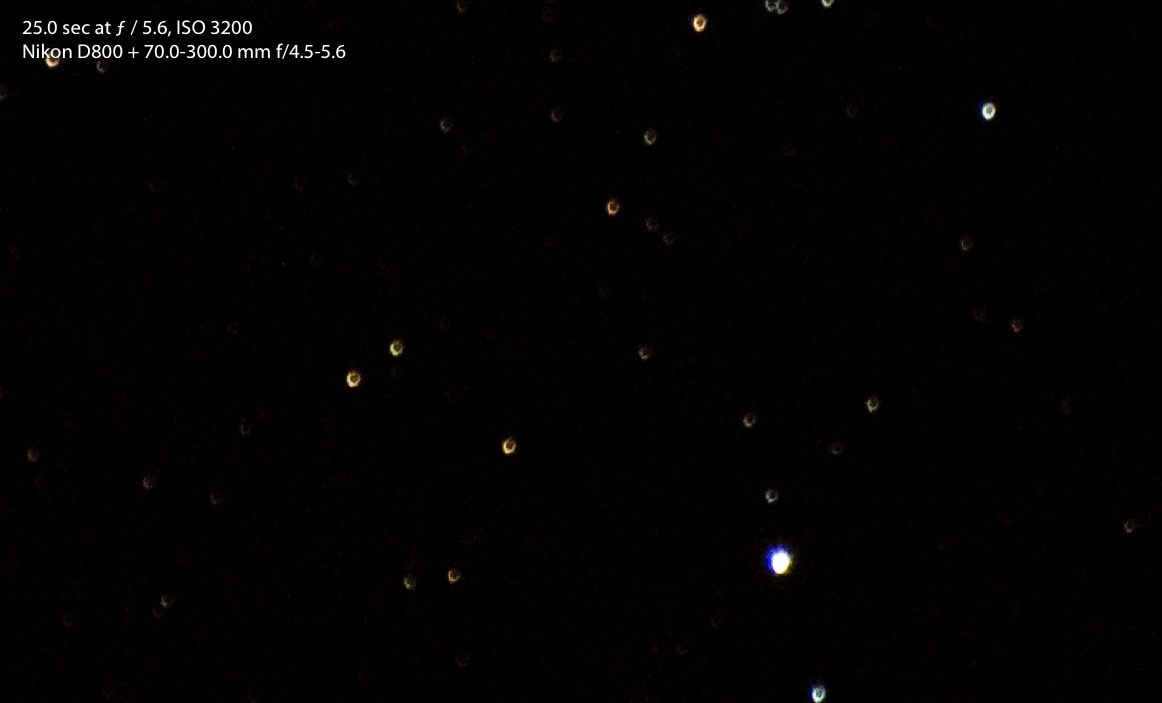 The second is a similar crop after I had switched off the Vixen tracking motor. 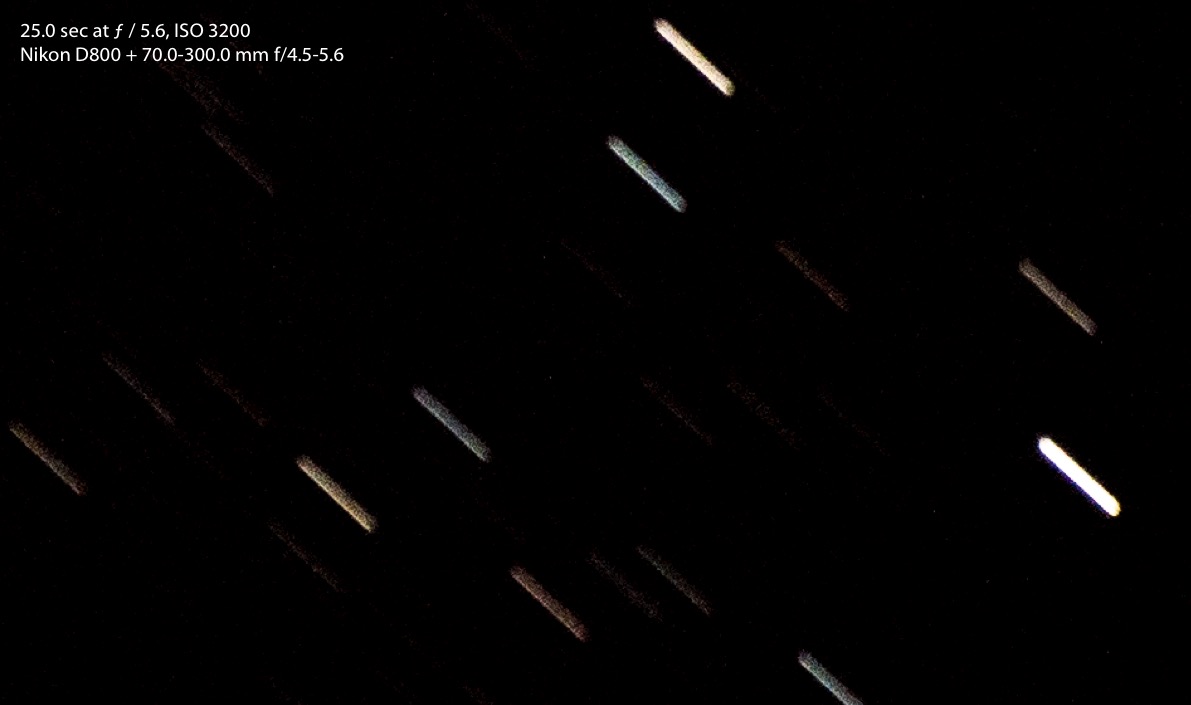 Now for the trails, bear in mind each exposure starts at 40 second intervals, 25 seconds of exposure, 15 seconds gap. 34 'Star Trail Stacked' exposures using the Vixen Polar mount. The squiggles are due to uneven tracking, why it's uneven I don't yet know. Like I said above, it may be due to the motor gear's alignment with the main worm gear shaft, or it may be due to stiff grease causing hard spots in the rotation. 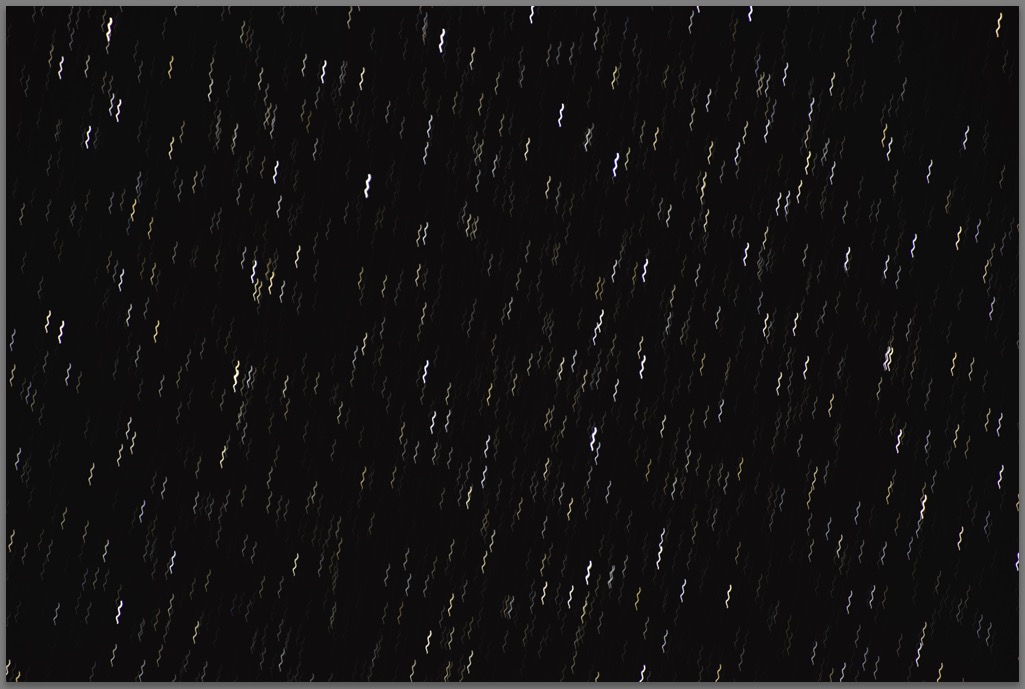 This is 38 'Star Trail Stacked' exposures, including the ones with the motor switched off, you can clearly see the exposure length and gap in the final four exposures, the mount is really doing it's stuff, almost perfect. 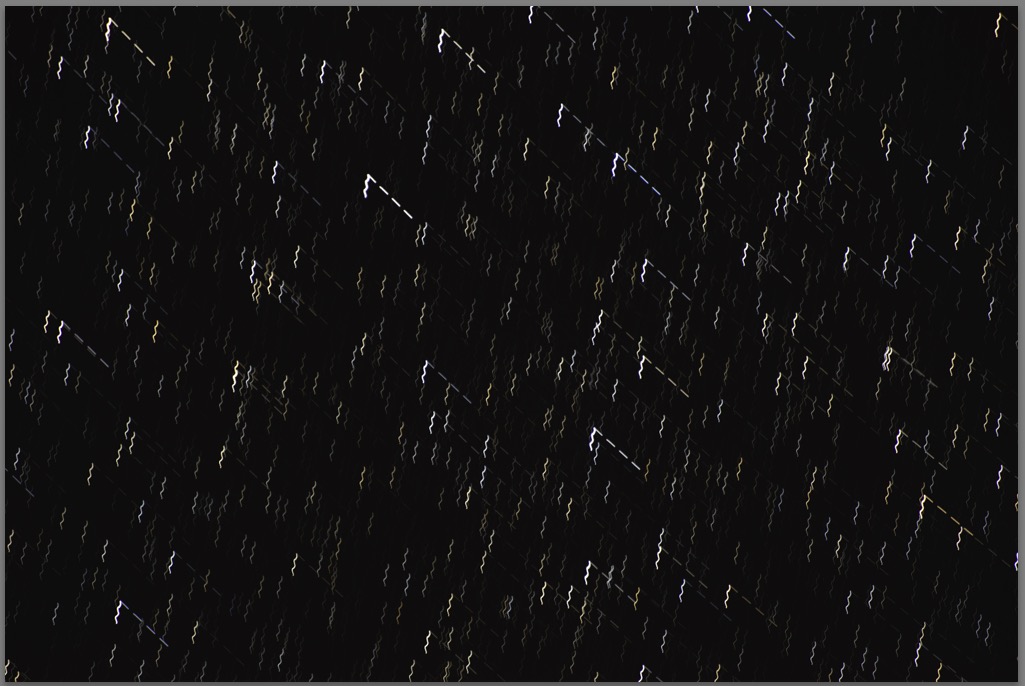 Finally a 100% crop of the previous image. 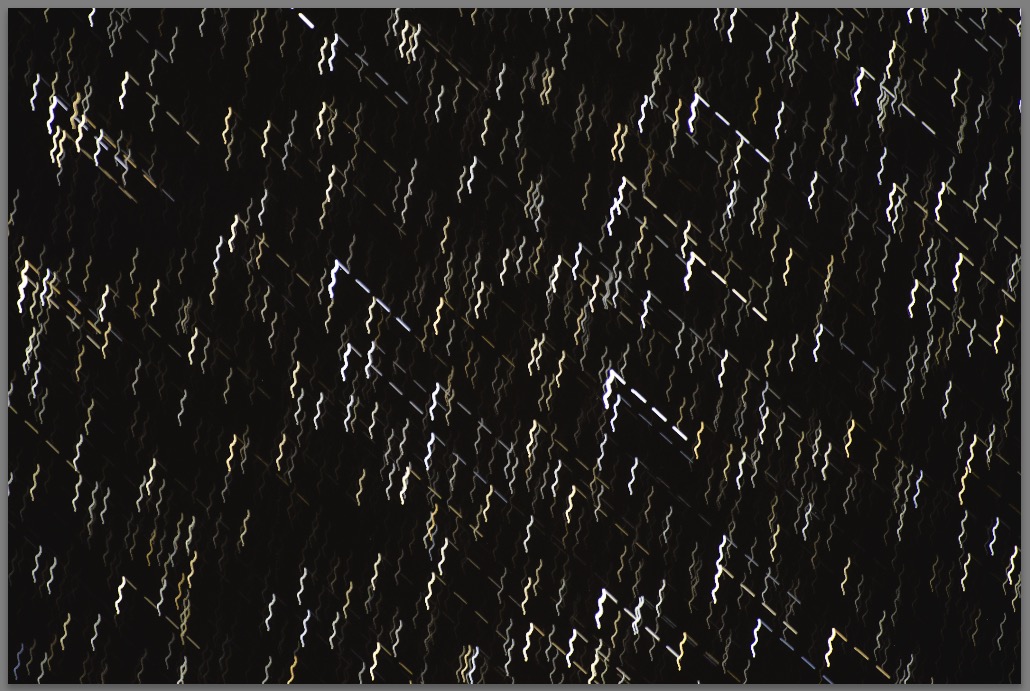 I have a lot of testing to do to check out the veracity of the polar scope and the uneven tracking.
____________________ Robert. |
| Posted by jk: Sat Mar 9th, 2019 15:03 | 14th Post |
| Have you seen this article? https://themcdonalds.net/richard/wp/setting-up-an-equatorial-mount/
____________________ Still learning after all these years! https://nikondslr.uk/gallery_view.php?user=2&folderid=none |
| Posted by Robert: Sat Mar 9th, 2019 17:21 | 15th Post |
| No, will have a look in the morning, thanks.
____________________ Robert. |
| Posted by Robert: Mon Mar 11th, 2019 18:51 | 16th Post |
| I have looked at the link JK, thanks it's a good, a well explained set of articles, which don't assume the reader is accustomed to the jargon of astronomy, it never fails to puzzle me why, in writings aimed at explaining complicated processes to total novices, the writer often uses incomprehensible terminology which is only meaningful to an expert. I have unravelled the mystery of the wiggly lines. The motor output is 1/10th of a revolution per minute, 10 minutes per rev. The repeat time of the wiggly lines is 10 minutes. I am putting the uneven tracking down to the motor to worm shaft gears being too closely meshed and the gears not perfectly concentric. I have adjusted the meshing and tomorrow I am expecting to do a trial run in daylight to test the tracking and to adjust the polar scope, which is well out of adjustment. Somebody has been fiddling because it's so far out, it couldn't have been used properly as it was. I went to the local brickworks and asked to borrow their chimney, the manager was somewhat suspicious but said OK so long as they get it back tomorrow!  (At this point the Splash screen kicked in, I simply back swiped on my track pad and OK'd sending the form again nothing lost, brilliant, thanks Chris, that's long overdue.) Said chimney... 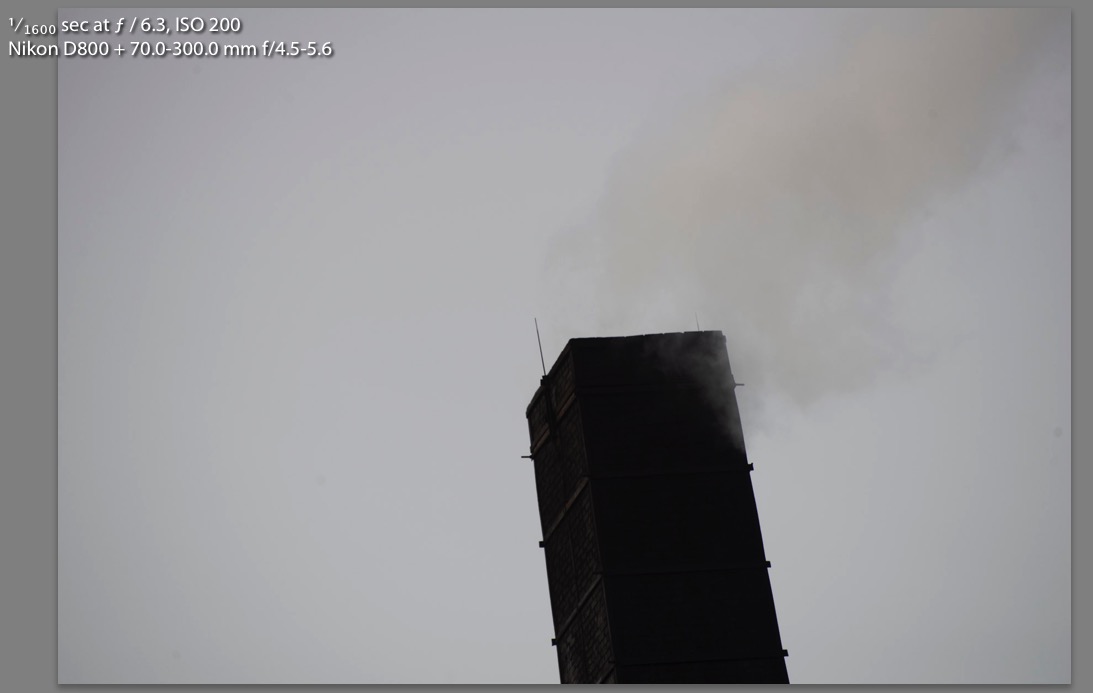 It's handy having the lightning conductor because it gives me a pin point accurate reference in the image. I am hoping when I have adjusted the polar scope, the rotated image will have all the images centred at that point, in fact this afternoon I used the nearest corner of the chimney as the target.
____________________ Robert. |
| Posted by jk: Tue Mar 12th, 2019 02:57 | 17th Post |
| Well I think I am following your train of thought but I will need to read the article on the set up. If anyone has the patience and perseverence to work it out then it is you. Hope the testing today proves successful.
____________________ Still learning after all these years! https://nikondslr.uk/gallery_view.php?user=2&folderid=none |
| Posted by Robert: Tue Mar 12th, 2019 04:56 | 18th Post |
| I just reduced the opacity of the layers in PS so the orientation of the four images can be seen, I don't quite understand the pattern of the cyan guide lines but the red circles are the reference points of the corner of the chimney. That was what the polar scope was aimed at. The weather isn't conducive to playing outside, cold and wet, but it may improve this afternoon...maybe not, that's when the gales arrive.  Edit: I just realised the lower left red circle was in the wrong place, I have attempted to remove it and have put a slightly bolder red ring in the correct place. 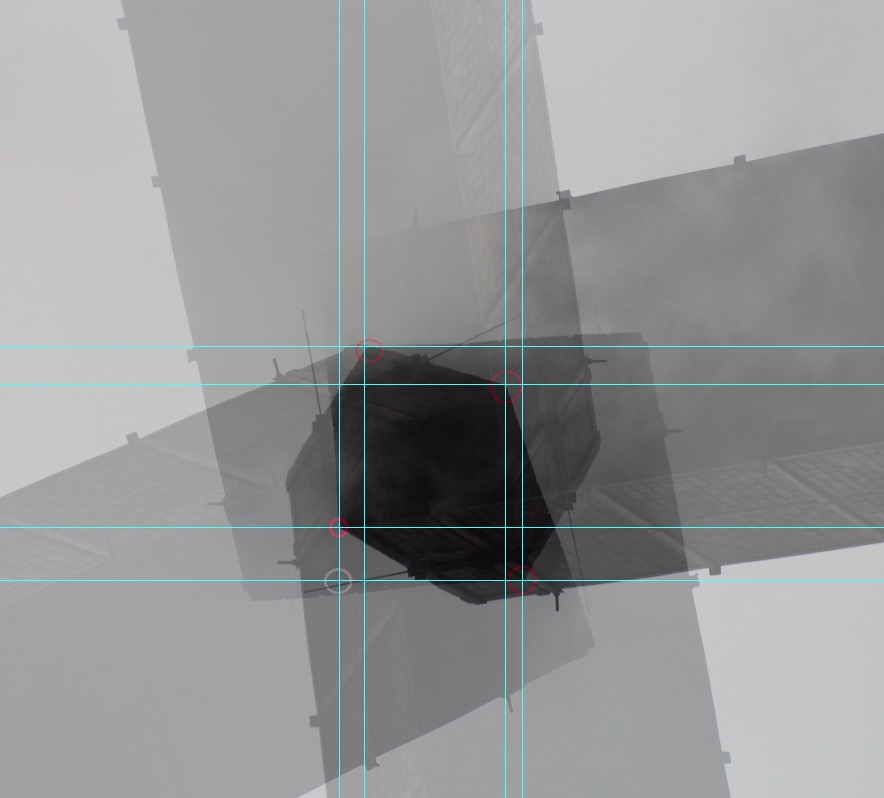
____________________ Robert. |
| Posted by jk: Tue Mar 12th, 2019 05:50 | 19th Post |
| So your reference (polar) point is the nearest (front) corner of the chimney. So everthing should revolve around that reference point? So all the reference points in all the pictures should overlap in a single place? Or am I missing something?
____________________ Still learning after all these years! https://nikondslr.uk/gallery_view.php?user=2&folderid=none |
| Posted by Robert: Tue Mar 12th, 2019 11:14 | 20th Post |
jk wrote:So your reference (polar) point is the nearest (front) corner of the chimney.Yes, the reference point was the corner of the chimney, I have just adjusted the polar scope and loaded the images into Lightroom, it was extremely difficult in the wind, I may have wasted my time today. Will see in a few minutes I have 193 images to sift through, I know many of them are scrap because the AF went awol perhaps because the camera was being buffeted by wind.
____________________ Robert. |
| Posted by Robert: Tue Mar 12th, 2019 18:01 | 21st Post |
| Well I have had a session today but the wind was really strong (and is getting stronger) It was buffeting the camera and the mount. I aligned the polar scope as best I could, not perfect but much better. I am still not certain which marks I should be calibrating it to. The adjustment was with a 1.3mm hex key, very fiddly, fortunately the grub screws which do the adjustment were not seized. I took four series of images, one set like the chimney ones of a church spire about 5 miles away. The horizontal alignment was reasonable, the vertical alignment was rubbish but I think the mount moved down on the tripod while I was rotating the camera by hand, causing the error. Then I took some at 40 second intervals just stationary to act as a control test. Then I took 34 more with the motor drive in forward direction, then about the same in reverse. I hadn't fitted a counterbalance, the D800 with the 70-300 lens is quite heavy so I wanted to see if the weight affected the accuracy of tracking. The motor was raising the camera in forward mode and lowering it in reverse mode. All three sets of images produced a similar sized cluster of results, given the gale which was blowing at the time I was quite pleased. There did not appear to be any significant difference between the motor raising the camera or lowering it. The unpowered exposures of which there were only 18 showed a very similar cluster with no pattern or apparent regular repetition patterns like the star trail exposures did. I am running out of energy so I will post the images tomorrow. On a side note the Splash screen has popped up twice while I have been typing this, I just swiped it away and carried on, the text was exactly as it had been before the Splash screen popped up. I am also designing a better wedge mount for the EQ mount. It's extremely difficult to align the polar scope exactly without a screw adjustment. I was going to try and use a worm and wormwheel but I have decided it's too coa**e an adjustment, it needs something very fine. Something like this... 
____________________ Robert. |
| Posted by jk: Tue Mar 12th, 2019 19:04 | 22nd Post |
| How many planar directions do you need for adjustment of the polar sighting scope? Whilst it is so windy you have a really tricky situation. Is there anyway that you can setup inside pointing out of a window?
____________________ Still learning after all these years! https://nikondslr.uk/gallery_view.php?user=2&folderid=none |
| Posted by Robert: Wed Mar 13th, 2019 03:02 | 23rd Post |
jk wrote:How many planar directions do you need for adjustment of the polar sighting scope? Not quite sure what you mean, there are three adjustment screws in the 'scope, that in itself makes it a bit tricky to adjust, four would have been better, making the adjustment in two planes. The accuracy has to be very close. A star is tiny, I have to eliminate all tracking errors which enlarge or elongate the star, that is incredibly challenging. The object of the accuracy of tracking is to allow long 'bulb' exposures of perhaps 30 minutes, currently 30 seconds is probably the limit for a reasonably sharp image. It's one of those exponential things where to double the accuracy you have to expend ten times the effort. Eventually you get to the Hubble stage. If I could get stable five minute exposures I would probably be happy, I think that would bring the likes of the Orion nebula within my range of targets. I don't want to get into astronomy as such, would just like to be able to do a bit more than just star trails and Milky Way. I haven't even tried the fisheye on the mount yet. Up until now I have relied on star stacking software, I think combining the EQ mount with multiple short (30 second) exposures will be my optimum route. Ah, I think I know what you mean now... The wedge mount in the image above provides elevation on a horizontal axis and rotation on a vertical axis, it only requires those two planes of adjustment to align with Polaris. The adjustment has to be very fine. Impossible with a conventional video head or even worse a ball head. A large geared head would not be stable enough. Whilst it is so windy you have a really tricky situation. Is there anyway that you can setup inside pointing out of a window? I have considered that, I need my target at least a Kilometre away. I don't have a window which provides a suitable target. I am happy enough, I have shown that the adjustment had yielded improvement. I will just wait until the gales subside. Maybe next week? There are no clear skies in the current 14 day forecast but I have decided I need to accustom myself to the complexities of the EQ mount in daylight before attempting it in the dark again. It's one thing finding Polaris by eyesight, quite another with a telescope which inverts and reverses the image.
____________________ Robert. |
| Posted by jk: Wed Mar 13th, 2019 03:12 | 24th Post |
| Robert said.... "The wedge mount in the image above provides elevation on a horizontal axis and rotation on a vertical axis, it only requires those two planes of adjustment to align with Polaris. The adjustment has to be very fine. Impossible with a conventional video head or even worse a ball head. A large geared head would not be stable enough." OK so two. I need to think about this more now I understand more but still a complete novice. 
____________________ Still learning after all these years! https://nikondslr.uk/gallery_view.php?user=2&folderid=none |
| Posted by Robert: Wed Mar 13th, 2019 04:50 | 25th Post |
| Here are the results of my tests yesterday: Firstly a general full D800 frame view of the target at 300mm, distance to spire approx 5 miles. I have added two spots to each image to help track the movement more easily. On some images the spots are a bit of a guess, but not very far out of position.  and a 100% crop: 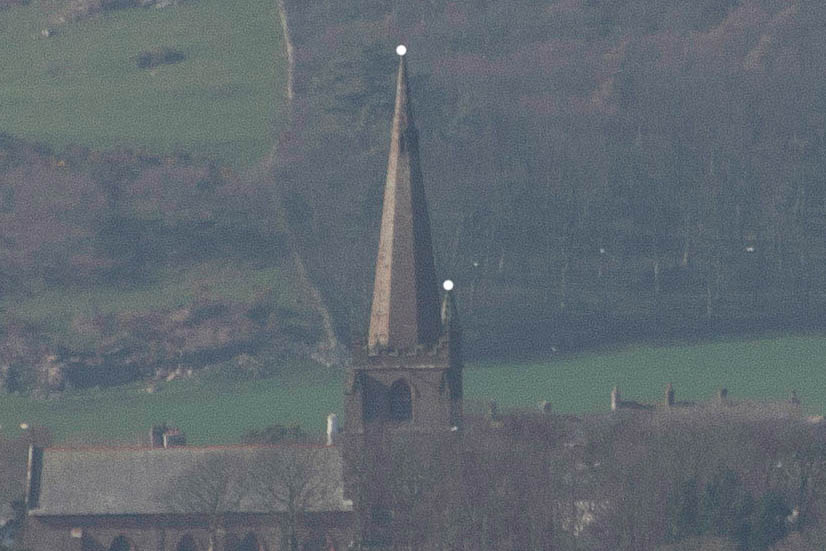 This is the StarStacker grouping of the control cluster, camera stationary, well wobbling a bit, but not being moved by the motor! 18 exposures, again 100% crop. 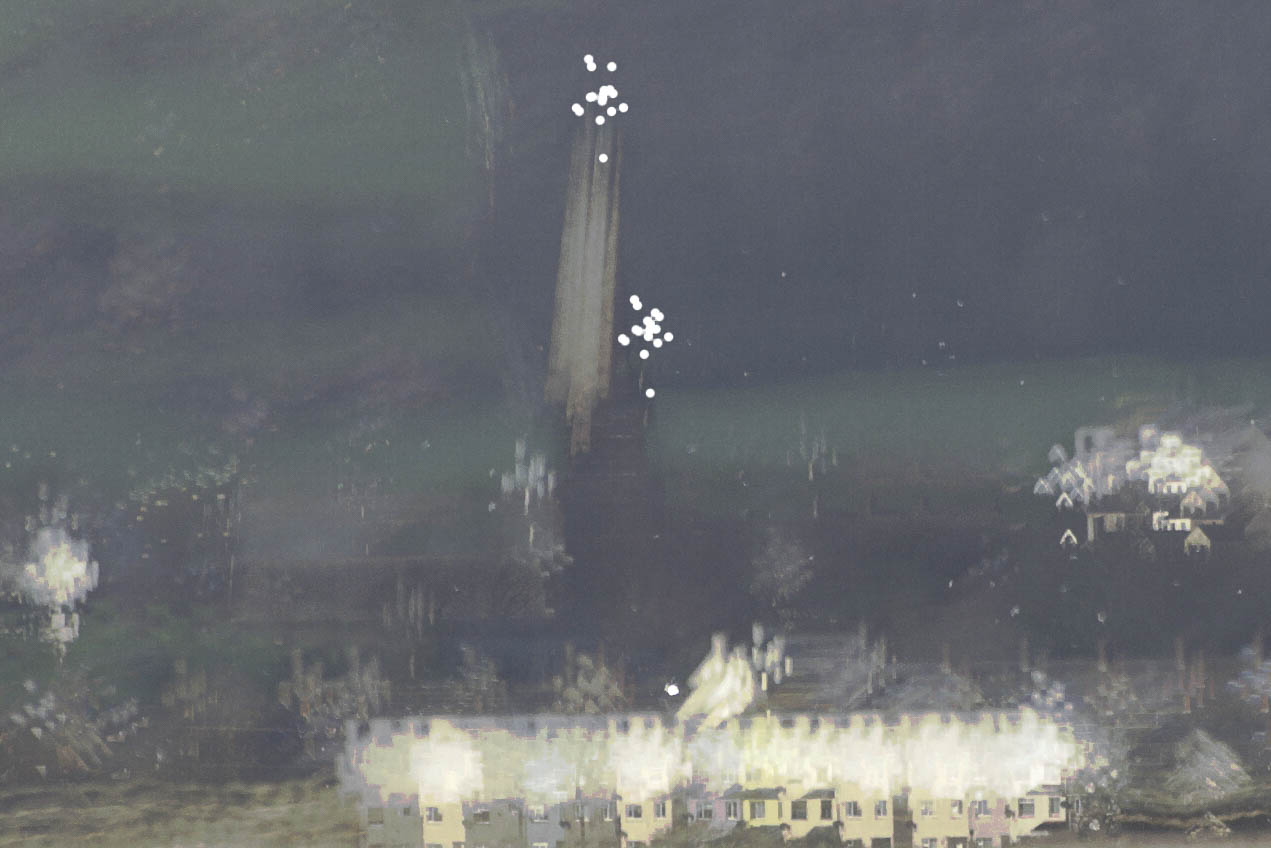 This is the StarStacker cluster of the ascending set, 34 exposures with the camera being raised by the motor without a counterbalance, ideally all the dots should be in exactly the same place. 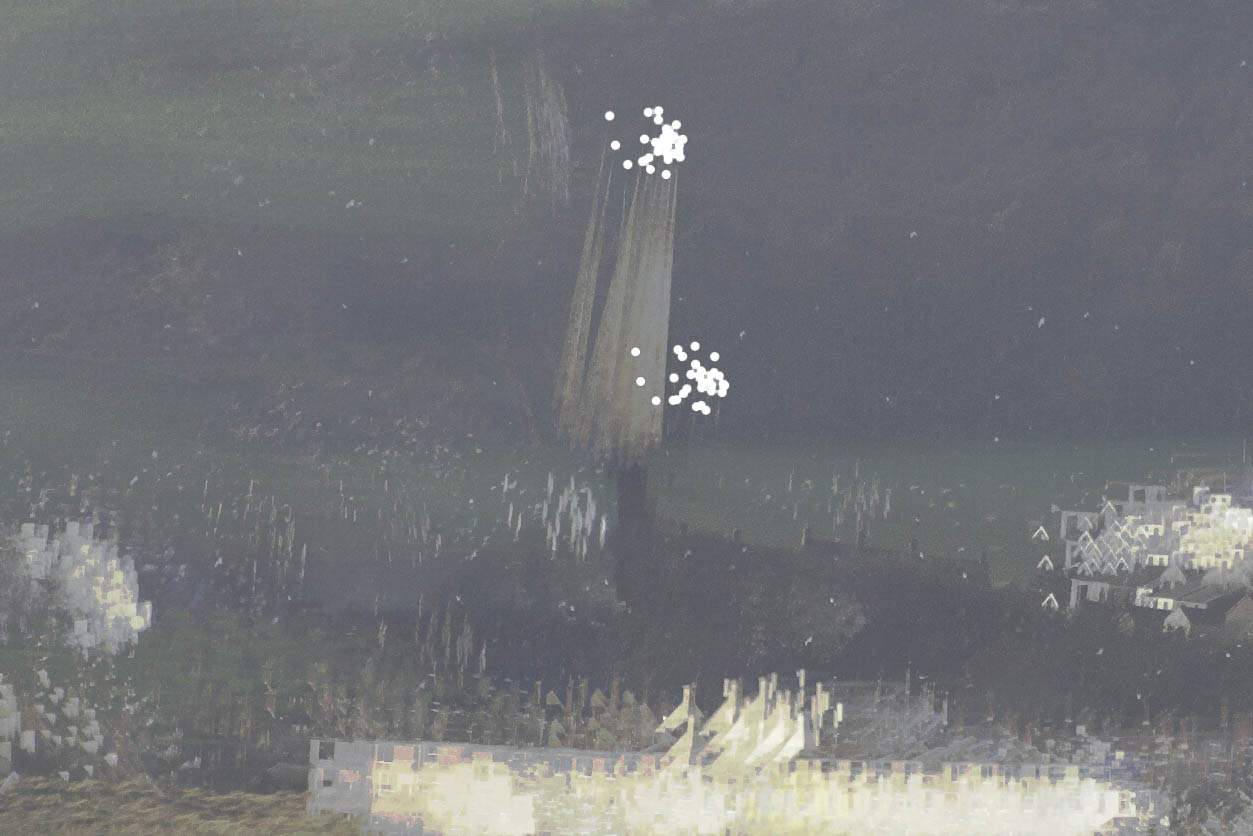 This is the StarStacker cluster of the descending set, 31 exposures with the camera being lowered by the motor without a counterbalance, it doesn't seem to show any signs of running more quickly than the ascending set. 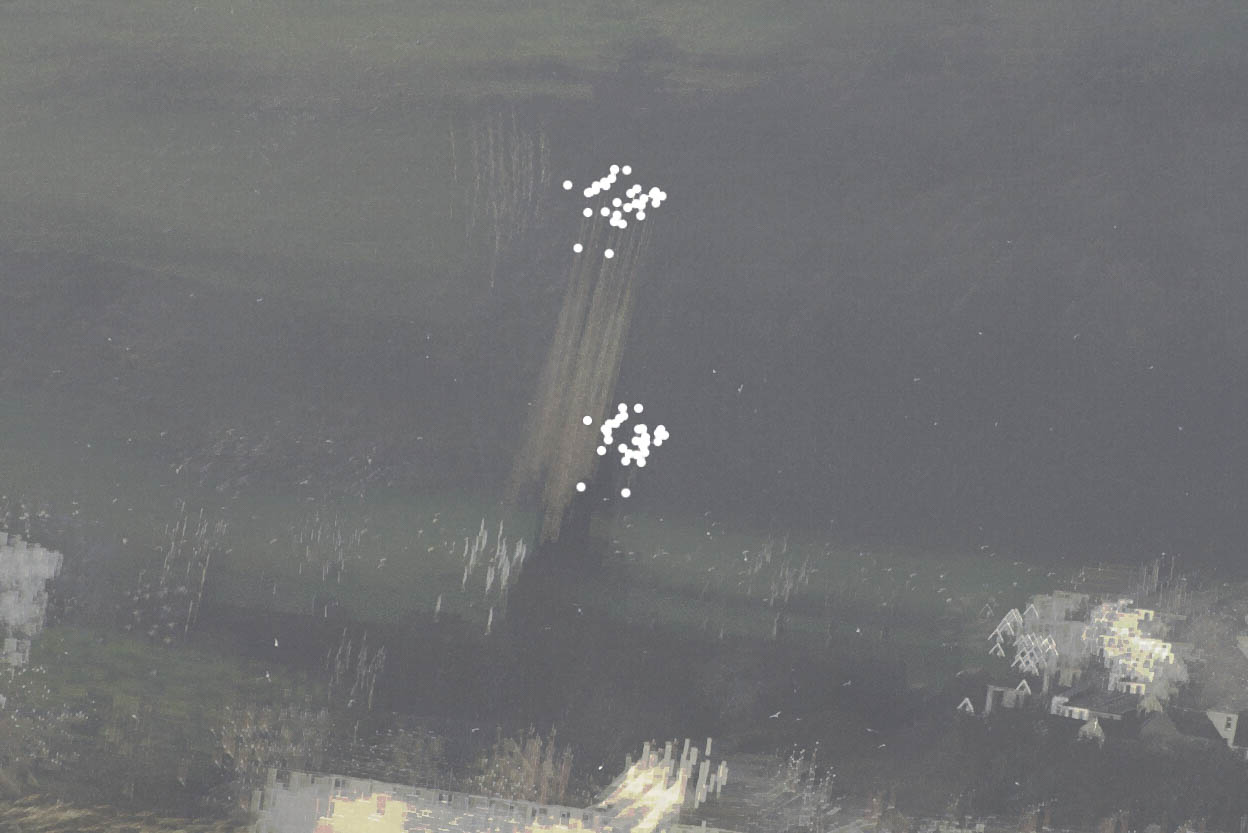 These images are stacked with the frame fixed but revealing each layered image and the differences between the images is visible. Bear in mind a 50mph wind was blowing at the time, the camera was being buffeted badly . Quite obviously the test needs repeating without the gales, but at least I now know I can adjust the polar scope and it's better than it was. There is no longer a tracking error pattern.
____________________ Robert. |
| Posted by jk: Wed Mar 13th, 2019 05:52 | 26th Post |
| Like all these technical things there is a learning curve and the last bits are part of 80/20 rule. Last image looks pretty good considering the conditions. I think that you need to prove that it is not atmospherics and wind effects that are detracting.
____________________ Still learning after all these years! https://nikondslr.uk/gallery_view.php?user=2&folderid=none |
| Posted by jk: Wed Mar 13th, 2019 18:28 | 27th Post |
| Dont know if this helps your design thoughts. http://www.baselabtools.com/Fine-Adjustment-Screws_c_86.html If you use a two point screw adjustment it gives greater precision. I also remember that some of the finest guage valve adjustments work using semi-precious/precious stones in the valve. I am trying to spark design ideas but I may be generating noise! Tell me to shut up if I am causing confusion.
____________________ Still learning after all these years! https://nikondslr.uk/gallery_view.php?user=2&folderid=none |
| Posted by Robert: Wed Mar 13th, 2019 19:34 | 28th Post |
| They are stunning! Wow, 240 tpi! Didn't realise they existed. JK, all input is welcome, it's the wilder ideas that sometimes crack the nut.  Nature produces the occasional freak, that's how evolution works, occasionally the freak fits a niche, then it's no longer a freak, it thrives. Nature produces the occasional freak, that's how evolution works, occasionally the freak fits a niche, then it's no longer a freak, it thrives.I am even considering using a EPSU (Electronic Power Steering Unit) to act as a servo motor to amplify the output from the relatively low power output from the Vixen motor, I just checked out the price of the current Vixen super model it's about £2500 and weighs 7 Kg, my mount with wedge weighs about half that. It's probably a step further than I need but I thought of it on my way back from Lancaster on Sunday night. The EPSU takes the input torque and amplifies it if needed, otherwise it remains passive. I don't think it will affect the speed of rotation and the torque assistance is fairly easily adjustable. After all, we are only talking about a quarter of a turn for a six hour session. I am also thinking of ways of making rock solid mount. Tripod isn't really solid enough for this sort of thing. Most serious astronomers have a pillar, a heavy tube buried in the ground or attached to a very large block of concrete like a pile. That's the only way to get a really stable place to lock the camera (or telescope) down. I may be taking my drill with me next time I venture into the hills! On a different aspect I really have to consider where I am going. I don't want to become an astronomer, I do have an interest in astronomy but I feel once you have looked at one star you won't see much difference with the next! I would however like to be able to make nicer Milky Way images, combined with nice landscapes, or even rock formations such as the stacked boulders in your recent images. I would also like to photograph the gas clouds like the Orion nebula and some of the other more visible nebula. Possibly Saturn? The Moon? But photography has to remain at the centre of these activities. I'm a bit like a butterfly, constantly flitting from one subject to another, but that's what I enjoy, fresh challenges.
____________________ Robert. |
| Posted by Robert: Thu Mar 14th, 2019 11:16 | 29th Post |
| In my quest for some cloudless skies I did a Google search, I came up with a site called 'Clear Outside'. https://clearoutside.com/ It's very good, they have arranged for a full clear night on Sunday/Monday from midnight. I have also downloaded the app for my iPhone, so I can check it while I am out. Will see what we actually get on Monday... Am hoping for a good night.
____________________ Robert. |
| Posted by jk: Sat Mar 16th, 2019 07:21 | 30th Post |
| Bon chance. Clear but cold!
____________________ Still learning after all these years! https://nikondslr.uk/gallery_view.php?user=2&folderid=none |
| Posted by Robert: Sat Mar 16th, 2019 09:12 | 31st Post |
| It seems to be moving slightly but there seems to be a window of about six hours of almost clear skies.
____________________ Robert. |
| Posted by jk: Sat Mar 16th, 2019 16:39 | 32nd Post |
| Lots of flooding up North take care!
____________________ Still learning after all these years! https://nikondslr.uk/gallery_view.php?user=2&folderid=none |
| Posted by Robert: Sat Mar 16th, 2019 17:19 | 33rd Post |
| Thanks JK, Just been looking at the news, they have called off the three peaks race due to flooding. I will be at about 350 Metres (about 1,150 feet), but I do have to pass through Broughton Mills, a tiny hamlet with a very tight bridge, a square bend off this tiny narrow hump back bridge, then it goes down to beck level. If I am going to have a problem it will be there, although there is a splash well up in the hills where the road becomes a river for 50 yards. Onto the road through one field gate and back off the road through another field gate. I have seen it a foot deep through there. It will all be gone by tomorrow night. Seathwaite has the highest rainfall in an inhabited area in UK over 24 Hrs and is about a mile from where I go for my night sky photography. Seathwaite Farm, Cumbria, November 19 2009 – 314mm* Martinstown, Dorset, July 18 1955 – 279.4mm Bruton (Sexey's School), Somerset, June 28 1917 – 242.8mm Upwey (Friar Waddon), Dorset, July 18 1955 – 241.3mm Cannington, Somerset, August 16 1924 – 238.8mm Loch Sloy Main Adit, Strathclyde, January 17 1974 – 238.4mm Long Barrow, Devon, August 15 1952 – 228.6mm Upwey (Higher Well), Dorset, July 18 1955 – 228.6mm Bruton (King's School), Somerset, June 28 1917 – 215.4mm Timberscombe, Somerset, June 28 1917 – 213.1mm Rhondda (Lluest Wen Reservoir), Glamorgan, November 11 1929 – 211.1mm Upwey (Elwell), Dorset, July 18 1955 – 211.1mm Kinlochquoich, Highland, October 11 1916 – 208.3mm Camelford, Cornwall, July 8 1957 – 203.2mm Bruton (Pitcombe Vicarage), Somerset, June 28 1917 -200.7mm Wynford House, Dorset, July 18 1955 – 200.7mm Otterham, near Boscastle, August 16 2004 – 200.4mm * Figure recorded by the Environment Agency There are many recorded high amounts of rainfall in the West Country.
____________________ Robert. |
| Posted by Robert: Mon Mar 18th, 2019 12:01 | 34th Post |
| Well the six hour window collapsed into two much shorter sessions. Nothing exciting materialised except I became slightly better at setting up! I have yet to analyse the images but the last set with my 16mm fisheye seems pretty reasonable. The main thrust if my efforts were to assess the improved alignment of the polar scope, I think it's much better but key to this will be a new solid and adjustable base mount to fit on the tripod and to mount the polar rotary tracker in very accurate alignment with the celestial North Pole. I have reached the drawings stage, I need to design the details of the adjustments and somehow devise some method of locking the adjustment robustly but without imposing great stress on the mount which will cause it to move out of alignment, the adjustment is extremely fine, accuracy needs to be in the region of 5 arc seconds or better, that means you can barely touch it because even a very heavy tripod will flex that much easily. It really needs bolting down, to something very solid. I do have ideas.
____________________ Robert. |
| Posted by chrisbet: Mon Mar 18th, 2019 12:27 | 35th Post |
| Just an off the wall thought - if you need something that remains perfectly in alignment with the earth's axis, would some sort of gimbal work?
____________________ If it is broken it was probably me .... |
| Posted by jk: Mon Mar 18th, 2019 12:52 | 36th Post |
| Robert, it is now illegal to use child labour so no sending the boys up mountains with predrilled slabs!
____________________ Still learning after all these years! https://nikondslr.uk/gallery_view.php?user=2&folderid=none |
| Posted by Robert: Mon Mar 18th, 2019 15:10 | 37th Post |
| LOL, what about a generator and rock drill? A helicopter would come in handy...
____________________ Robert. |
| Posted by Robert: Mon Mar 18th, 2019 15:23 | 38th Post |
chrisbet wrote:Just an off the wall thought - if you need something that remains perfectly in alignment with the earth's axis, would some sort of gimbal work?It's getting the alignment which has to be pretty exact with basic and robust design. Something like a Wimberly might be OK for the articulation but it has to be rock solid, Wimberlys are not rock solid. The head I have is supposed to have a 5 Kg payload, but the payload is supposed to be balanced so the motor doesn't slow down uphill or speed up downhill. Speed has to be consistent 1 revolution per 24 Hrs. The 300mm lens and D800 weigh about 2.5 Kg so it needs about a 1.5 to 2Kg counterbalance, less then the camera/lens, because it can be hung out on an arm so you get the right leverage without adding too much to the payload. The design is coming together, I am tempted to make a wood mock up to avoid making a metal one which has a snag. Just about to process last nights images, this will be interesting...
____________________ Robert. |
| Posted by jk: Mon Mar 18th, 2019 15:52 | 39th Post |
| Looking forward to see those images. I am sure it will be a big improvement. Problem is that further improvement will be a lot of work for just inch-pebbles. Per ardua ad astra!
____________________ Still learning after all these years! https://nikondslr.uk/gallery_view.php?user=2&folderid=none |
| Posted by Robert: Mon Mar 18th, 2019 18:19 | 40th Post |
| Here you are JK... Please bear in mind these are not intended to have artistic merit, they are simply the results of experiments and an attempt to learn how to set up an Equatorial mount for photography. I am learning and making gross mistakes. These images were made with a Vixen EQ-polar mount and a D800 with 70-300 lens and 16mm f/2.8 fisheye lens. They were 25 second exposures taken at 26 second intervals - one second gap. The black spot right of centre must be a spec of dust on the sensor. The first image was made without the Vixen mount motor running, about 40 exposures. The bright star to the left near the centre, is Polaris. You can see how far it is from the celestial polar centre. 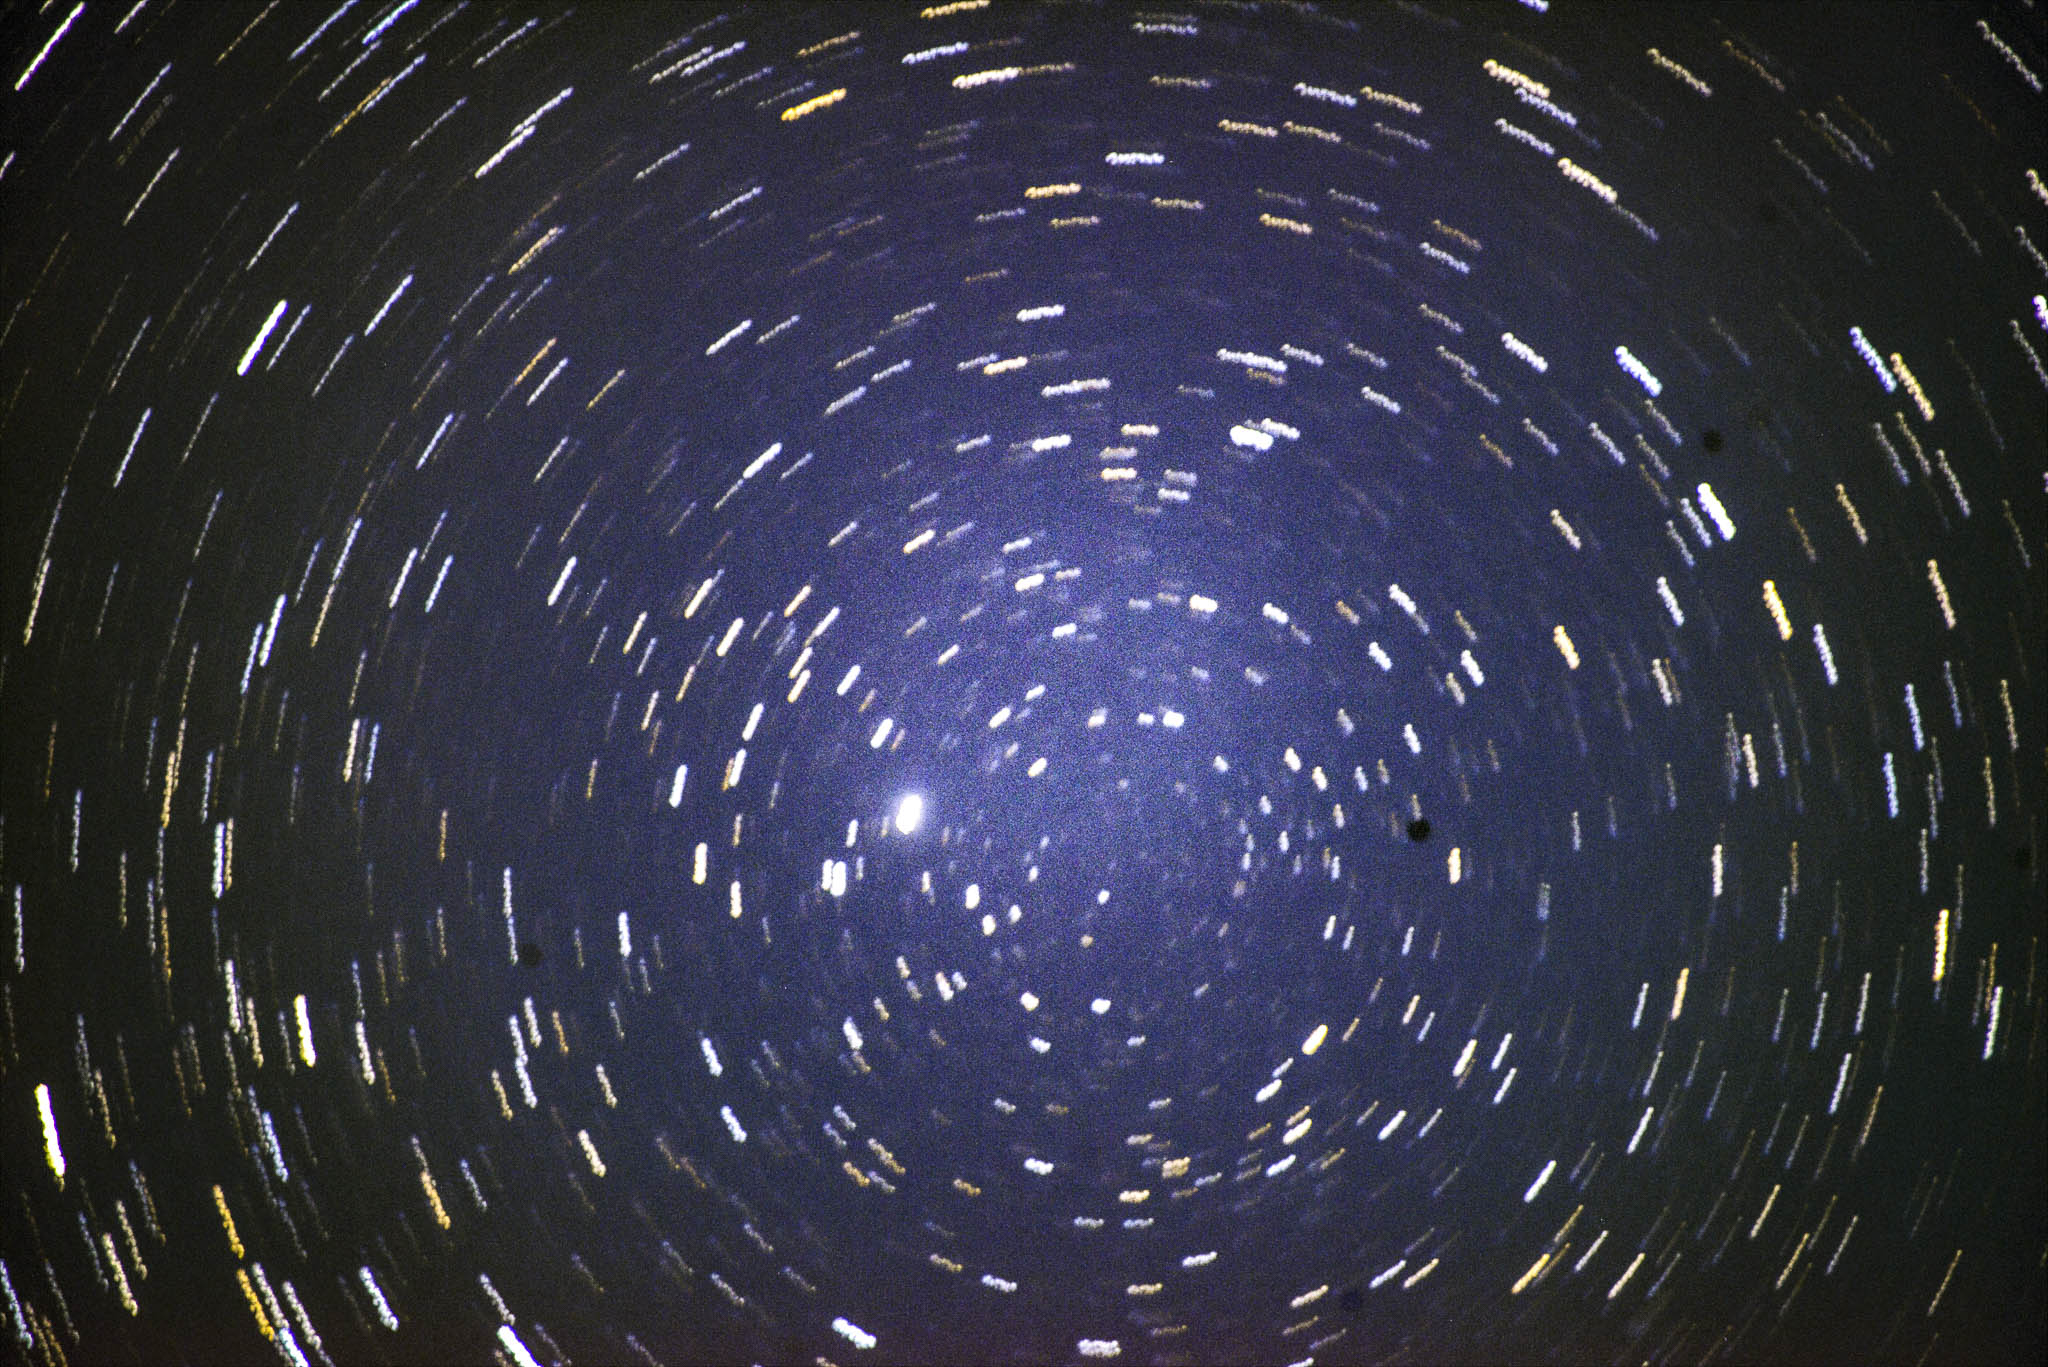 This was taken after the initial 40 exposures, I switched the motor on but the setup must have been very wrong. I think I rotated the polar locating scope the wrong way, I was trying to get Ursa minor aligned but somehow I missed! 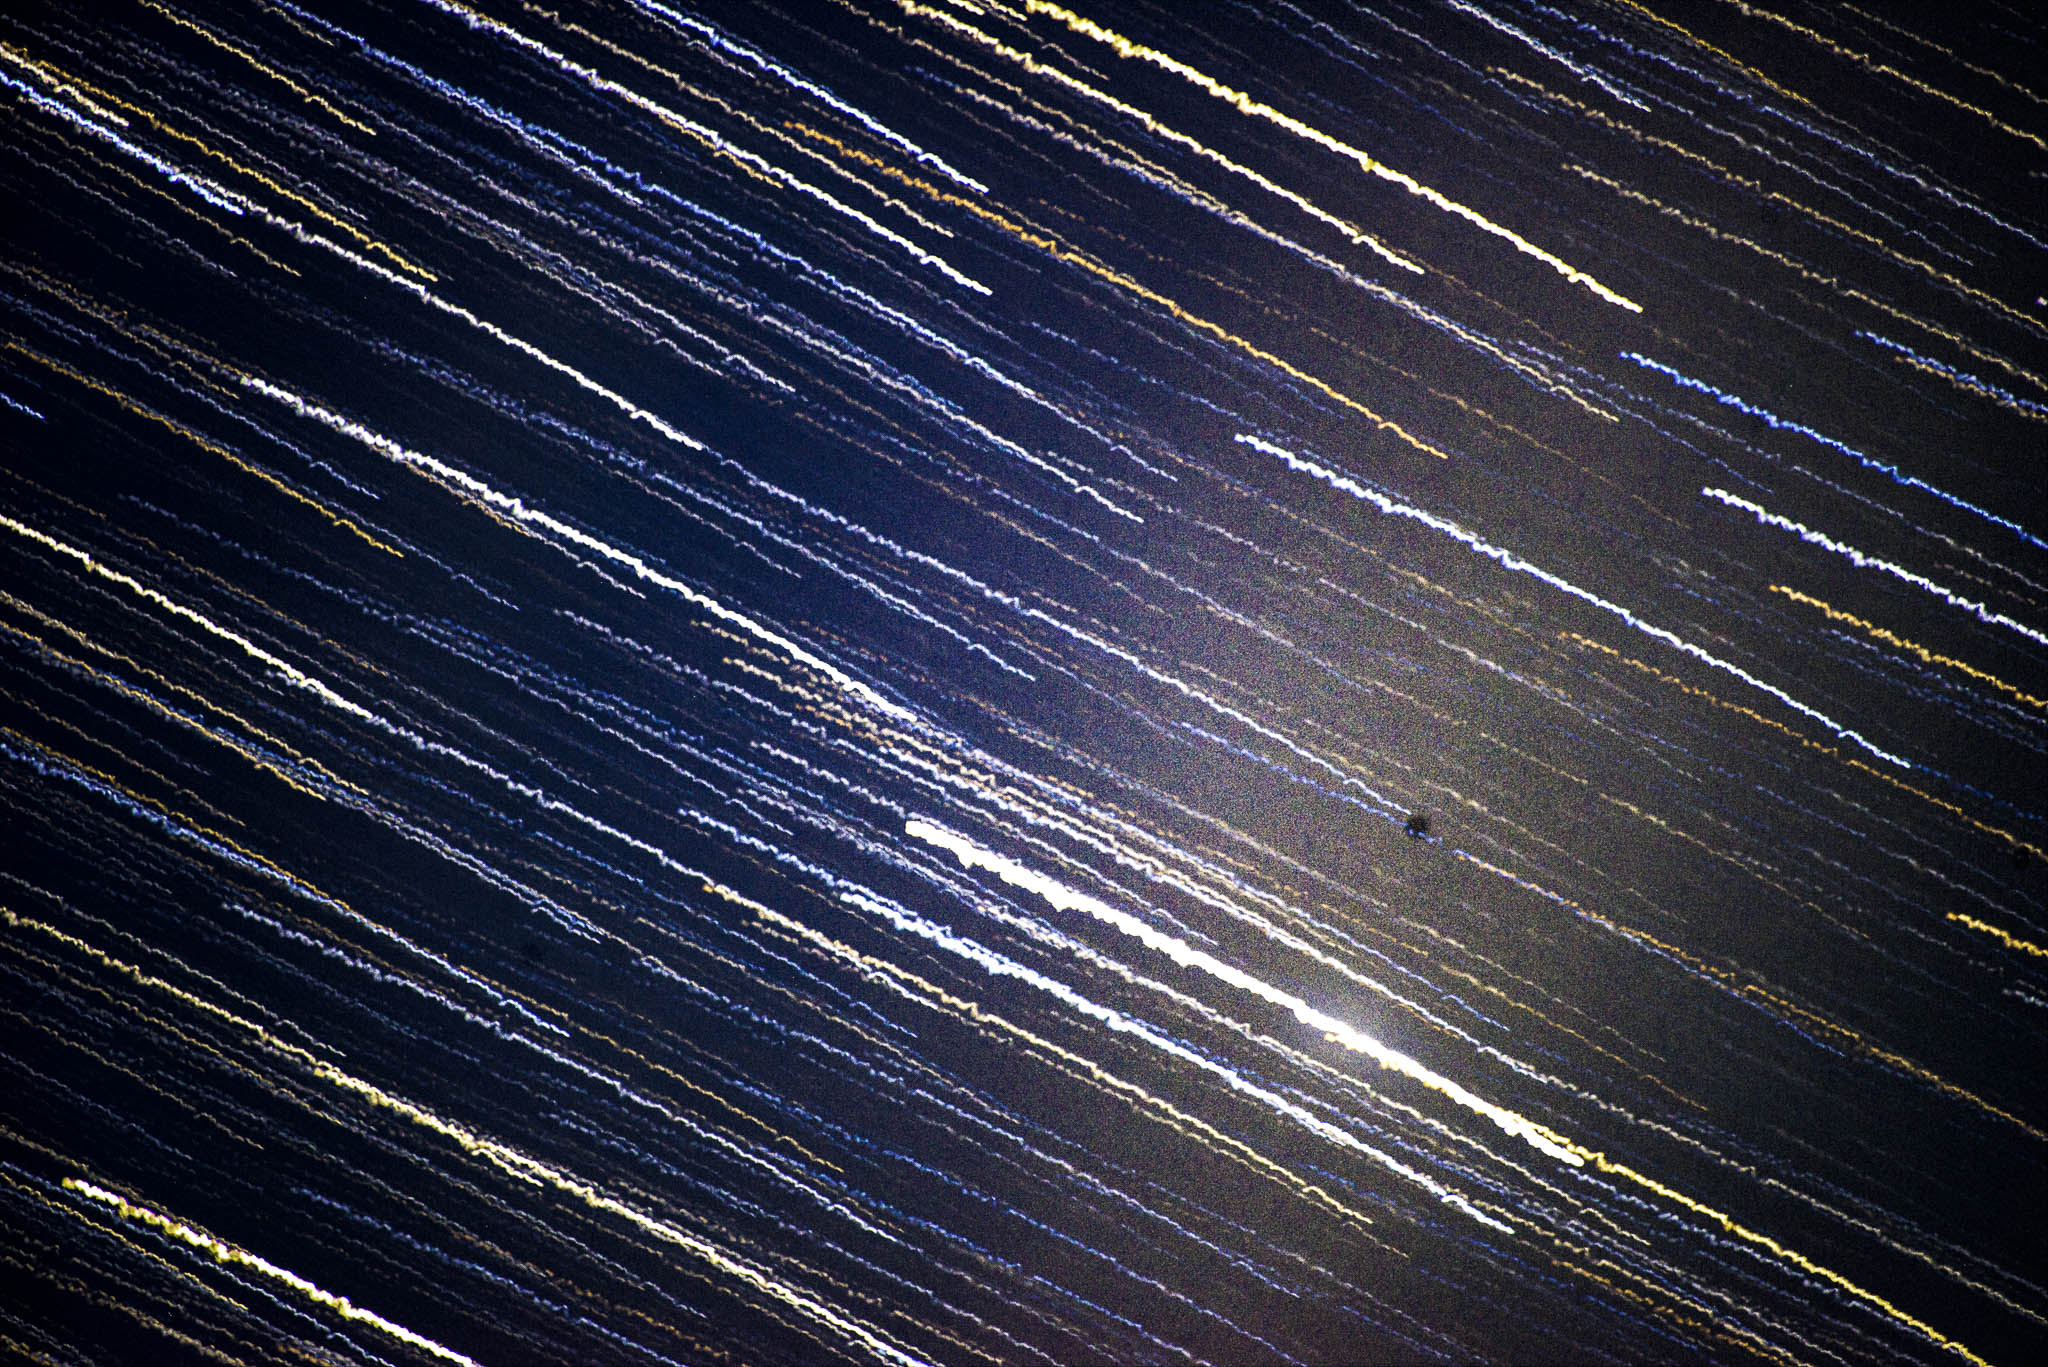 This is the two above images in one. 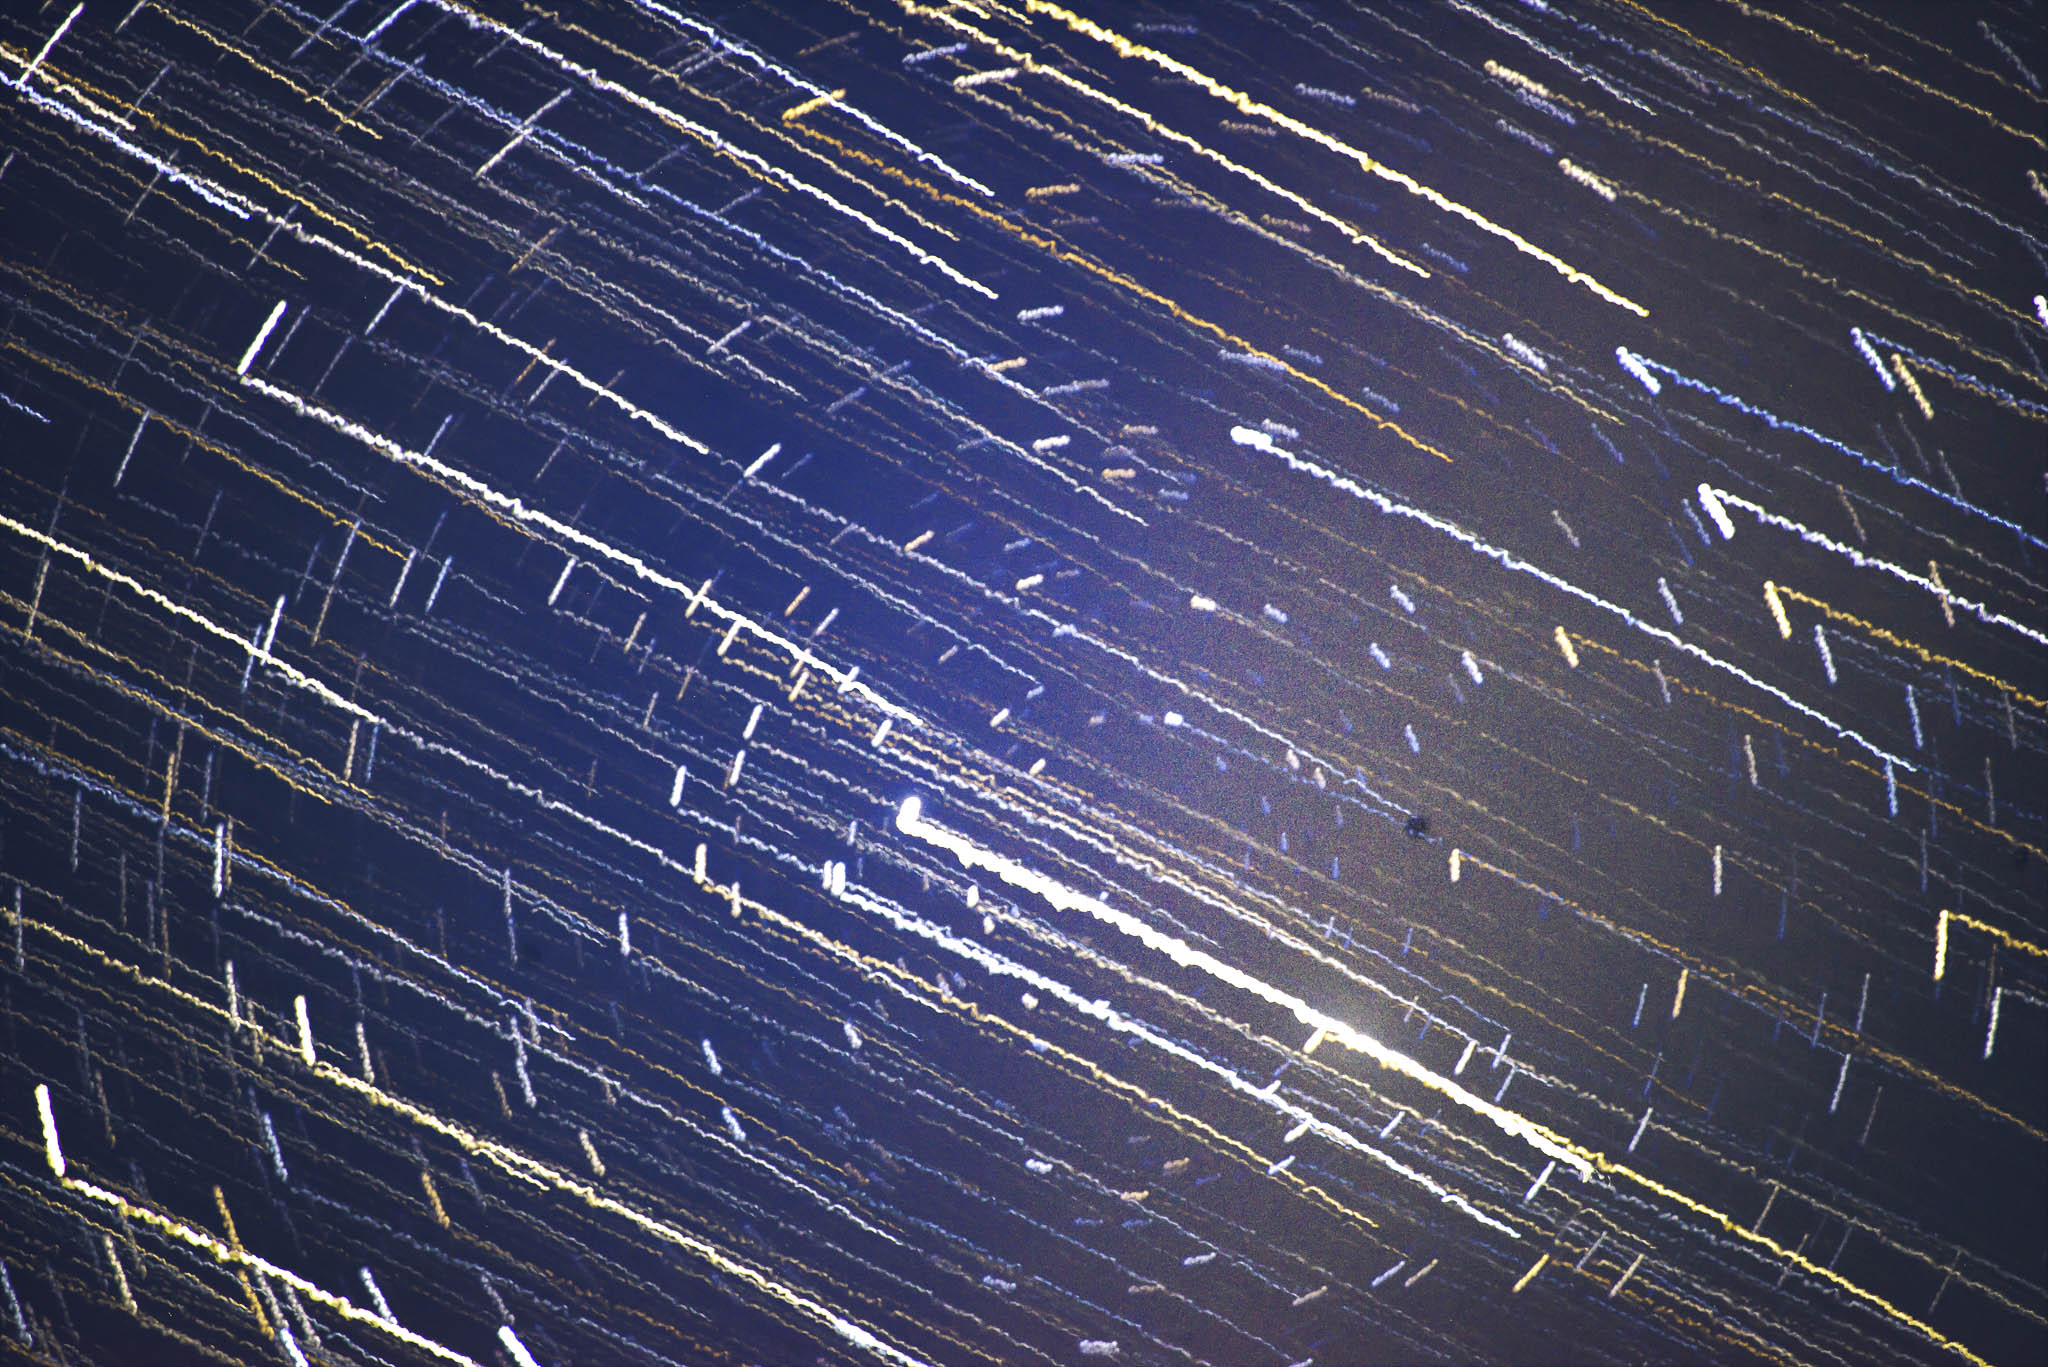 Finally back to Stickle, only a short session with the fisheye. 74 images stacked. Notice I am much nearer the correct polar centre. Again, 25 second exposures at f/4.0 for some reason only ISO200, I must have forgotten to re set it for astro, I usually run at ISO 1600. I need to sit down and set up some dedicated menus for astro photography. 
____________________ Robert. |
| Posted by jk: Tue Mar 19th, 2019 05:01 | 41st Post |
| I can see some improvement. Yes in first shot the centering is off but it is not horrific. Second and third images have some slight curvature in the light lines which (to me the unknowledgeable) looks like something is offset. I dont know what but it is at least consistent. This may be a long ride but it will be fun watching the progress.
____________________ Still learning after all these years! https://nikondslr.uk/gallery_view.php?user=2&folderid=none |
| Posted by Robert: Tue Mar 19th, 2019 05:44 | 42nd Post |
| The biggest issue at the moment is the 'wedge' the adjustment of elevation to equal the latitude, for long time exposures >30 seconds, it needs to be within a couple of arc seconds 5 at most and alignment with true celestial North within a similar margin. Magnetic North is simply misleading. I am working on the design of the adjustment assembly, currently trying to find a short length (100mm?) of 8mm fine thread (1mm pitch) stainless rod. Those adjusters you pointed me to were amazing but way too accurate! For now anyway! I can find high tensile steel fine pitched rod and I may go with that but unless I keep it greased, it will corrode because of the condensation and damp air, due to being used outside at night. At the moment I am using a Manfrotto 701 HDV head but the clamp locking is not positive enough and the adjustment is a nightmare. It has to be fine screw adjustment to stand a chance. If I can get to the point where the rigidity of the tripod is my limiting factor I will be satisfied. Currently fine adjustment of elevation and heading is the limiting factor, there isn't any!!! I have considered the Manfrotto geared head but the SKU 400 which is about the only one rigid enough is £834.95. https://www.manfrotto.co.uk/studio-geared-head The other gears heads are gangly and wouldn't afford the rigidity needed, if indeed the SKU 400 would due to it's height, the head needs to be simple, very solid and squat.
____________________ Robert. |
| Posted by Robert: Sun Mar 31st, 2019 03:31 | 43rd Post |
| My engineering is progressing slowly, I have mostly finished the upper parts, I have made the altitude adjustment, I have created a clamp arrangement for the altitude movement. This is turning the bore for the Polar alignment scope in the support arm in my lathe, the small green casting is the original, inadequate support arm/wedge mount.  The altitude adjustment is from about 43º to 60º, I live at about 54º so I have plenty of adjustment available. 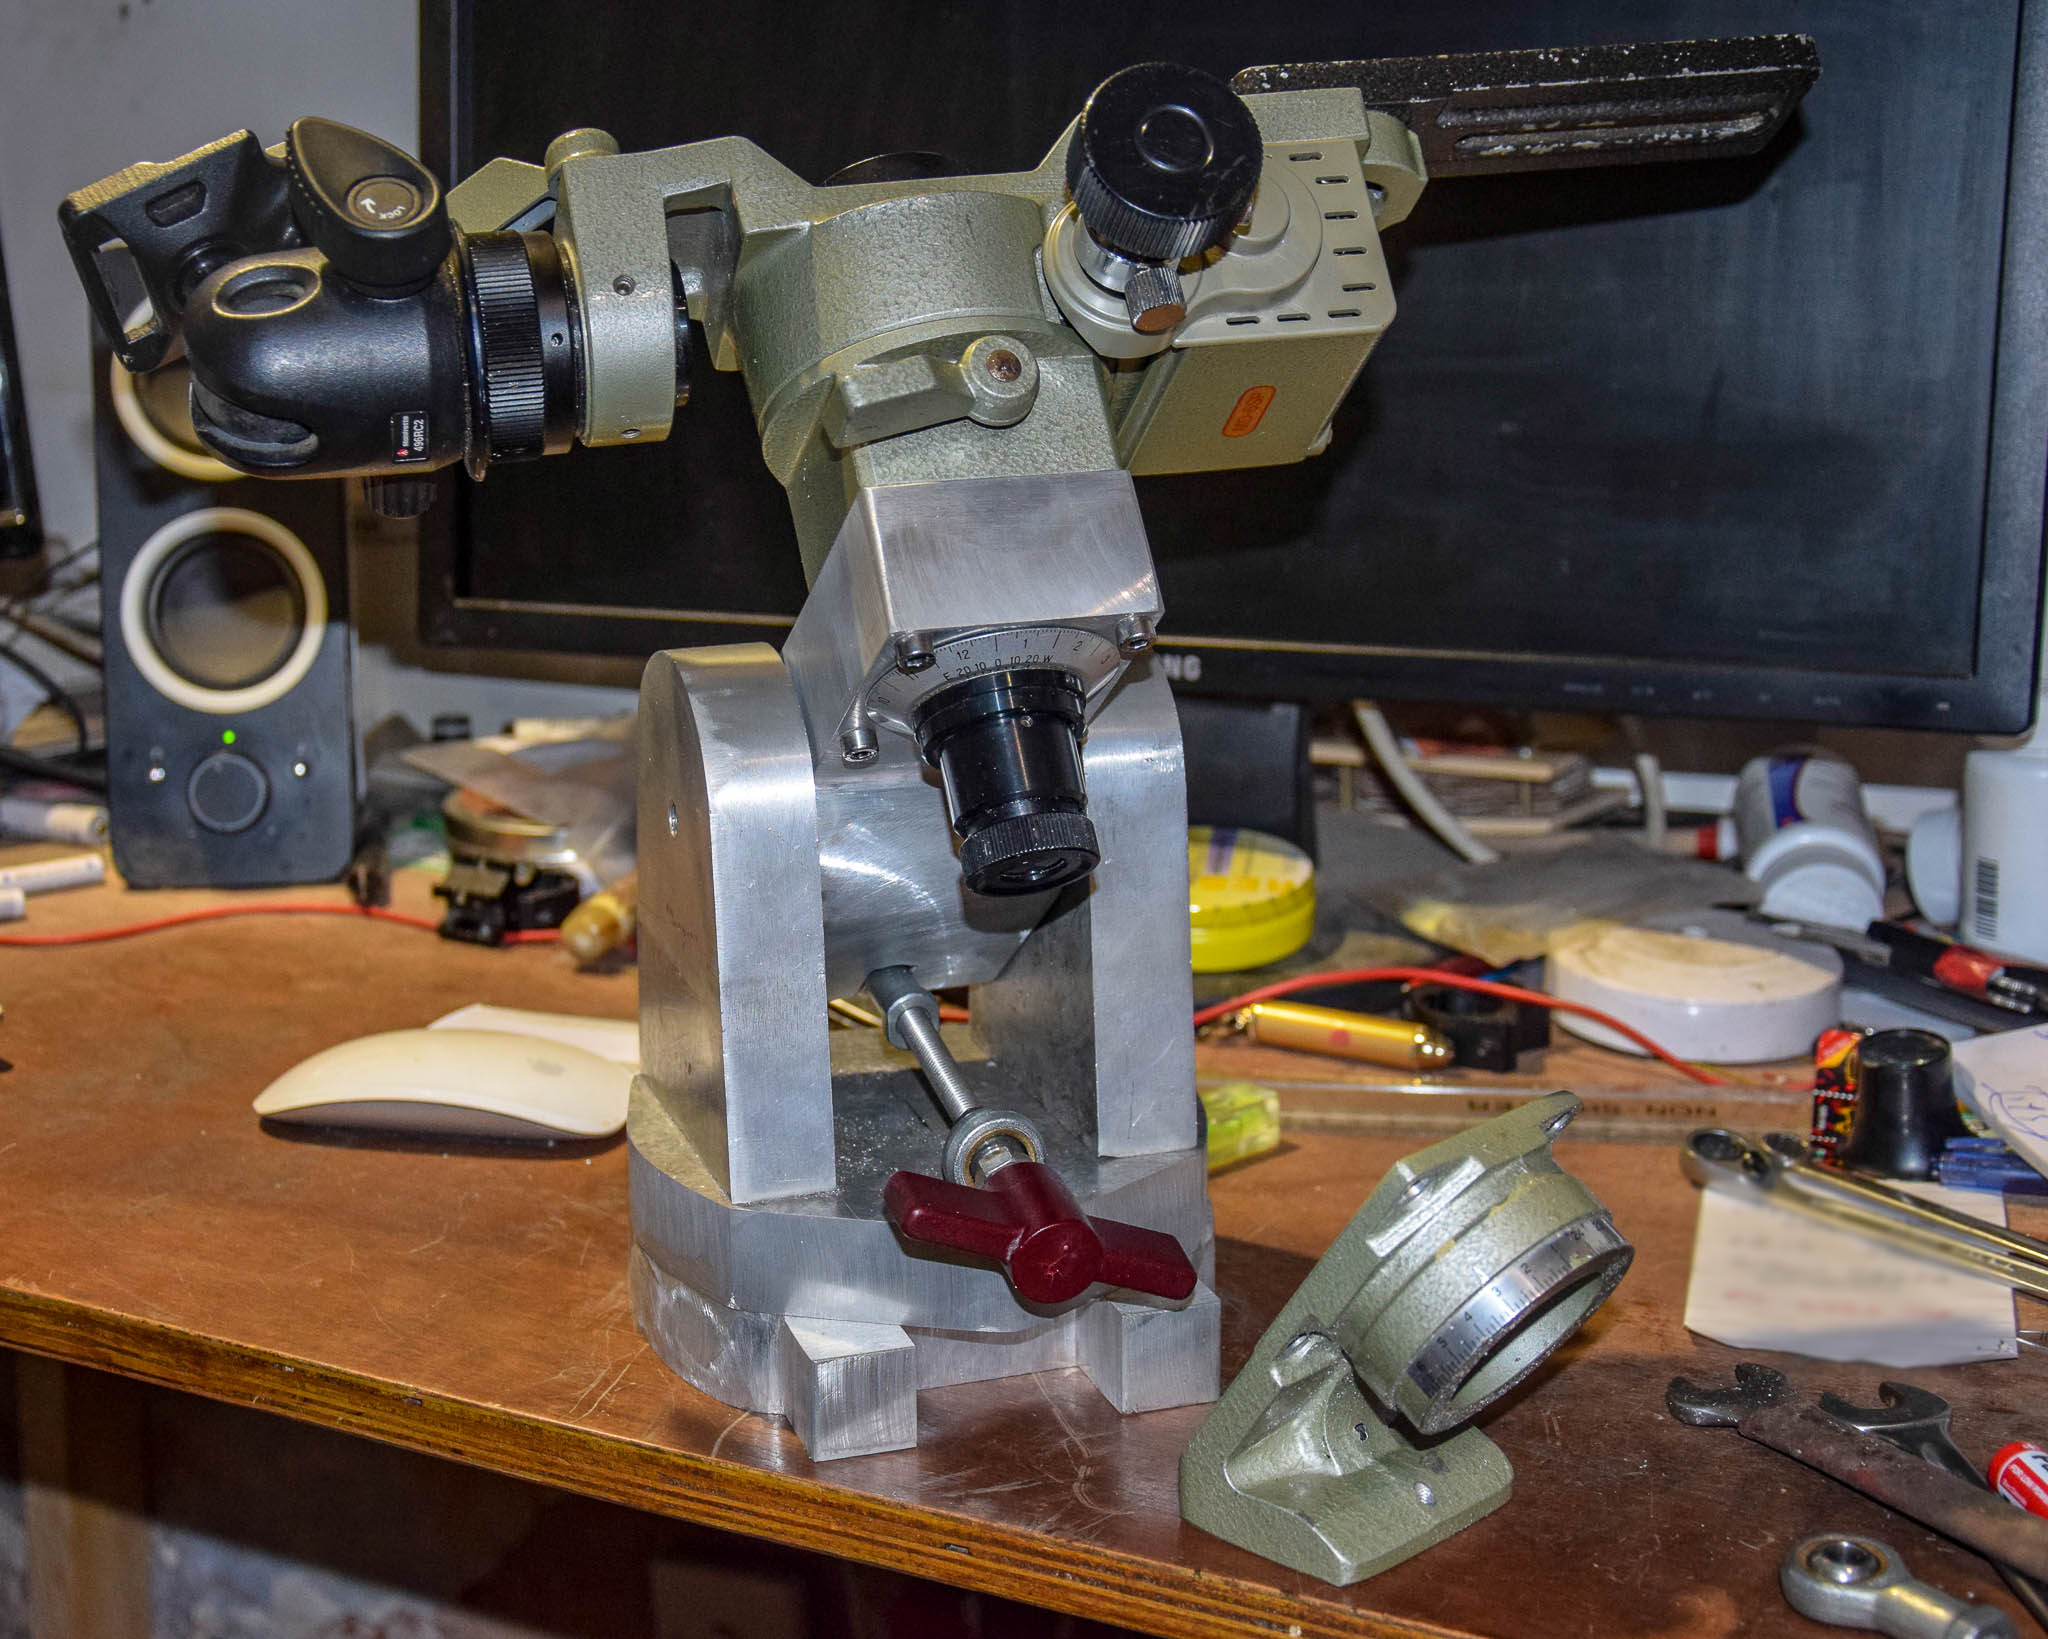 The next part is making the base adjustment, which is a slightly clever way of adjusting and clamping the base down using a dovetail post. I have never seen this idea before so I have no idea how well it will work. Time will tell. All I need then will be a clear night, free of clouds. Currently an hour at midnight on Thursday is forecast.
____________________ Robert. |
| Posted by chrisbet: Sun Mar 31st, 2019 03:41 | 44th Post |
| Certainly looks robust, but how do you get your eye to the polar scope?
____________________ If it is broken it was probably me .... |
| Posted by Robert: Sun Mar 31st, 2019 04:08 | 45th Post |
| Ah, very good point! It's not easy at any time looking up at 54º, the standard solution is to use something like a DR-3 or DR-5 right angle eyepiece. https://www.keh.com/shop/nikon-manual-focus-dr3-rt-angle-view-attach-fe-fm-ser-240550.html I am going to try a novel approach, I have a little Go-Pro Session cube camera which can stream video via wi-fi to an iDevice or my MBP laptop. Placing it on the eyepiece of the Polar scope it gives a nice clean image. Given it's a one off setting at the beginning of the session it should speed things up for getting the Polar alignment quickly and easily rather than kneeling in a muddy or rocky field. I am also coming to the idea that I don't actually need a tall tripod. A dwarf stand of some sort, a stubby tripod or something similar and leave the camera at ground level or on a large rock. The assembled mount weighs about 7.5Kg, add camera, lens and counterbalance it weighs close to 10Kg. A small solid mount at ground level would get the job done.
____________________ Robert. |
| Posted by jk: Sun Mar 31st, 2019 07:48 | 46th Post |
| Looks like you have been using some large hunks of aluminium. Nice work. The GoPro will make for less back-breaking or neck-aching and squinting down the sighting telescope. Agree with you that a shorter tripod is better than a taller one. Look forward to seeing how you get on.
____________________ Still learning after all these years! https://nikondslr.uk/gallery_view.php?user=2&folderid=none |
| Posted by Robert: Sun Mar 31st, 2019 18:15 | 47th Post |
| OK, brief test this evening, really good sky tonight despite not going far. The new wedge mount is excellent, needs finishing properly and details refining but it works a treat. It's very solid and the adjustments work really well, way better than before, need much more practice but I took two series of exposures with and without the motor running. I am currently processing the images as I type, I took some without the motor running then I started the motor and all the stars stopped moving, but... they are giggling about. I am not yet sure what's causing that, it may be the gear train again or it might be mirror slap shaking the camera arm. The D800 mirror does seem to generate a fair old whack, at that magnification it must have some effect on sharpness. I need to look into locking the mirror up. I seem to have managed to find the celestial North. I still haven't a clue how I did it, I wasn't sure which star was Polaris, which has been my problem before but I am gaining some understanding. Polaris describes a circle around the celestial North axis, the trick is knowing at what point around that circle Polaris should be. It relates to a 24 Hr clock, as you might expect... This evening I wasn't able to see Ursa Minor, which would have clinched it. I tried the Go-Pro Session but the images of stars in the dark were not bright enough. It's fine in daylight but not in the dark. I still need to make a small red LED lamp for the Polar Scope. Will post some images in the morning.
____________________ Robert. |
| Posted by chrisbet: Mon Apr 1st, 2019 02:56 | 48th Post |
| Rather than the Go Pro, how about making a slide to take the phone on front camera?
____________________ If it is broken it was probably me .... |
| Posted by Robert: Mon Apr 1st, 2019 04:32 | 49th Post |
| Not quite clear on what you mean... Given my experience last night I am leaning towards a DR-3 right angle eyepiece. The added complexity of electronic devices is unwelcome. Time is a major factor and faffing about with these electronic things is very time consuming and frustrating when they don't always respond as expected. Unless I can get a simple, cheap dedicated mono camera with low light capability, I think I will try a right angle eyepiece, they are simple and clear. That will get the job done without adding complexity. I need to speak with my buddy, he has right angle eyepieces, I could maybe try one first. OK, I have pix. This was the viewpoint, on Kirkby Moor, overlooking the Duddon Estuary. D800 with Nikkor 16mm fisheye lens. Note the depth of focus Chris!!! lol The three glowing patches in the sky to the right Sellafield, Whitehaven and Workington. 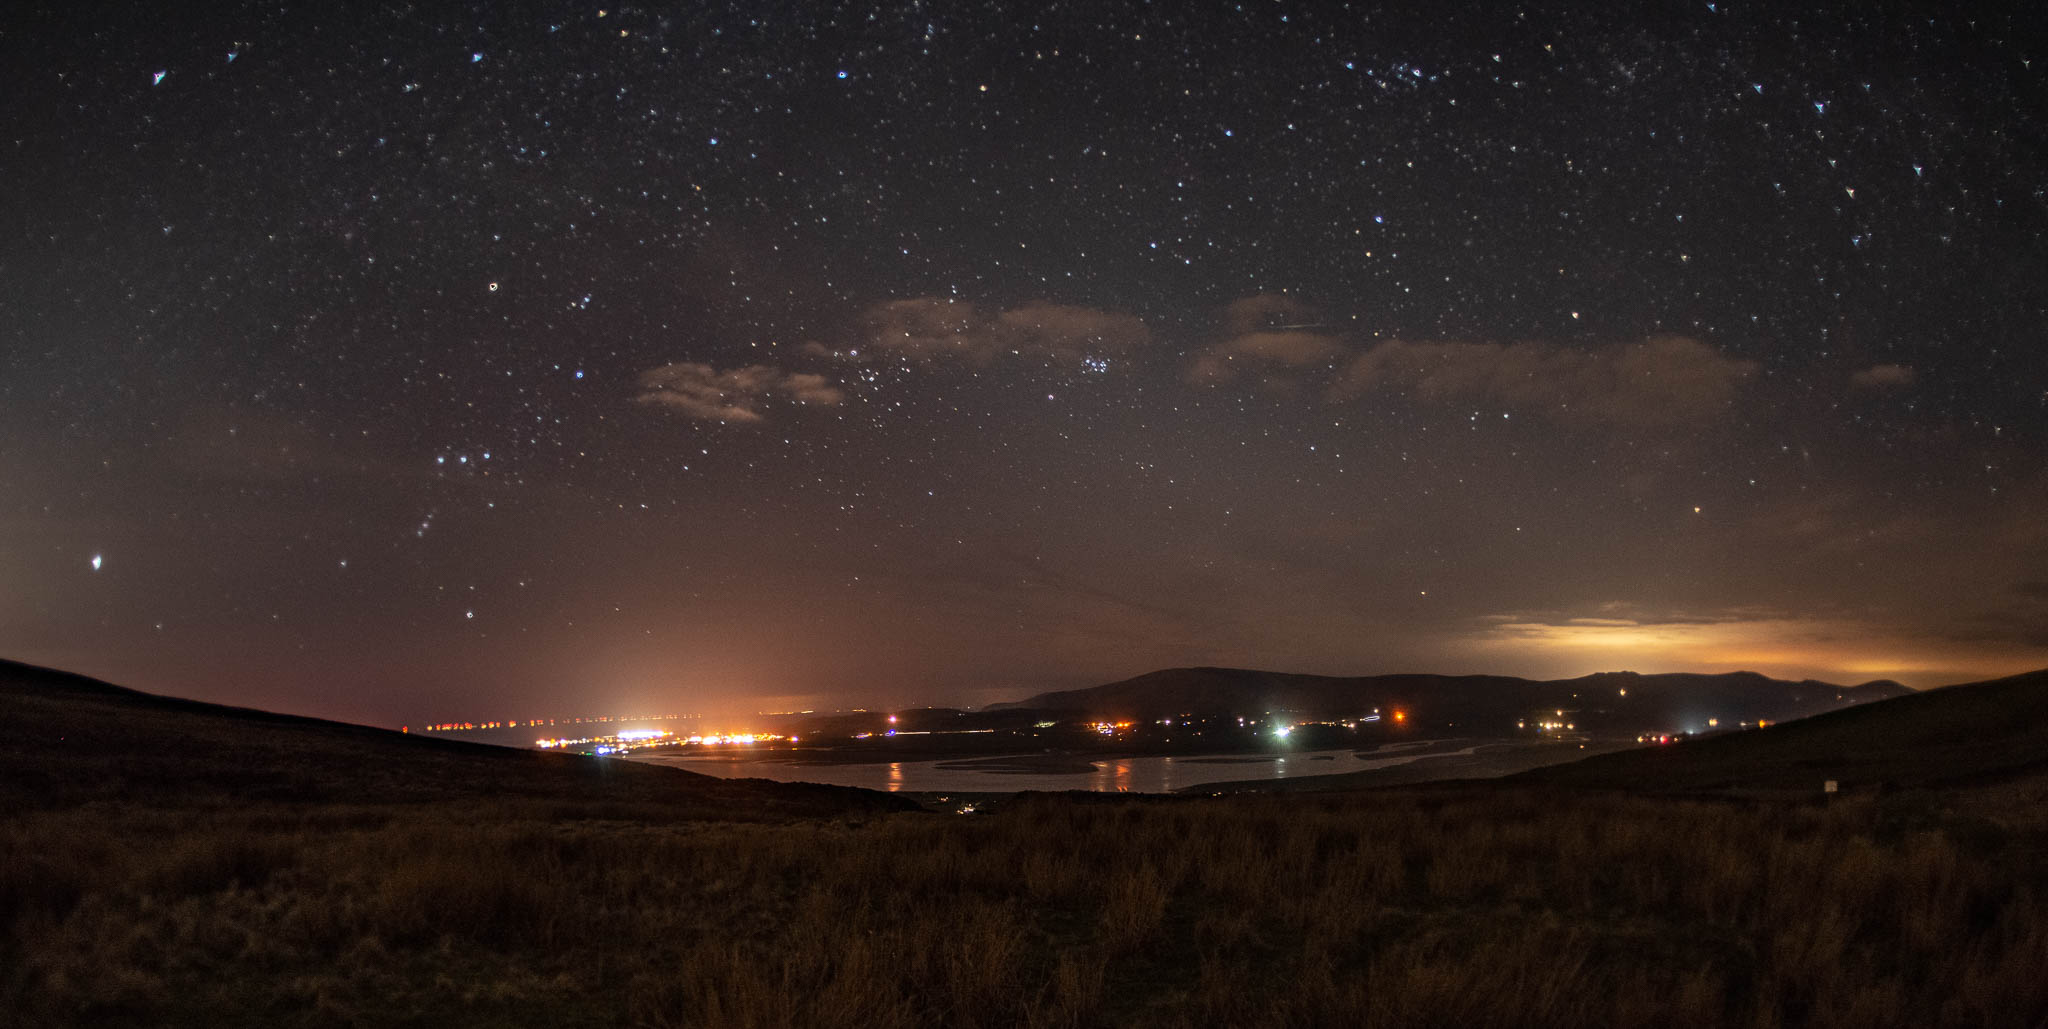 This is the first set, I think they are of the Northern stars of Orion's belt, bottom right, I had intended to centre on the belt but the camera must have moved, camera on the EQ mount but motor not running. Ten 15sec exposures taken at 30 second intervals f/5.6. D800 with 70-300 VR Lens (VR and AF turned off) 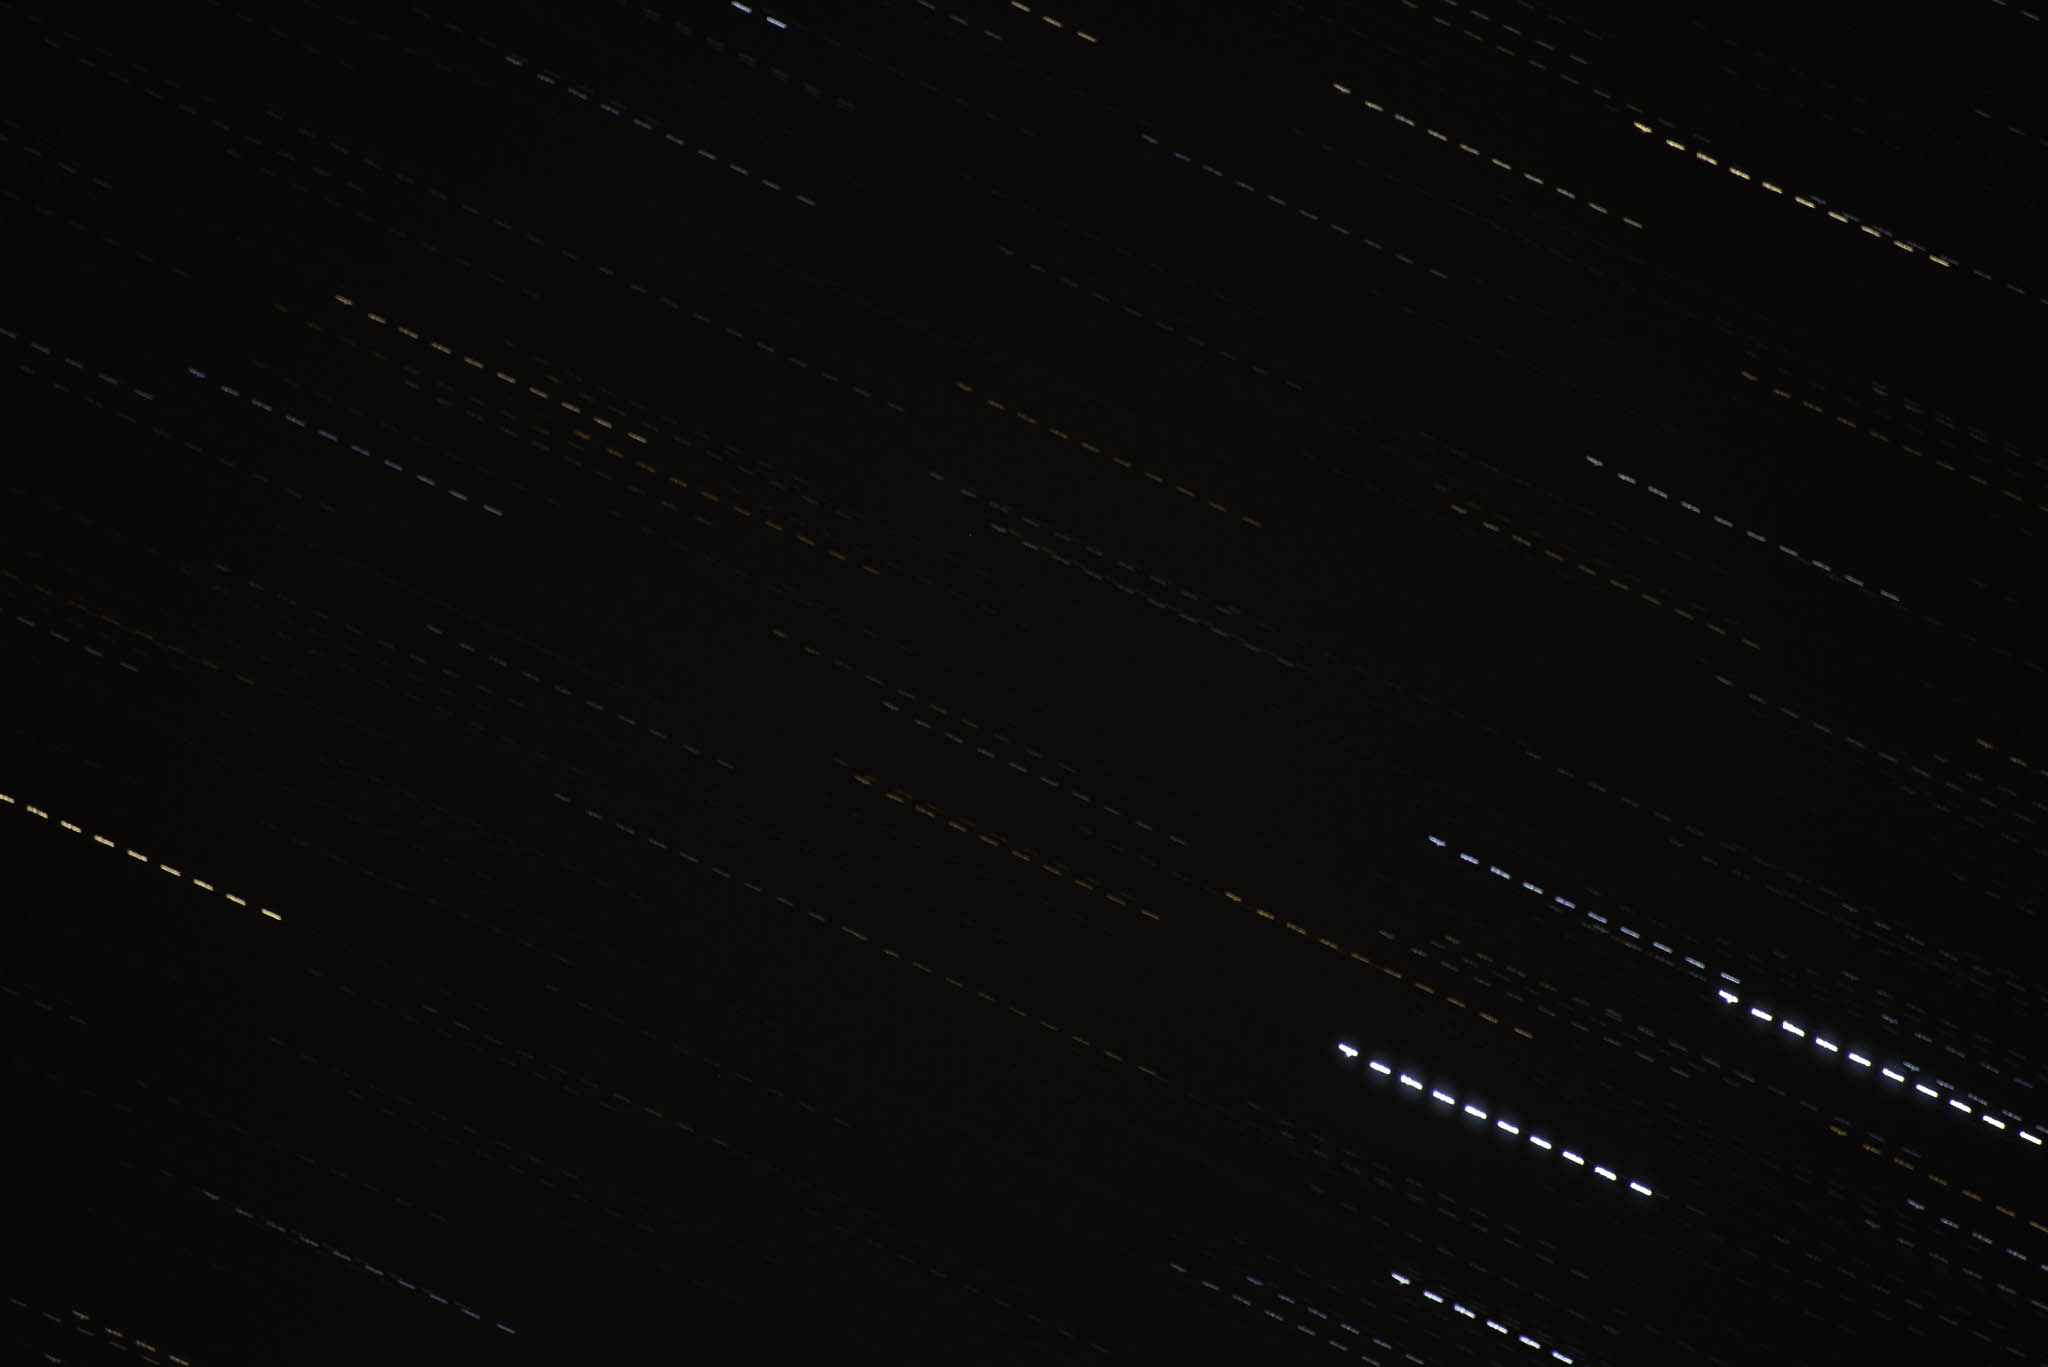 This was the best single exposure of the set of 34 at 100%, round stars, no trailing. 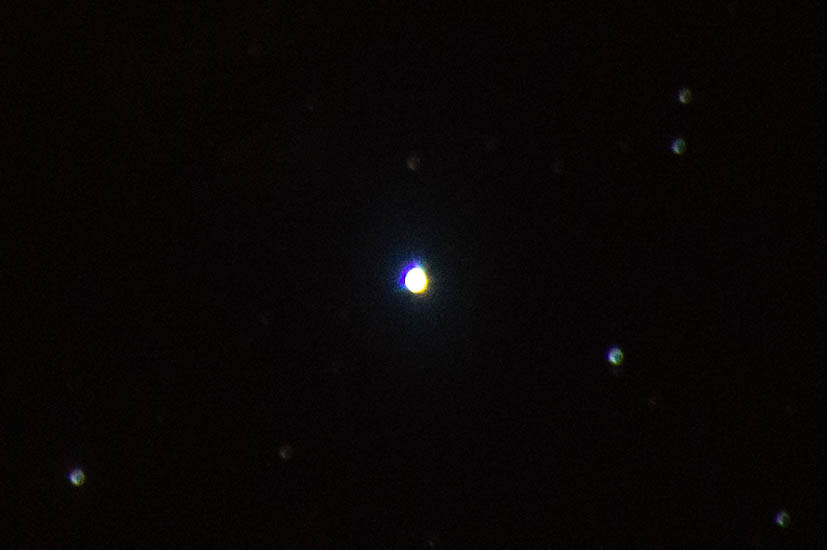 This was the worst single exposure of the set at 100%, no trailing but atmospheric disturbance has resulted in a poor image. 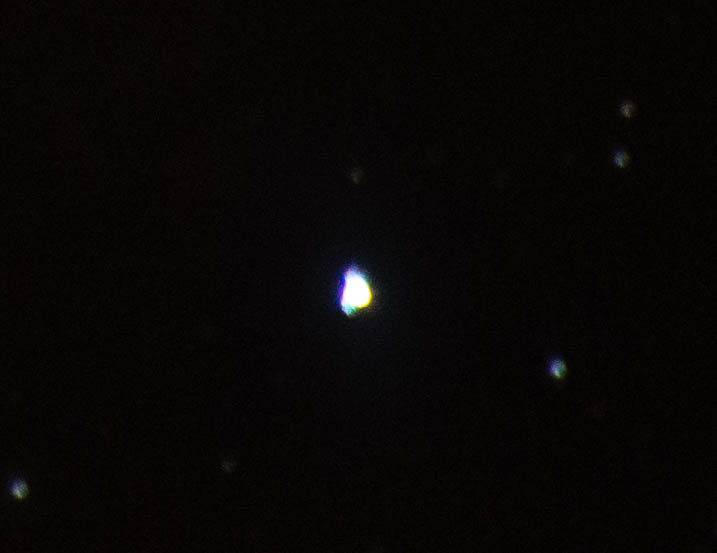 This is a stacked image of the best nine exposures  This is a stacked image of all 34 exposures, very little trailing but a disturbed and less than crisp image. 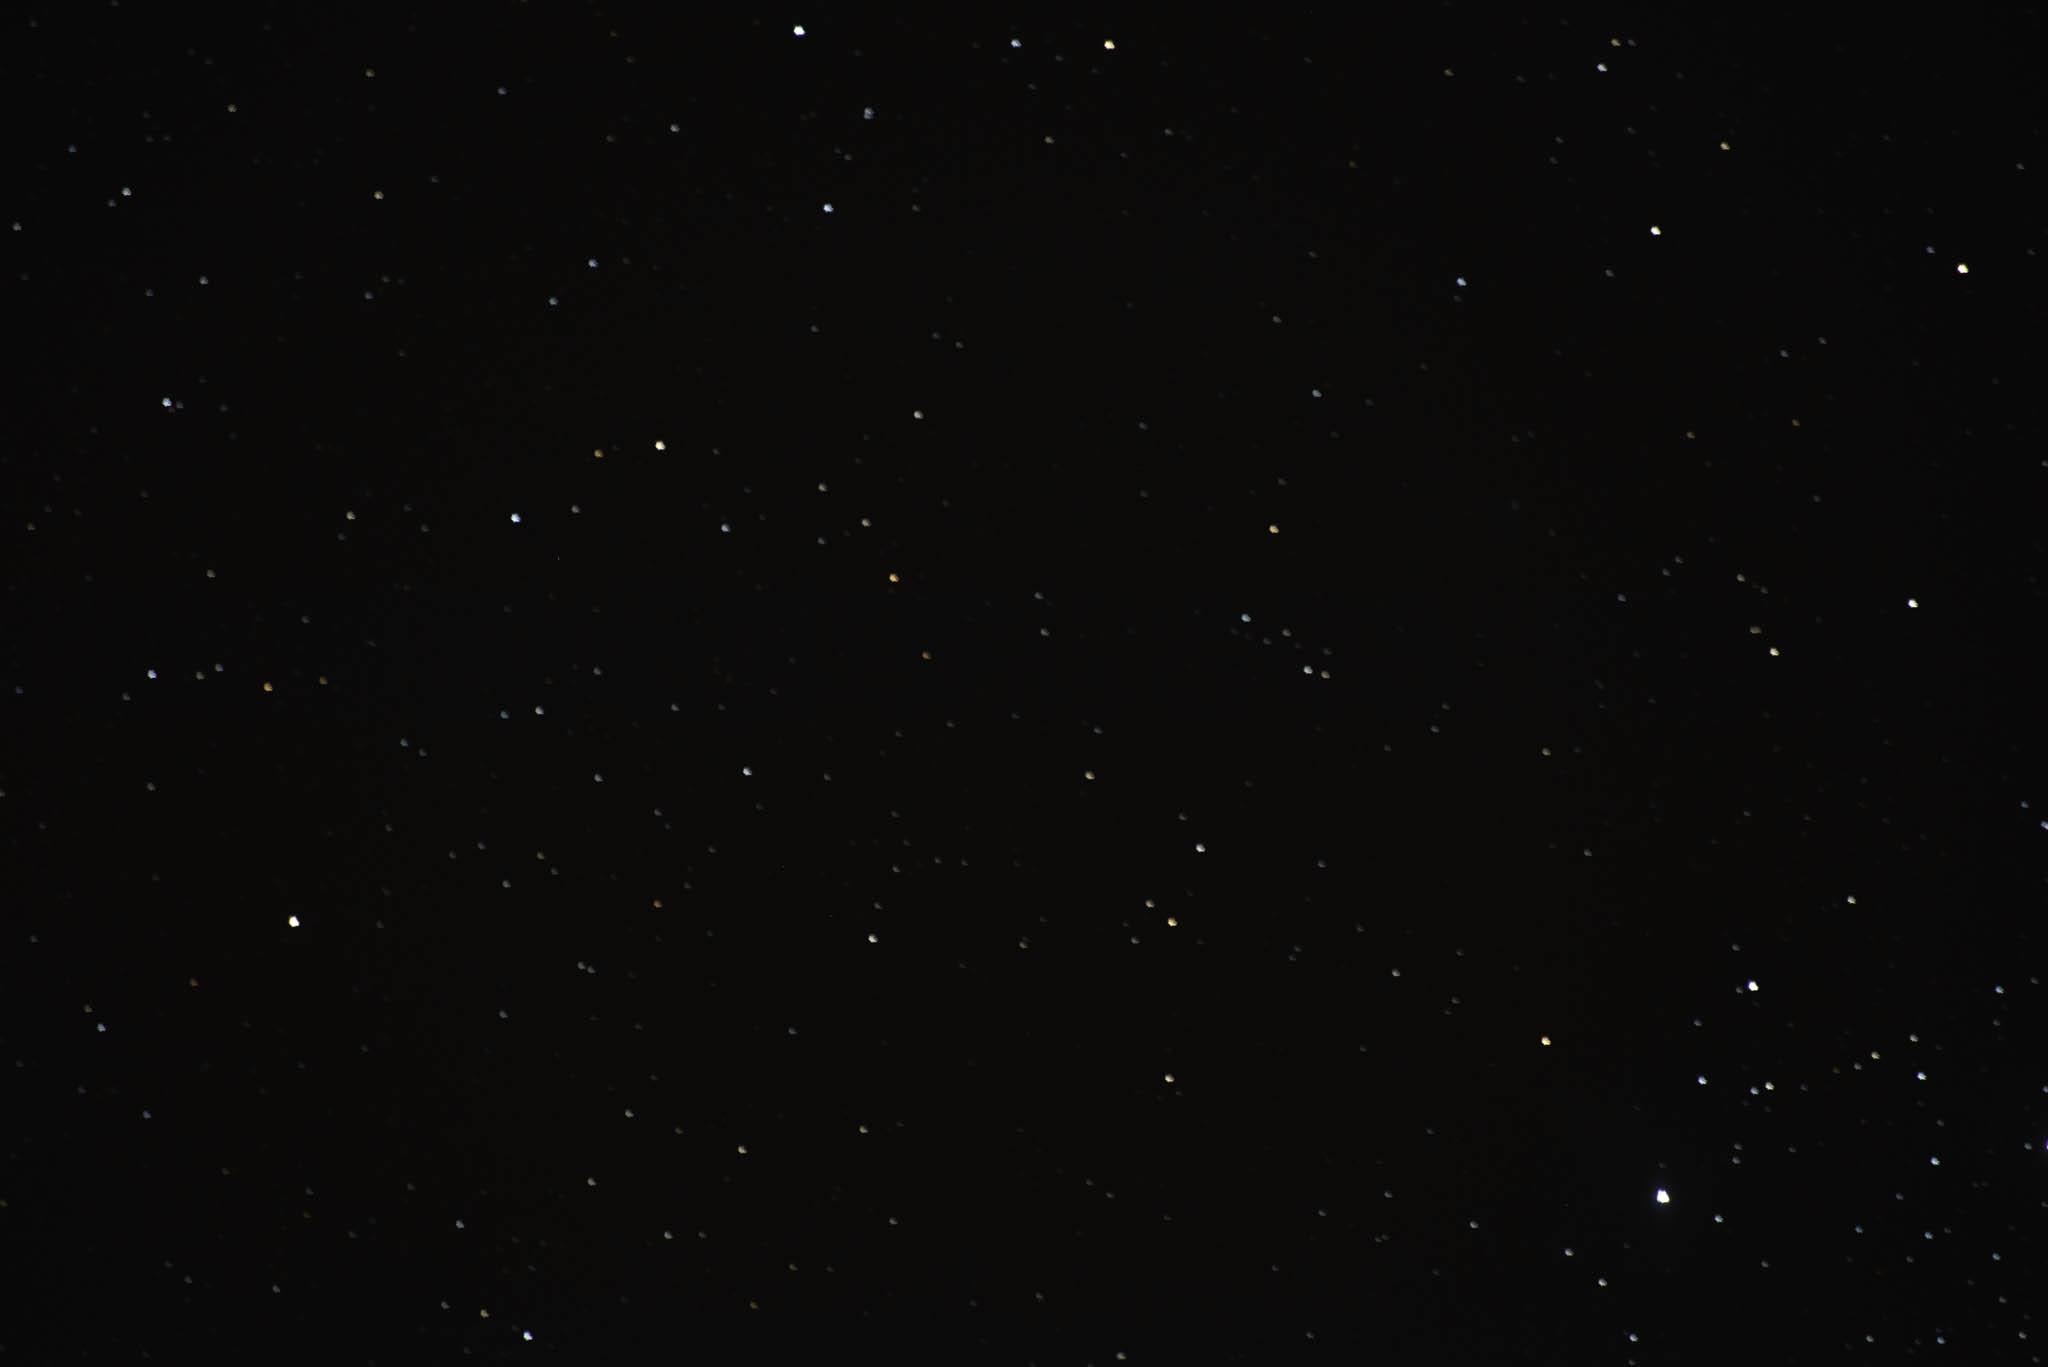 All in all I am delighted. The effort of creating the heavy duty mount has been worthwhile, the adjustments work well and the alignment is accurate enough. Good Polar wedge mounts are very expensive, nowhere near as robust as mine which has cost zilch. I am unlikely to want to use it far from the car so the weight isn't really an issue. The weight contributes a great deal to the rock solid foundation it provides. Viewing through the Polar scope isn't as easy now but it's still entirely possible. Have to tidy the workshop now then I can turn my attention to a bit of refining.
____________________ Robert. |
| Posted by chrisbet: Mon Apr 1st, 2019 16:07 | 50th Post |
I applaud your efforts 
____________________ If it is broken it was probably me .... |
| Posted by Robert: Wed Apr 3rd, 2019 17:49 | 51st Post |
| Thank you Chris! Yesterday I had an idea... I checked out the Go-Pro controls, they are accessed via an app on my iPhone or iPad, I seemed to recollect there was some means of controlling the exposure manually. I fiddled with the controls at home and managed to increase the sensitivity a bit, two stops I think, so I redoubled my efforts and made a small clamp to properly secure the tiny Go-Pro camera to the eyepiece of the scope. It worked fine in daylight and even poor light in my bedroom with the lights off and curtain closed, so I got some fish and chips, then headed for the local viewpoint, to await darkness. While I was exploring the track I attracted the attention of the local gamekeeper, who stopped and watched me for some time while I enjoyed my fish and chips! Eventually the parking spot near the bench came free and I moved down to set up before darkness fell, ready to test the Go-Pro camera. Gamekeeper still back and forth keeping an eye on me! lol Eventually it was almost fully dark, just about to test the Go-Pro the gamekeeper came past again so I stopped him and assured him I was just a mad photographer waiting for it to go really dark before I could take some photo's. He seemed a bit puzzled, I explained you can't see the stars in daylight!!! He laughed, so I took the opportunity to ask him where the best viewpoint would be where I could get a full view of the Duddon sand-bar and the estuary. He was very helpful and showed me where I could go to get a the best view of the entire estuary. I am going up there this afternoon to check it out. I am hoping I can make a time-lapse video of an entire incoming tide on a very low to very high spring tide.Finally... It was dark. I powered up the Go-Pro and no dice. Just a black image, no sign of Polaris or any other stars. By shining my red lamp into the polar scope I could see the etchings to locate Polaris, so the camera was working. One thought was perhaps in the darkness the Go-Pro autofocus wasn't able to latch onto the tiny dot in the sky? Whatever the reason it's a No-Go-Pro! Turning my thoughts to an angle finder, will see what my buddy has...
____________________ Robert. |
| Posted by Robert: Mon Apr 8th, 2019 18:24 | 52nd Post |
| OK so I have acquired a damaged DR-3 right angle finder for a pittance. I made the mount for the DR-3 over the weekend but cloud prevented testing. This evening with totally clear skies I took it out and was able to test the finder, the threads which attach the finder to the camera eyepiece were damaged, that doesn't matter for me because I have made a slip on adaptor to fit it to the polar scope. I still need to fine tune the fit but essentially it works. I have now made an adaptor to allow me to hold a red LED in front of the Polar scope to light up the etched markings in the Polar scope to assist aligning the stars. The forecast is for tomorrow and Wednesday nights to be clear skies, so with luck I will try to get some images tomorrow night. I will try the Nikkor 300mm f/2.8 too. If I can I will try to capture an image of the Orion nebula, the only possible issue may be the Moon because it's in the same area of sky as Orion at the moment. I might even be able to combine them in the same image.
____________________ Robert. |
| Posted by jk: Tue Apr 9th, 2019 02:41 | 53rd Post |
| Well done. Seems like you are getting a really nice setup for a song!
____________________ Still learning after all these years! https://nikondslr.uk/gallery_view.php?user=2&folderid=none |
| Posted by Robert: Tue Apr 9th, 2019 15:26 | 54th Post |
| There seems to be a very slight mismatch between the Vixen Polar scope and the DR-3 right angle eyepiece which reduces the field of view but I still have enough to aim at Polaris and get three of the stars of Ursa Minor, which I am hoping to be able to lock onto tonight. Getting Polaris locked on is only half the story, the rotation alignment of the Polar scope has to be correct too. I am gradually gaining an understanding. The manual I have is for a newer model which has different markings and the various tutorials online seem to be aimed at people with 'Go To' mounts. This is an old fashioned, manually aligned mount which is a very different kettle of fish. Hoping to get some images tonight... Taking the 300mm f/2.8 and the fisheye.The wind seems to have abated some, it was blowing hard last night, my eyes were watering because of the wind, which made it even harder to aim the scope.
____________________ Robert. |
| Posted by jk: Tue Apr 9th, 2019 15:43 | 55th Post |
| Bon chance, mon ami. Look forward to seeing the results.
____________________ Still learning after all these years! https://nikondslr.uk/gallery_view.php?user=2&folderid=none |
| Posted by Robert: Tue Apr 9th, 2019 15:55 | 56th Post |
| Likewise! LOL
____________________ Robert. |
| Posted by chrisbet: Tue Apr 9th, 2019 17:22 | 57th Post |
Me too ... 
____________________ If it is broken it was probably me .... |
| Posted by Robert: Tue Apr 9th, 2019 21:48 | 58th Post |
| Well, I'm home and cold. Had to wait for the moon to set, I exposed a batch with the fisheye 16mm. I failed to lock onto Polaris properly but I now have a clear understanding of the issue. It's known that the earth's axis is wavering slightly which effectively means my scope from about 1986 is incorrectly calibrated. I have asked on several forums by what degree the relative location of Polaris has changed but nobody has given me a clear or definitive answer. However tonight I think I have cracked that one. While the camera was clicking away making exposures with the fisheye lens, I was thinking about the problem, it occurred to me that to swivel the Right Ascension movement around the Polaris axis 360º should reveal where it describes an imaginary circle with the hairline cross sight which denotes the celestial North pole. It *seems* that the little aiming circle which Polaris should be central in is about twice as far from the Celestial North as a it should be, however I gave up due to the cold wind. Pleased because I feel I am a step nearer. I will resume again tomorrow night if conditions allow, with additional clothing. The right angle finder makes it much easier to see what's going on. Pity the Go-Pro didn't work. I can see why people like these 'Go To' mounts but I ain't for spending a grand, or ten of them... Just to save a bit of head scratching. What's the fun in that?
____________________ Robert. |
| Posted by chrisbet: Wed Apr 10th, 2019 01:43 | 59th Post |
| No fun at all and they are the poorer for not understanding how it works. That's one of the reasons I like old cars rarher rhan the comurers in wheels - I can fix them when they go wrongðŸ˜
____________________ If it is broken it was probably me .... |
| Posted by jk: Wed Apr 10th, 2019 02:20 | 60th Post |
| Well it seems that you can fix computers as well Chris. The buttons on the Splash screen and the green down arrow seem to be working perfectly. Very well done.
____________________ Still learning after all these years! https://nikondslr.uk/gallery_view.php?user=2&folderid=none |
| Posted by chrisbet: Wed Apr 10th, 2019 02:54 | 61st Post |
| Thanks - any view on the Unread posts button? I find that the easiest way to check for new posts.
____________________ If it is broken it was probably me .... |
| Posted by Robert: Wed Apr 10th, 2019 10:01 | 62nd Post |
| This Nothing spectacular, I had hoped to try the 300mm but until I get a real handle on the Polar alignment there is no point. I took these pics with the 16mm f/2.8 fisheye. The mount is rock solid, well on top of it's job, the adjustments are nice, the right angle finder is good enough. I have established that Polaris is closer to the celestial North than it was in 1985 by about 50%. I now think I know how to set the Right Ascension (RA) to the celestial 'clock' by aligning Ursa Major with the etched markings in the Polar scope. Now that I know Polaris is only about 2 degrees from celestial North, that makes the RA adjustment less critical in a sense, although for long exposures with a long lens it does matter, especially if the subject is well away from the pole. The Milky Way is close to the horizon. All images taken with Nikon D800 and Nikkor 16mm f/2.8 fisheye @ ISO1600, 30 seconds at f/4.0, taken at 35 second intervals. 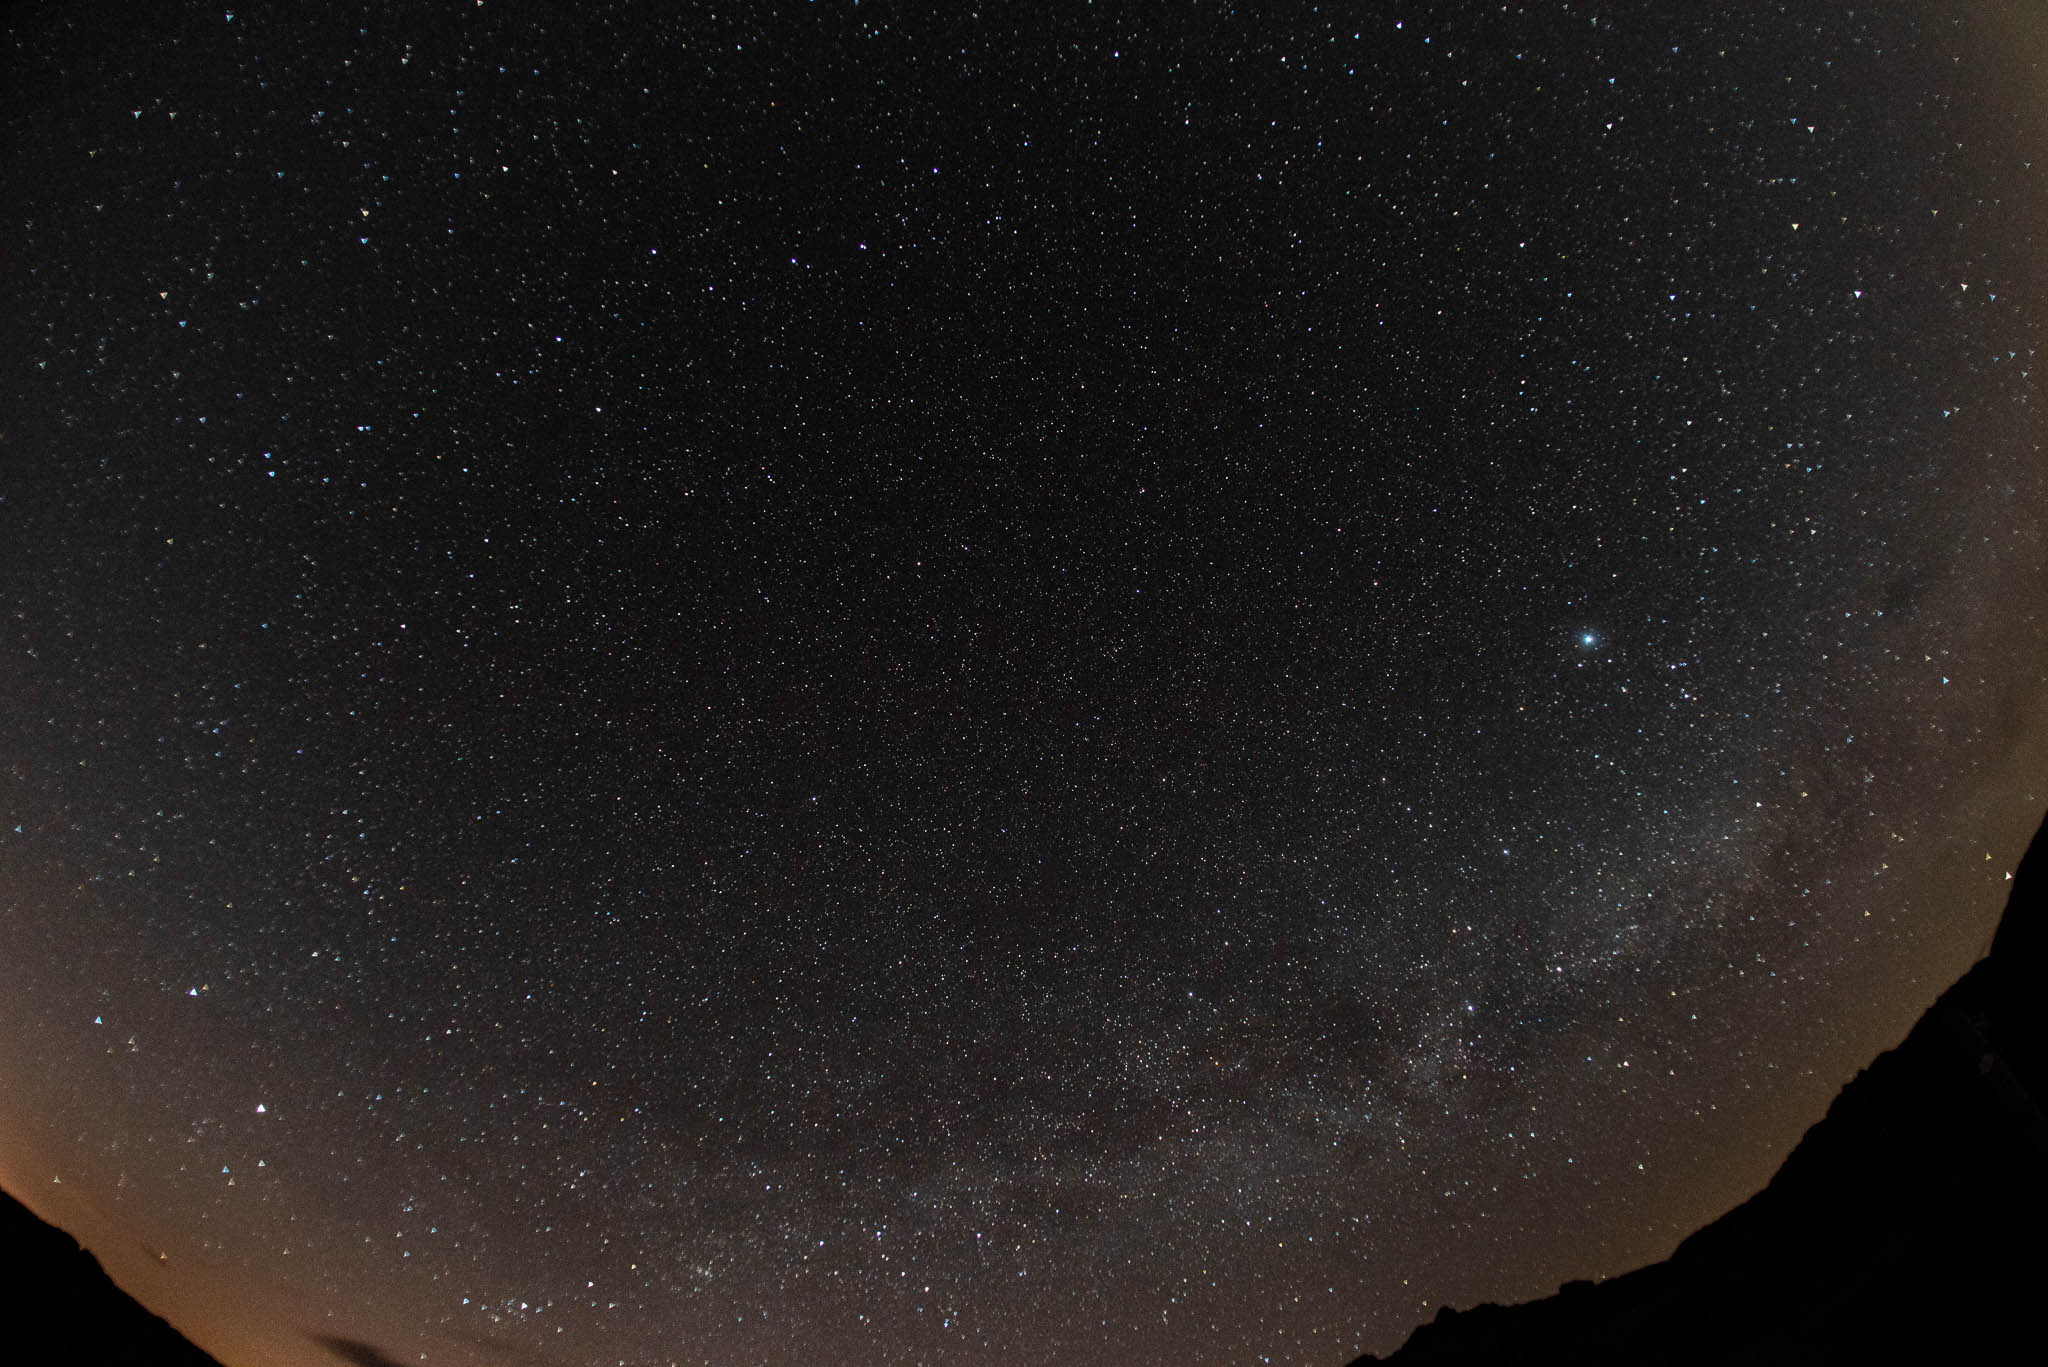 This is 20 exposures taken with the polar mount running, stacked in StarstaX. Almost no trailing, the motor is doing the business but it's only a 16mm lens.  And 100% crop...  The next is with the Polar mount turned off. 37 exposures. And a meteor! 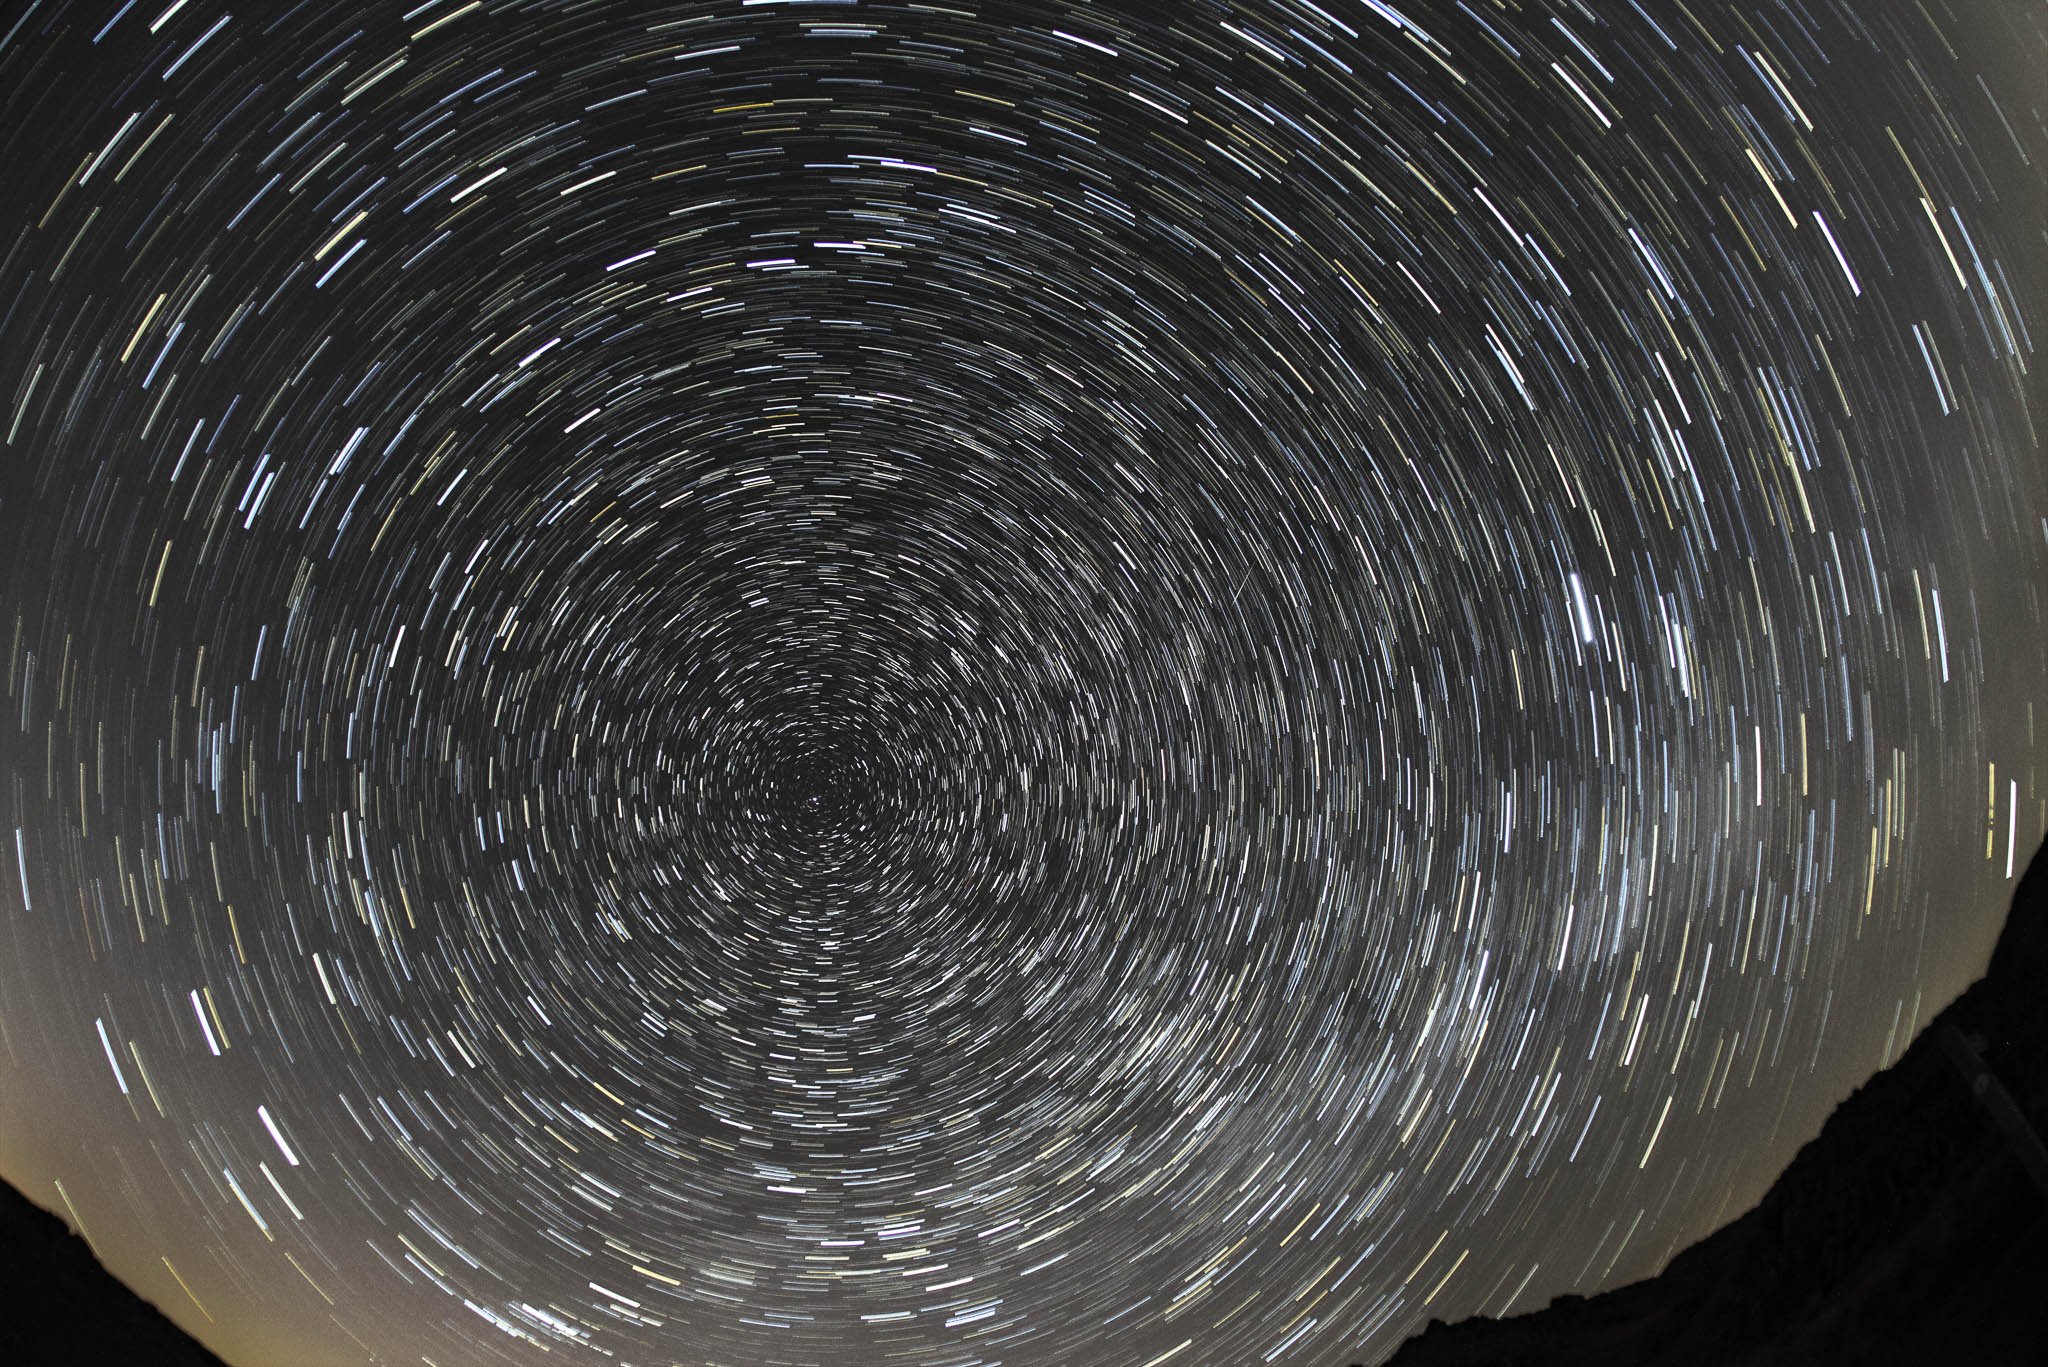 And 100% crop... Also showing the crop area.  With the 100% crop, you can clearly see that Polaris is nowhere near the celestial pole at that magnification with the D800 resolution. It's coming together.
____________________ Robert. |
| Posted by chrisbet: Thu Apr 11th, 2019 03:45 | 63rd Post |
| Looking at those photos brings to mind a couple of Douglas Adams quotes : "Space is big, really big." and "The last thing you need is a sense of perspective."
____________________ If it is broken it was probably me .... |
| Posted by jk: Thu Apr 11th, 2019 03:58 | 64th Post |
| Well the latest black hole pictures are interesting. https://www.bbc.co.uk/news/science-environment-47873592 Robert, your next project is.......
____________________ Still learning after all these years! https://nikondslr.uk/gallery_view.php?user=2&folderid=none |
| Posted by chrisbet: Thu Apr 11th, 2019 04:08 | 65th Post |
| Yes - I watched BBC4 last night - very interesting - couldn't help thinking about Robert while they were trying to align 8 telescopes all over the world to focus on such a tiny target - an orange on the moon I think they said!
____________________ If it is broken it was probably me .... |
| Posted by jk: Thu Apr 11th, 2019 08:44 | 66th Post |
| Robert, Please can you post a picture of your current setup preferably with the 300mm on the camera so I can see the setup. I have looked at the manual briefly but everything seems to be driven from the telescope being in place.
____________________ Still learning after all these years! https://nikondslr.uk/gallery_view.php?user=2&folderid=none |
| Posted by Robert: Thu Apr 11th, 2019 09:08 | 67th Post |
| Yes, no probs, I have it set up outside now, fine tuning the Polar scope.
____________________ Robert. |
| Posted by Robert: Thu Apr 11th, 2019 17:37 | 68th Post |
Doh!  Sorry, I clean forgot to take picture of setup, will try tomorrow. I took the D3300 out specially to make some pix for posting but I was so focused on adjusting the mount that I clean forgot to take pix of it. I spent all last night outside with the mount, determined to overcome my lack of understanding of the adjustments and practice setting it up. Part of the problem has been that the Polar scope reticule wasn't adjusted properly. It's impossible to set the altitude and azimuth if the Polar scope itself isn't set right in the first place. I had been trying and no matter how hard I tried, I got nowhere. Going back to basics today I spent time adjusting the reticule in daylight, I now have it set up very close to an optimum setting. It isn't easy because it requires adjustment in two axis with three screws, possible but for very fine adjustments it's not easy, the Allen key is 0.9mm (tiny), I have fitted the Allen key into a small screwdriver handle to make it possible to hold with my arthritic fingers. Four adjustment screws would have been much easier. I still need to fully understand the time element since it can cause an error from zero to twice the distance between the celestial North pole and Polaris. As Polaris appears to describe a circle around the celestial North pole, one has to know *where* around that circle Polaris actually needs to be, because that is what determines where the centre of the circle is, it needs to be exactly centred on celestial North, an incorrect time causes an eccentric rotation, it would be exactly right once in 24 hrs. Difficult to describe, this adjustment is achieved by rotating the Polar scope to the correct angle, like setting a clock, which is correctly determined from periodic tables, by the date and time of day, a bit like tide tables, in fact probably uses the same base calcs. It can also be determined from the position of Ursa Major but in reality using Ursa Major is only a very rough guide. The more I use the EQ mount the more I realise how exacting the settings need to be. Even with modern and very expensive EQ mounts they are only as good as the alignment and support allows. For really accurate alignment massive foundations and an incredibly solid structure are needed. A tripod mounted setup is way too flimsy and then add the distortions caused by air movements. With the practice I have had, I can now get the mount roughly aligned in a few minutes. For most purposes that's probably good enough to reduce star-trailing to acceptable levels but for what I want I think I will also adopt another technique, rather than making very long exposures, which risk showing star-trail elongation of the image, I will take many relatively short exposures using the EQ mount to maximise the exposures and minimise the elongation. Because drift is likely over long sessions, using image alignment software will align the images exactly. My eventual hope is to be able to make pictures of planets, star clusters and nebula, I might eventually get a modest telescope if I find one at the right price.
____________________ Robert. |
| Posted by Robert: Fri Apr 12th, 2019 08:54 | 69th Post |
| 11 Pictures! Of the mount... #1  #2  #3  #4  #5  #6  #7  The original flimsy mount against my solid heavy duty mount. #8  The DR-3 right angled eyepiece with my adaptor, a bit of plastic plumbing fitting and three thumb screws out of an old Mac. #9  A somewhat out of focus eyepiece. #10  #11 
____________________ Robert. |
| Posted by jk: Fri Apr 12th, 2019 09:27 | 70th Post |
| Thanks Robert. I think that I see what is the problem and the issue with some of your difficulties with sighting. If you want to call me this evening then we can chat it through. PMed you my mobile number.
____________________ Still learning after all these years! https://nikondslr.uk/gallery_view.php?user=2&folderid=none |
| Posted by Robert: Fri Apr 12th, 2019 09:56 | 71st Post |
| Thanks JK, I have numbered the images for ease of reference. In image 7 (and others), the silver dial around the Polar scope is numbered 1-24 effectively, that relates to hours, when locked to the running motor, the arm rotates at 24 hours per revolution. That dial can be turned independently of anything else and can be set to time of day. The graduations on the original mount which is green Hammerite are used to set the rotary adjustment of the polar scope, in combination with the hours on the movable disk AND a mark etched on the polar scope itself. This is a screenshot of the Vixen Manual, page#12. It explains the procedure in detail.  [/url] [/url]My brain is going into meltdown with that description. I think that this also requires star charts as well as the hardware. The movement of Polaris is also indicated in the final figure, #10 at bottom right. It's not as much as I thought. The applicable procedure starts at item 6 I think but I very quickly get lost in the nonsensical text/reality. My EQ mount is not exactly the same as the one illustrated but in essence near enough. The one below is 1986, the one in the manual is 1995, nine years newer. Mine is older than both. 
____________________ Robert. |
| Posted by Robert: Sat Apr 13th, 2019 04:04 | 72nd Post |
OK, I have success!  Last night I went out again set up at Stickle Pike and took three series of images, firstly the Moon, just to test a theory, then I selected a bright object to the North West, not too high in the sky, then another bright object to the South East. I set the Polar scope as best I could then rotated the mount arm around 360º which caused the polar star to appear to describe a circle around celestial North, by eye it seems pretty well centred on the celestial North marking. After I took the Moon exposures I again checked alignment, there was slight Polar drift so I corrected that and went for the first set of a star, may have been a Planet, I don't know... I took about 70 exposures, 30 second intervals, checked alignment again, the Polar drift was so slight I left it alone. Then I made a second star set, same settings. Going through the sets the results are variable, some exposures are crisp and clean, others are mush. At the end of the session I again checked the Polar alignment and drift was very slight, Polaris had drifted from the centre of the tiny locating circle to the edge, which is measurable but insignificant for my purposes, in fact Starry Sky Stacker suggests a little drift is beneficial because it helps to cancel any noise. I have processed star 1 images and they are below. I have used Lightroom and Starry Sky Stacker free trial. https://drive.google.com/file/d/18CE7amExArYwIvF5h0K0SBaEwjKrXSGb/view Initially I tried to use Starry Landscape Stacker, by the same developer but it recognised that I was using an astro mount and warned by using the wrong version it could freeze the software because the algorithms are not intended to deal with that type of image. Amazing! The composite image produced by SSS was made with ten selected 'best' images from 72, the images used spanned a period of 18 minutes of exposures, the first few exposures were not very good, I assume the mount needed to settle down. Firstly the worst individual image from the set. These are at 100% crop.  The best individual image from the set.  The best individual image uncropped.  This is the final, cropped image made by Starry Sky Stacker from my ten selected best images.  As you may imagine I am delighted. I still need to more clearly understand how to get Polar alignment without groping in the dark! I will now go forward and finish the machining of the mount and refine some little niggles but essentially I have cracked it. Will process Star 2 images later and post the results.
____________________ Robert. |
| Posted by chrisbet: Sat Apr 13th, 2019 05:47 | 73rd Post |
| Absolutely great photos, well done!
____________________ If it is broken it was probably me .... |
| Posted by jk: Sat Apr 13th, 2019 05:52 | 74th Post |
| Well done Robert. Looks like you are almost there.
____________________ Still learning after all these years! https://nikondslr.uk/gallery_view.php?user=2&folderid=none |
| Posted by Robert: Sun Apr 14th, 2019 13:14 | 75th Post |
| Thanks, I am very pleased. I went through the second set of images but they are somewhat mundane, the same image quality is there but they are just boring plain star pix. However, just for fun this morning I stacked them in photoshop and blended them that way. I aligned them manually although they were very close, the error was well less than half a small star between any of them. The 11 images I selected for star 2 were chosen from about 70 exposures, The 11 images were taken over 22 minutes, so any error could have been much greater. This is my setup 'in the field'. Note the kneeling pad, just the right height to view through the DR-3 fitted to the Polar scope. 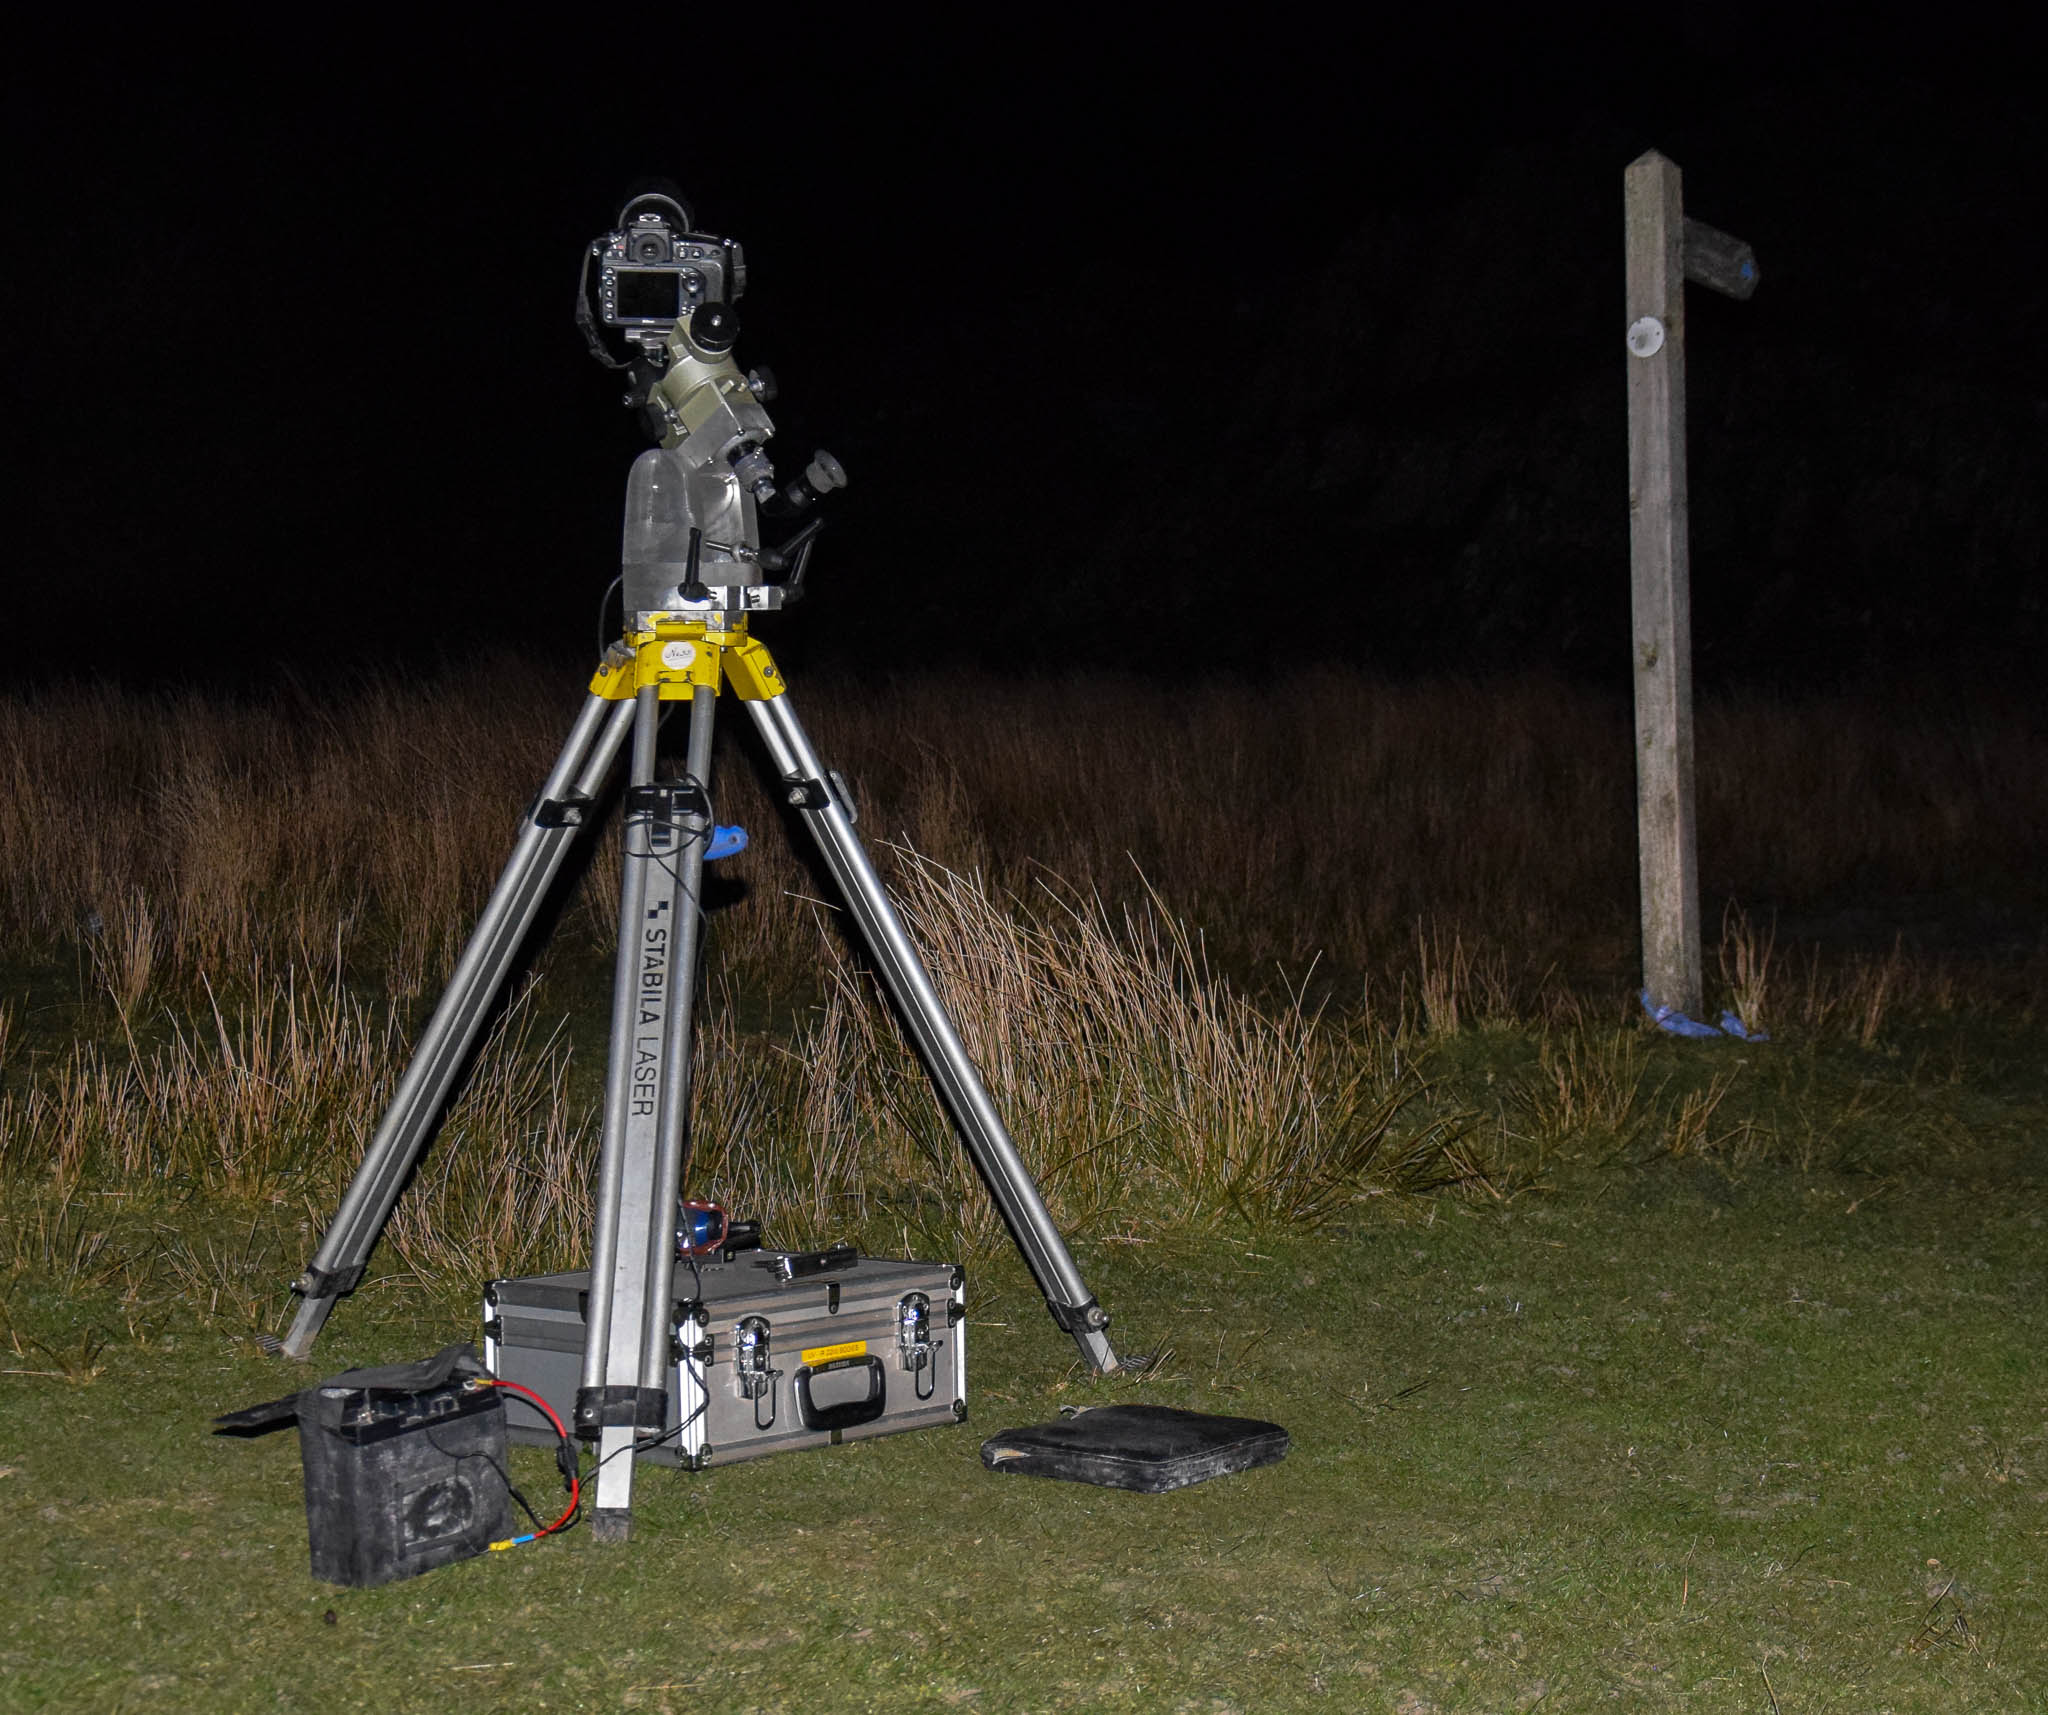 This is the combined 11 exposures stacked in Ps CC. Taken towards the South East, lowish in the sky, a bright star. The light pollution to the south is worst aspect at that site, Lancaster, Morecambe, Ulverston and Barrow all contribute to making a low contrast sky.  This is a 100% crop from the above full frame image, there are no noticeable signs of elongation of the stars due to Earth rotation. 
____________________ Robert. |
| Posted by Robert: Fri Apr 19th, 2019 11:34 | 76th Post |
| The final piece in the jigsaw... https://itunes.apple.com/gb/app/polar-scope-align/id970157965#?platform=iphone I came across this by a rather circuitous route of exploring a lot of dead end avenues, which mainly ended in obsolete PC software. The particularly appealing factor with this 'app' is it knows about my Vixen equatorial mount and more especially the peculiarities of the Vixen Polar scope. The app makers suggest my scope isn't the best, most accurate design for a Polar scope but by using their app properly it can in fact bring it up to excellent accuracy. I am off out again tonight, good forecast for clear skies. Hopefully I will mount the 300mm f/2.8 lens on the D800 and run off some test exposures. If the full Moon allows I will try to get some of the Orion nebula.
____________________ Robert. |
| Posted by Robert: Sat Apr 20th, 2019 05:12 | 77th Post |
| Well I didn't get to try it last night, too much cloud. This is what I saw: Pennington reservoir. 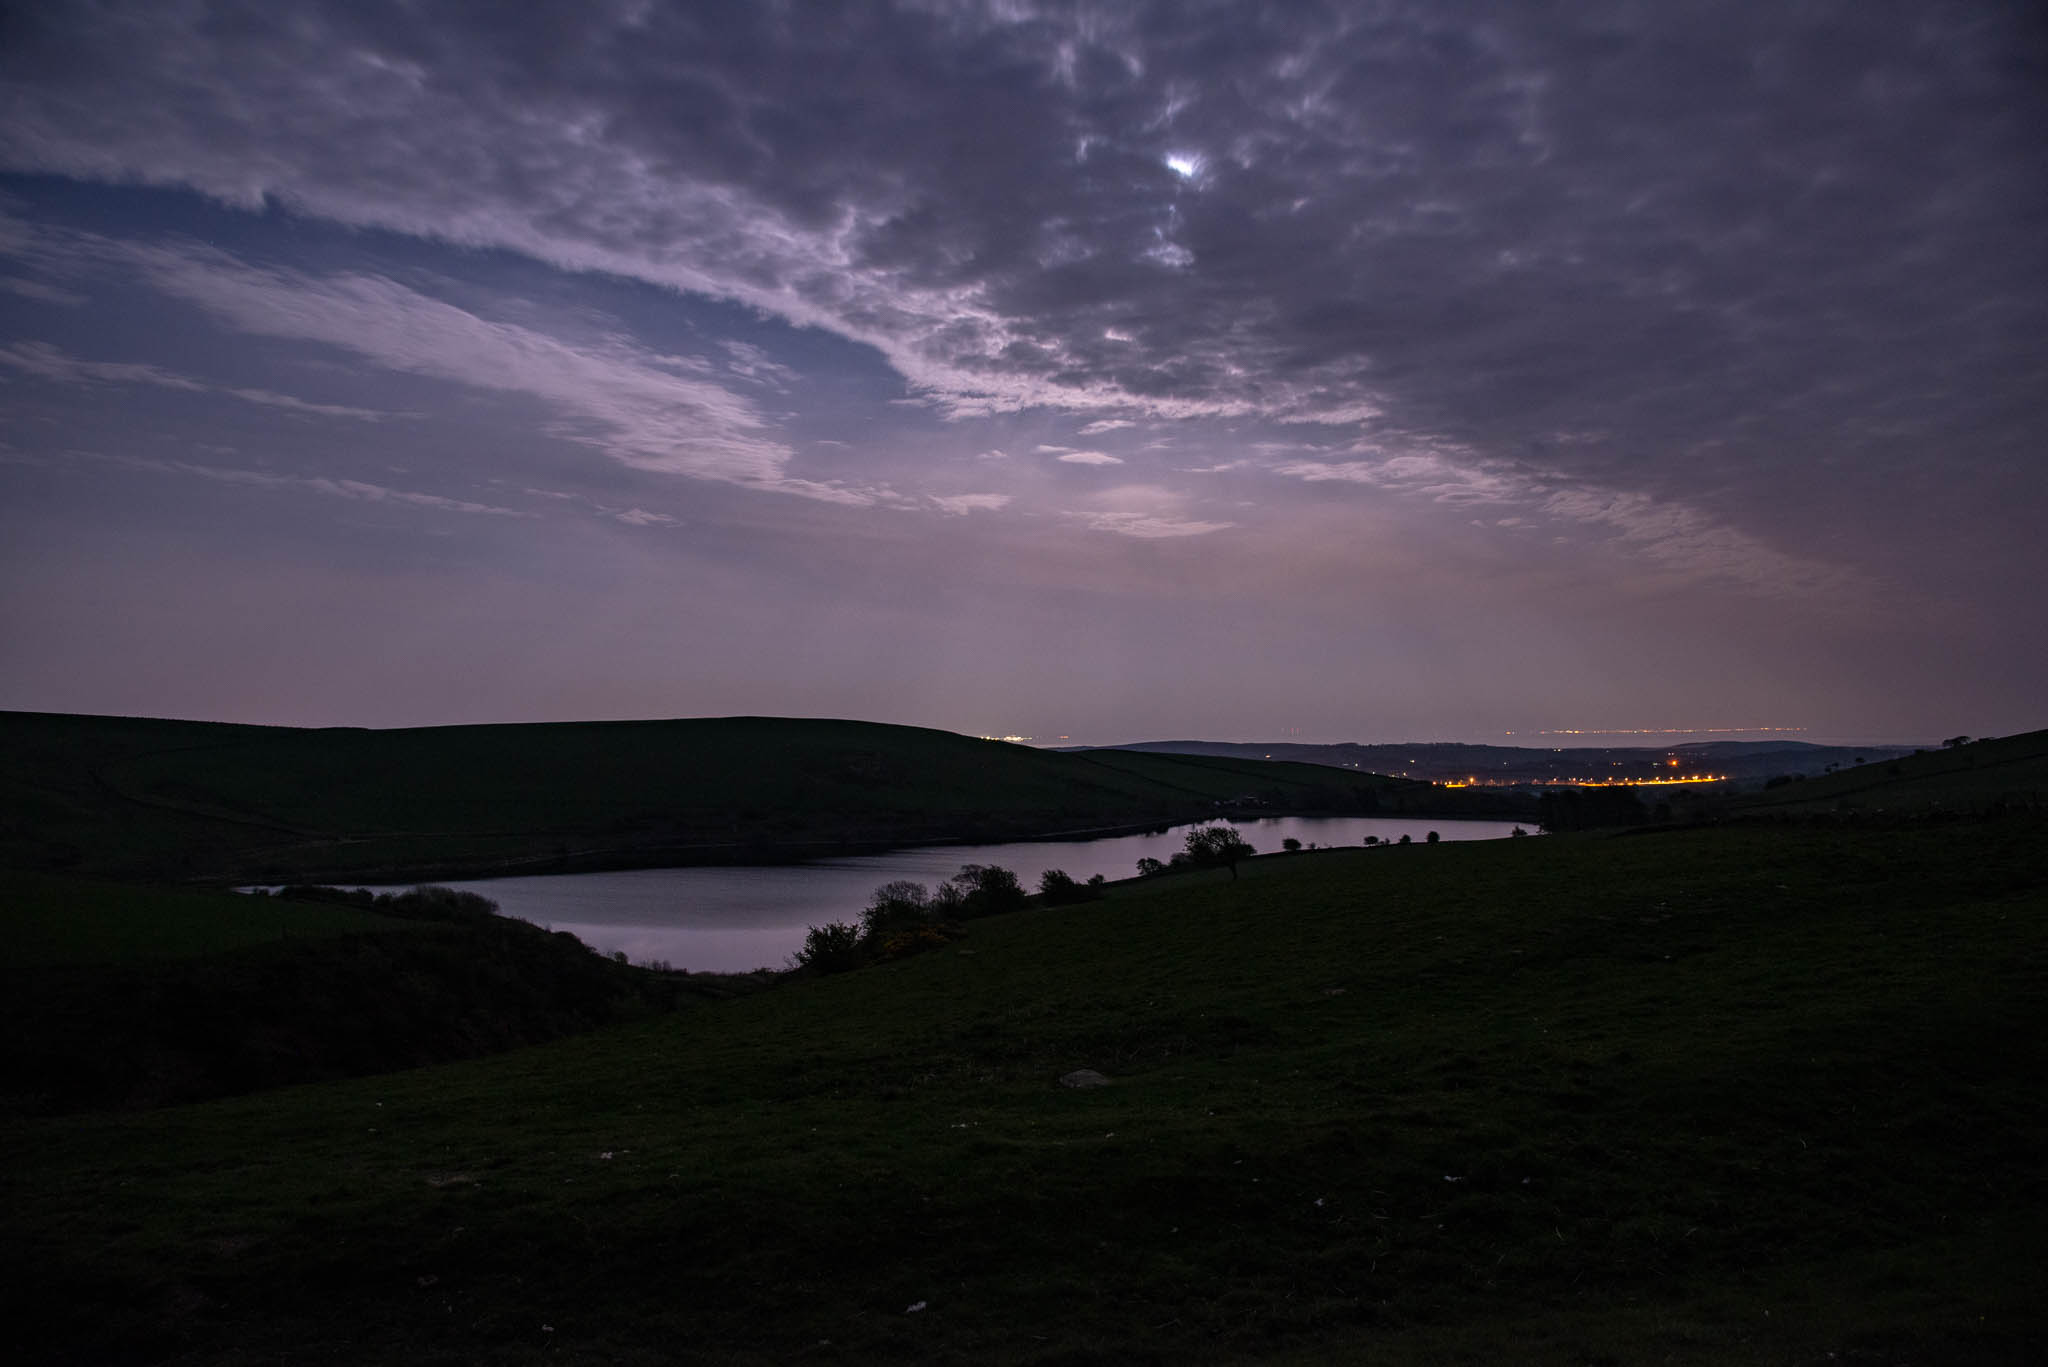 This is what the camera saw:  This was at full focal length, 120mm with the 24-120 on the D800 Morecambe across the bay. 
____________________ Robert. |
| Posted by jk: Sat Apr 20th, 2019 05:42 | 78th Post |
| Like the darker version Robert. Lots of light pollution for your sky shots!
____________________ Still learning after all these years! https://nikondslr.uk/gallery_view.php?user=2&folderid=none |
| Posted by Robert: Sat Apr 20th, 2019 06:26 | 79th Post |
| It was like a sort of misty haze, the light pollution is from Ulverston and Barrow to the South East, I forgot to mention it was a full Moon, a Pink Moon no less. To the North it's much darker.
____________________ Robert. |
| Posted by Robert: Sun Apr 21st, 2019 08:39 | 80th Post |
| I have finally been able use the Equatorial (EQ) Mount with my Nikkor 300mm f2.8 lens. Last night was reasonably clear but the 'pink' Moon was almost full, only having waned very slightly. My newly acquired app for making the rotation setting of the Polar scope to obtain better accuracy of tracking worked well, I still have to perfect it but that's down to refining my technique, I now have the tools I need and an understanding of what's needed to get very close tracking of the night sky. While waiting for the sky to get darker I tried some Moon pix. This is Knottallow tarn above Ulverston, with Morecambe Bay in the background, the GSK factory can just be seen to the left, together with the Sir John Barrow monument, a replica of the Eddystone Lighthouse, caught in a blue moment. http://www.ulverstoncouncil.org.uk/education/john-barrow-monument D800 and Nikkor 24-120 f/4.0 - 2.5 sec @ f/5.6  This was made with the Nikkor 16mm f/2.8 fisheye - 2.5sec @ f/4.0  This is Pennington reservoir, not far from Knottallow tarn. This is where the Ospreys have been seen fishing. Taken about an hour after the previous images, the Moon having risen above the mist and become less pink.  Next is the EQ Mount image no idea what star it was, location to the North West. Made with the best 11 images of 15, taken at 30 second intervals. Nikon D800, Nikkor 300mm f/2.8 ED Ai lens (MF) - 25sec @ f8, ISO 400. Processed in Starry Sky Stacker. 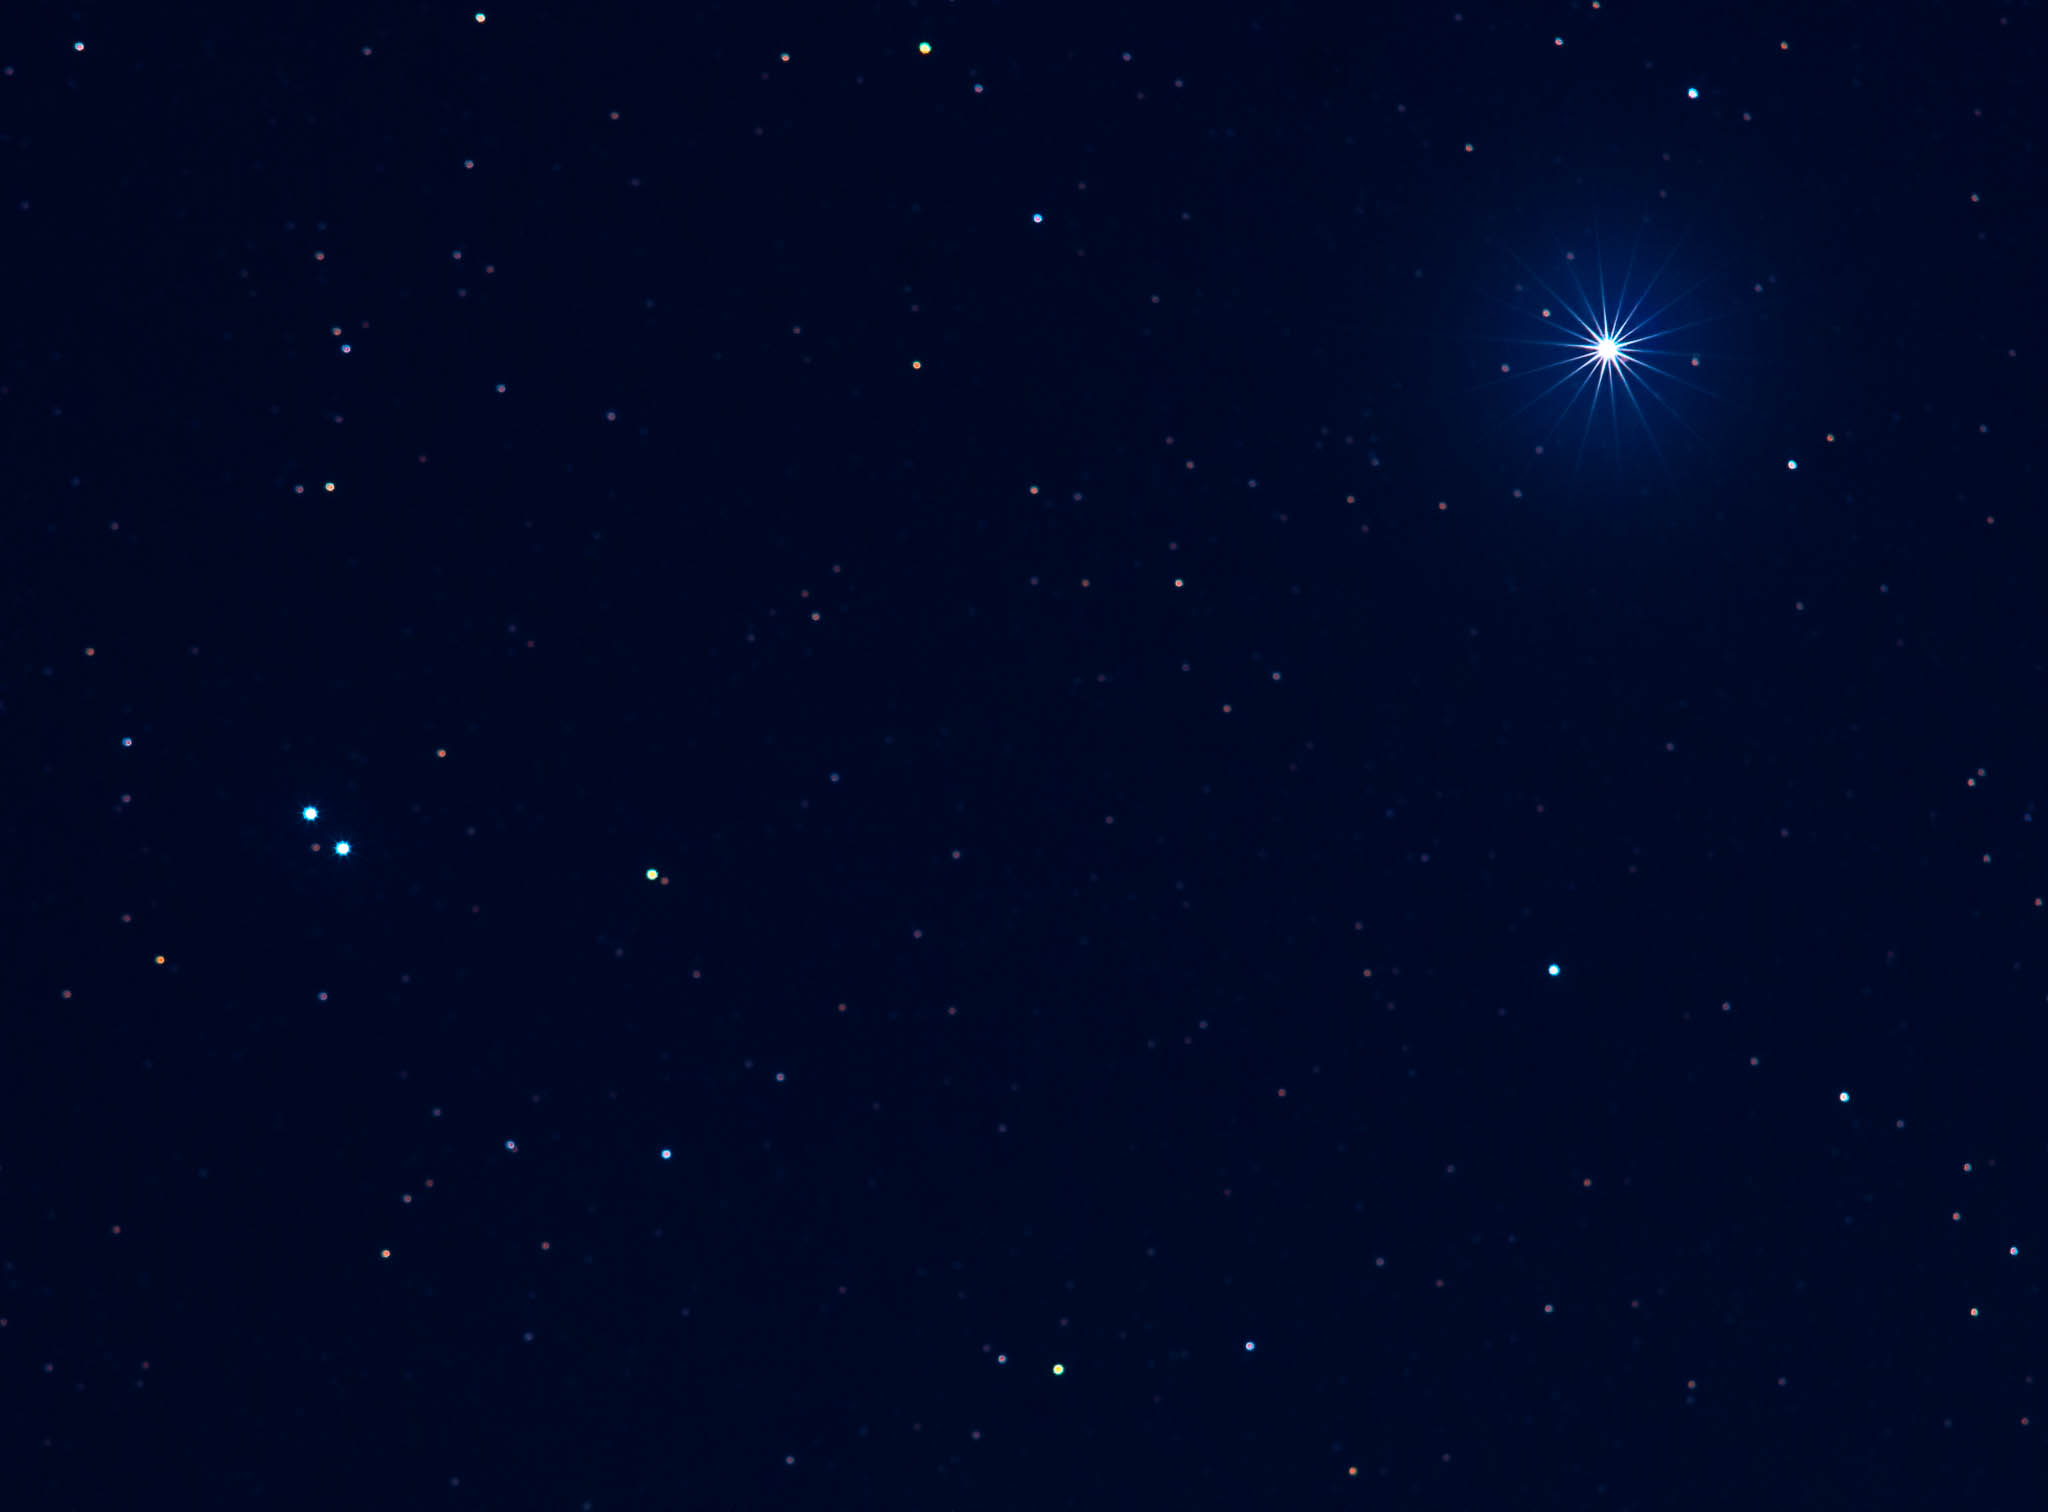 This is a star trails image using the same frames as the stacked image above, showing the movement from slight tracking error. I did not balance the weight of the heavy f/2.8 lens and camera for this test, partly because I need to make a better balancing arrangement and also because I wanted to see how badly the lack of balancing affected the tracking. It seems to have given an error of about one star diameter over 7 minutes. There wasn't as much air turbulence last night, almost all the exposures were pretty well perfect once the EQ Mount had settled down after a couple of minutes. 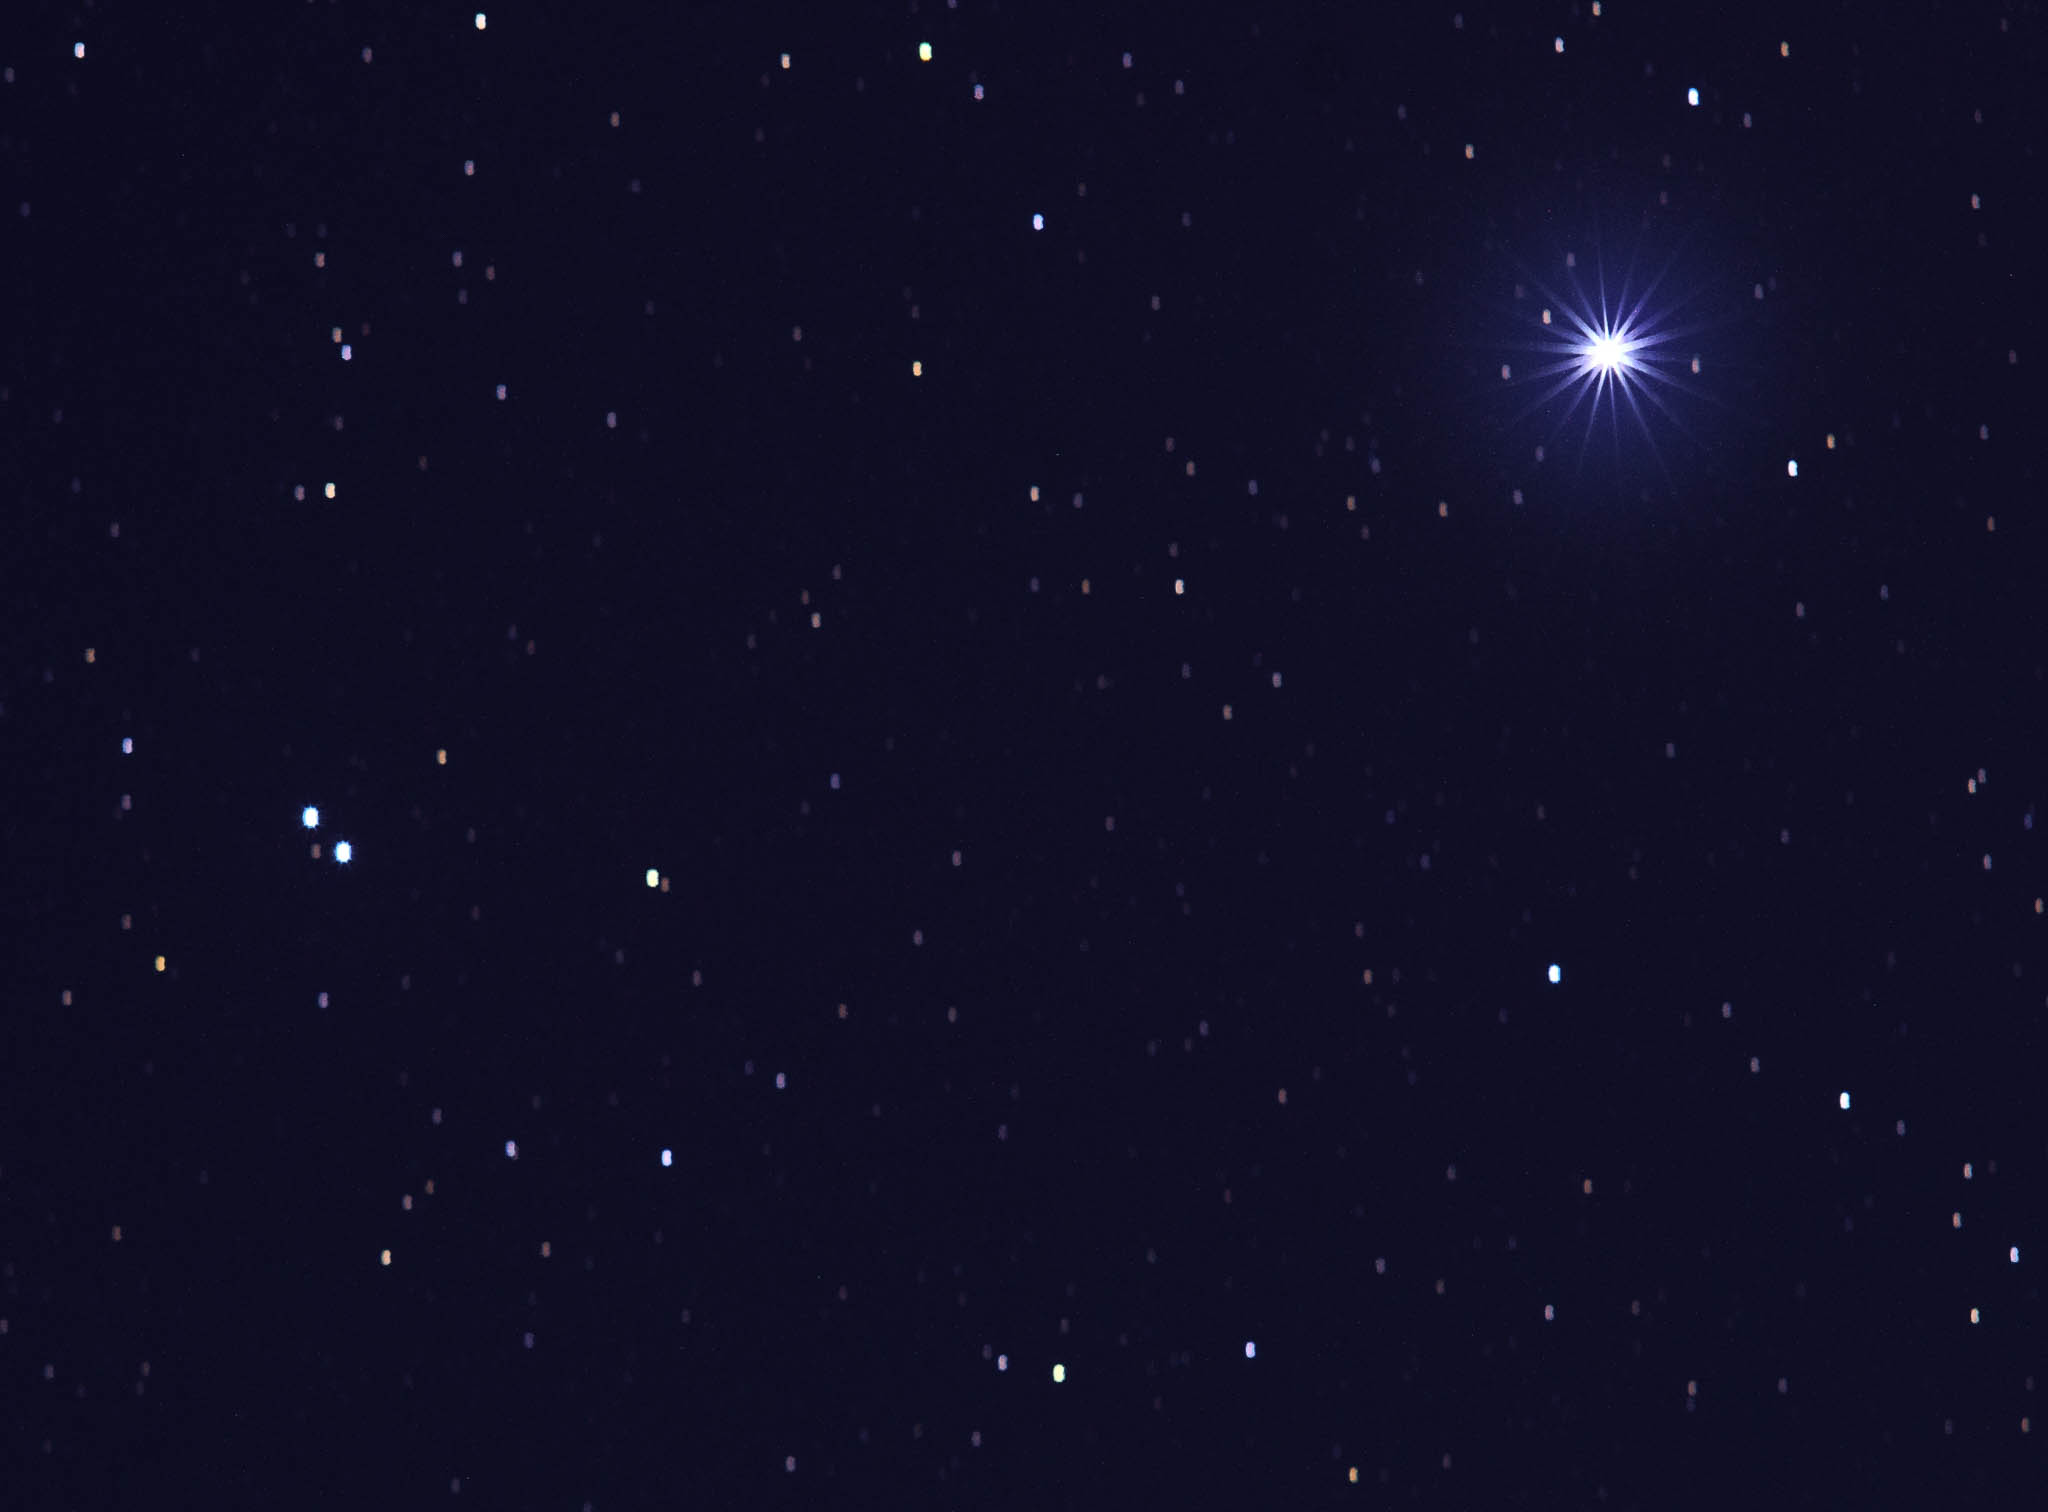 It's been quite a long journey but I have learnt a lot, I need to refine the mount and my technique but I am confident I have an outstanding combination with the D800 - 300mm f/2.8 and the EQ Mount. Roll on the autumn and darker skies. EDIT: Looking at these last two images there appears to be some banding effect visible, I don't have that on my processed images at my end, need to investigate that
____________________ Robert. |
| Posted by jk: Sun Apr 21st, 2019 15:39 | 81st Post |
| Well how about this for temptation? https://nikonrumors.com/2019/04/19/new-eagle-core-device-for-astrophotography-with-the-nikon-z6-and-z7-and-dslr-cameras.aspx/
____________________ Still learning after all these years! https://nikondslr.uk/gallery_view.php?user=2&folderid=none |
| Posted by Robert: Sun Apr 21st, 2019 17:45 | 82nd Post |
| Wow! What a rig... Looks expensive. 
____________________ Robert. |
| Posted by Robert: Mon Aug 26th, 2019 12:37 | 83rd Post |
| Well, with feet back on the ground after that amazing link JK provided, I went out last night, first time this season. A slim waning Moon and a warm night was pretty promising. Armed with coffee and some munchies Christopher and I went up to my favourite local vantage point to see what we could get. I left the astro mount at home, just hoping for a few simple shots of the Milky Way. As we pulled up at the top of the hill I was dismayed to find a very large camper-van, awning and tents taking up most of the parking area, the rest of the locality was taken up by hundreds of sheep. They were the laziest, most stubborn sheep I have ever seen. I had to bump into them to get them to move, they were completely blocking the road, usually they scamper off but not this lot. I decided to move on to an alternative location, I didn't want them knocking the tripod over. Birker fell wasn't too far away so we made our way there. No sheep but lots of cars driving by, at least for the first 10 minutes after I started taking pictures, Birker fell seems an OK place, about the same travel distance from home as Stickle Pike with possibility of less light pollution, despite being slightly closer to Sellafield. After about 20 minutes the sky started clouding in, at 30 minutes it was total cover so I wrapped up and we headed home. I used the D800 and 16mm f/2.8 fisheye, pointed straight up at the Milky Way which was overhead and visually very clear. I have looked at the results, there were only about 15 usable exposures but they have quite long trails, the exposures were for 30 seconds, ISO1600, f/4. They didn't stack well and so I haven't done anything with them. I think this is about the first time I have used the 16mm on the D800 so I wasn't sure what to expect. Another clear and almost Moon free night is forecast for tonight so I am planning to go out again, this time on my own. Charging the astro mount battery as I type...
____________________ Robert. |
| Posted by jk: Mon Aug 26th, 2019 13:05 | 84th Post |
| Looking forward to seeing some more results from your mount. Longer nights are coming and hopefully less numbers of holidaymakers in the high places.
____________________ Still learning after all these years! https://nikondslr.uk/gallery_view.php?user=2&folderid=none |
| Posted by Robert: Mon Aug 26th, 2019 15:22 | 85th Post |
| Yes indeed and fewer dumbhead sheep! LOL I am using 'Clear outside'... https://clearoutside.com/forecast/ It seems pretty good, takes a little getting used to, the app allows you to store locations, the Mac software doesn't seem to allow that. Not always 100% right all the time but the weather is a rather inexact science. If I get anything worth sharing I will post it. I'm now running Mojave on the iMac and the Mac Pro, just now Google Earth locked my iMac up, reporting incompatibilities with the OS and also a notice saying that future updates of the OS will render Google Earth inoperative. That's a minor disaster, I use Google Earth a lot. Presumably I will still be able to run it on the Mac Pro but I use it for so many things besides photography. Is there any (viable) alternative?
____________________ Robert. |
| Posted by Robert: Mon Aug 26th, 2019 21:08 | 86th Post |
| Much better this time. I found setting the astro mount up a bit daunting but once set up the world stopped turning, for my camera at least. Nothing spectacular by way of images, I took about 16 I think but I have been experimenting with the MC-36 and longer exposures. It works very well. The Astro mount worked well stoping star trails, the MC-36 worked well providing long exposures. Will post some later this morning, it's a bit late now.
____________________ Robert. |
| Posted by Robert: Tue Aug 27th, 2019 10:59 | 87th Post |
| OK, gradually getting this together. Here are the images. This was taken setting up the Equatorial Mount, need to level it and align with Polaris. The only item of gear I forgot was my little level. The iPhone did that perfectly well. As I was doing my first test exposures a car came from the South, behind me. At that point any cars approaching from the South light up my position for quite a long time, at least a couple of minutes. All these images were taken with the D800 on my Equatorial Mount using the 16mm f/2.8 ais fisheye. This was @ f/4.0 for 30 seconds, ISO1600. you can see the shadow of the tripod and a slightly ghostly shadow of me on the weatherbeaten grass. 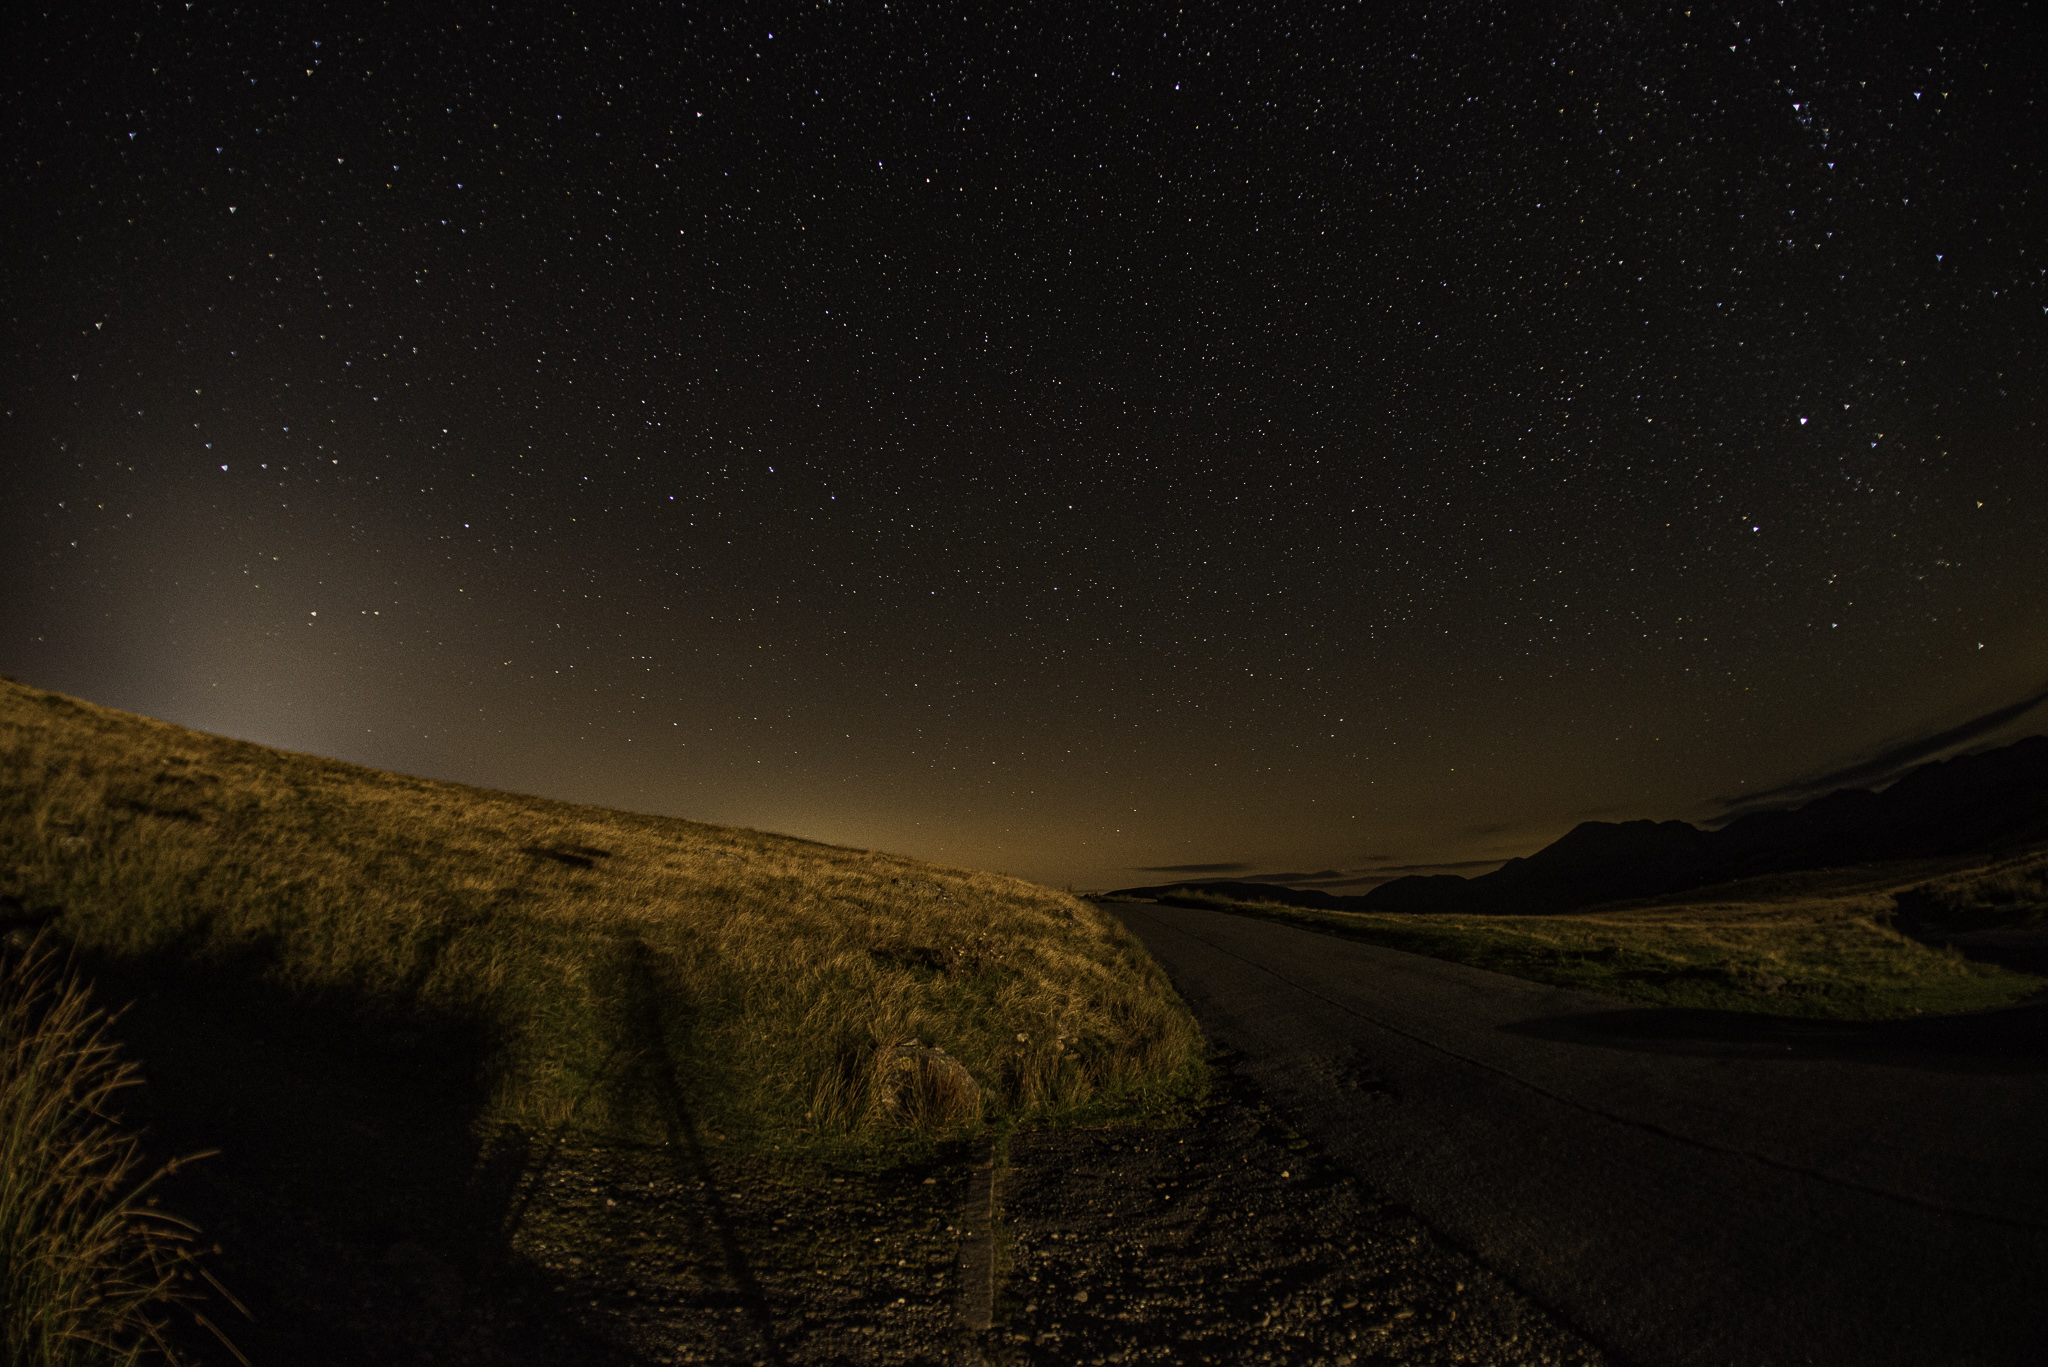 This was taken @ f/5.6, 120 seconds, ISO1250. Graham may be interested because the signpost is directing the traveller to Eskdale 3 Miles away.  Longer exposure of 240 seconds, a flash of my head lamp on the signpost reveals the text better, again f/5.6 and ISO1250.  Ambient lighting here, f/5.6, 240 seconds, ISO 1250  The next image was caught by my red head lamp, 180 seconds, f/5.6, ISO1250.  Finally, 480 seconds @ f5.6 ISO 1250 but with the Astro Mount motor turned off.  I took one exposure at f/8.0 but it wasn't much good because it was contaminated by my torch and a passing cars headlamps, but it was pretty sharp @ f/8.0 so I may try that again. This is the location, I was in the Southern corner of the crossroads, the Lat-Long are of my camera position. 
____________________ Robert. |
| Posted by Robert: Wed Aug 28th, 2019 07:22 | 88th Post |
jk wrote:Nice mount. Just reviewing the thread, I had clean forgotten this post. Many thanks JK, that is a perfect solution. One of the snags I have encountered has been that I have been using a 12 Volt lead acid golf trolley battery which is heavy, somewhat fragile and not particularly easy to connect onto, requiring spanner and screwdriver to connect the wires. I don't like the idea of having a powerful battery with loose trailing wires which are live. A recipe for fire. I will make up a lead for the purpose. It's an XLR plug which avoids the possibility of connecting anything other than suitable into the power pack. As for the illuminator I found a cheap copy Chinese illuminator off of eBay which fits perfectly and does the job nicely. It's only needed at set-up so then it's put away in the box. The button battery last for ages, provided I remember to turn it off, it's one of those devices which would benefit with an auto off circuit.
____________________ Robert. |
| Posted by Graham Whistler: Wed Aug 28th, 2019 17:45 | 89th Post |
| Very dramatic Robert, you have good clear sky with little light polution compared with our part of the country.
____________________ Graham Whistler |
| Posted by Robert: Wed Aug 28th, 2019 19:17 | 90th Post |
| Thanks Graham. So densely populated it can't avoid the light pollution, it's reasonable here but could be better. I think Haverigg prison must have gone for LED floodlights because there doesn't seem as much glare from that quarter now. Sellafield, to the North West is probably the worst offender. To get really dark skies Kielder is probably our nearest but that's at least 135 miles, each way... I really want to get up into the North West of Scotland but the weather up there is so unpredictable and it's such a long haul that the chances are slim. I have just returned from a fruitless outing, the clouds closed in so quickly that I only had a fleeting glance of a clear sky, probably the last chance for a few days.
____________________ Robert. |
| Posted by jk: Thu Aug 29th, 2019 02:49 | 91st Post |
Robert wrote:OK, gradually getting this together. Here are the images.Like these three best. Well done looks like you are well setup now.
____________________ Still learning after all these years! https://nikondslr.uk/gallery_view.php?user=2&folderid=none |
| Posted by chrisbet: Thu Aug 29th, 2019 03:25 | 92nd Post |
| Great photos but not convinced about including the signpost! Any idea what the curved dotted trail in the 2nd pic is? Plane? Meteor?
____________________ If it is broken it was probably me .... |
| Posted by Robert: Thu Aug 29th, 2019 03:36 | 93rd Post |
| Thanks JK, my setup is maturing, I will take a look a the UV power Pack later that will make the setup tool-free, quicker, easier and safer, I'm not keen on taking lead acid batteries into the field, in the dark, clambering over gates and suchlike. Also it would make it easier (lighter) to take the rig to less accessible locations, although the astro head is by far the heaviest and most cumbersome bit. I went out last night but as soon as I parked up the clouds came rolling in. We have windmills in the hills nearby, I had intended to use a couple as a feature with the Milky Way behind but it was not to be. I want to get a feel for the exposure using the MC-36, it's a totally different technique because it allows me to close the lens down some and reduce the ISO to much lower levels. I still need to assess that compared with wide open lens and high ISO but shorter exposures. I suppose it's a bit like birders and TC's or longer lenses. The 16mm seems to improve about f/8.0, wide open the stars towards the outer edges of the image seem to take on a triangular appearance with severe CA. The triangles seem to point towards the centre of the image. I haven't noticed this with the D3 but the higher resolution of the D800 reveals it clearly, so that is another reason to stop down some. The lower resolution of the D3 largely masks the effect. There are no clear skies forecast for the next week or 10 days, beyond that it's anybodies guess, by then the moon will be bright again.
____________________ Robert. |
| Posted by Robert: Thu Aug 29th, 2019 04:42 | 94th Post |
chrisbet wrote:Great photos but not convinced about including the signpost!Thanks Chris, these shots are only me trying to get a handle on the D800, 16mm fisheye and the MC-36 combo. I try to include a land based structure or feature like a tree, church or maybe a viaduct in my night sky images. To me plain pictures of the starry sky lack a subject, they make a nice background. Unless of course you can get close in to nebula or other spectacular night sky features but that really requires a telescope, which ramps up the cost, astronomically... Once I get a good feel for the combo and have refined my technique a bit, I plan to take some starry background photos of some of my favourite locations, Coniston Water - East side, the Ribblehead Viaduct, an old rail bridge near Sedburgh, various churches, etc. As I drive around I am constantly looking for suitable subjects, sometimes they have snags, like security lights which only manifest themselves on the night... Which was the case when I made a planned shoot at Ravenglass railway station, permissions obtained, all set up perfectly, once it was properly dark and I started taking the photos, security lights started coming on in one of the building every few minutes, totally ruined my picture. I did eventually get there, I grafted in a sky from one I had taken at nearby Wastwater the week before, same sky, different day!  After (more than) a bit of work with photoshop...  This is Ribblehead Viaduct with a little added extra from Eric. Viaduct and star-trails were mine, Eric added the train! 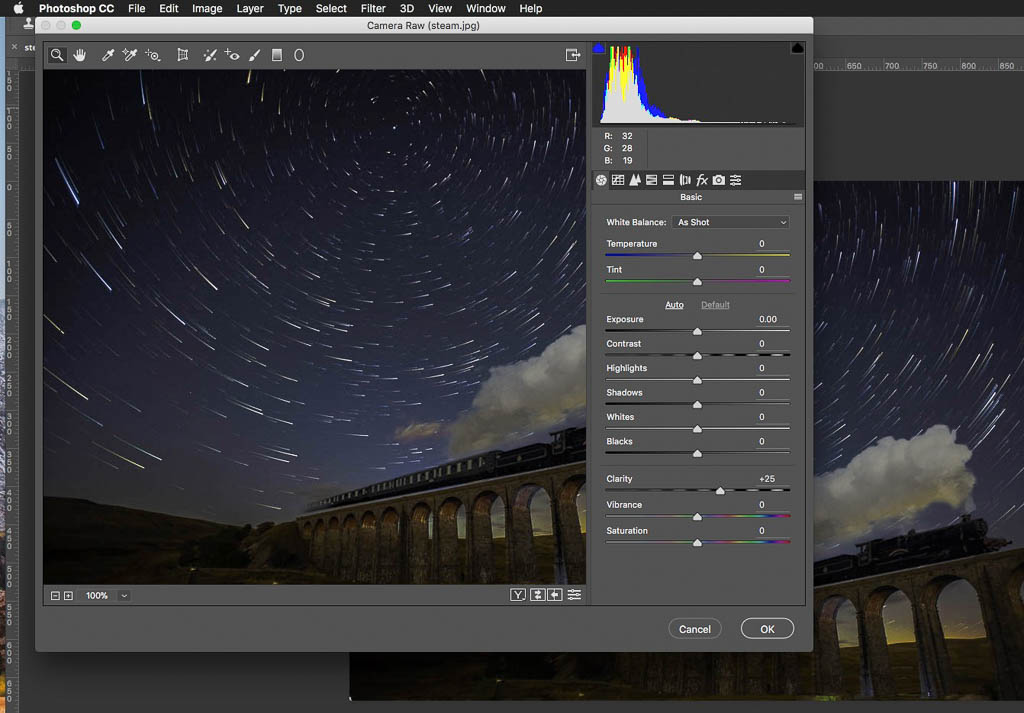 Might not be a wonderful example from my trip to Scotland in May, but it's different...  Another... The Skye Bridge. 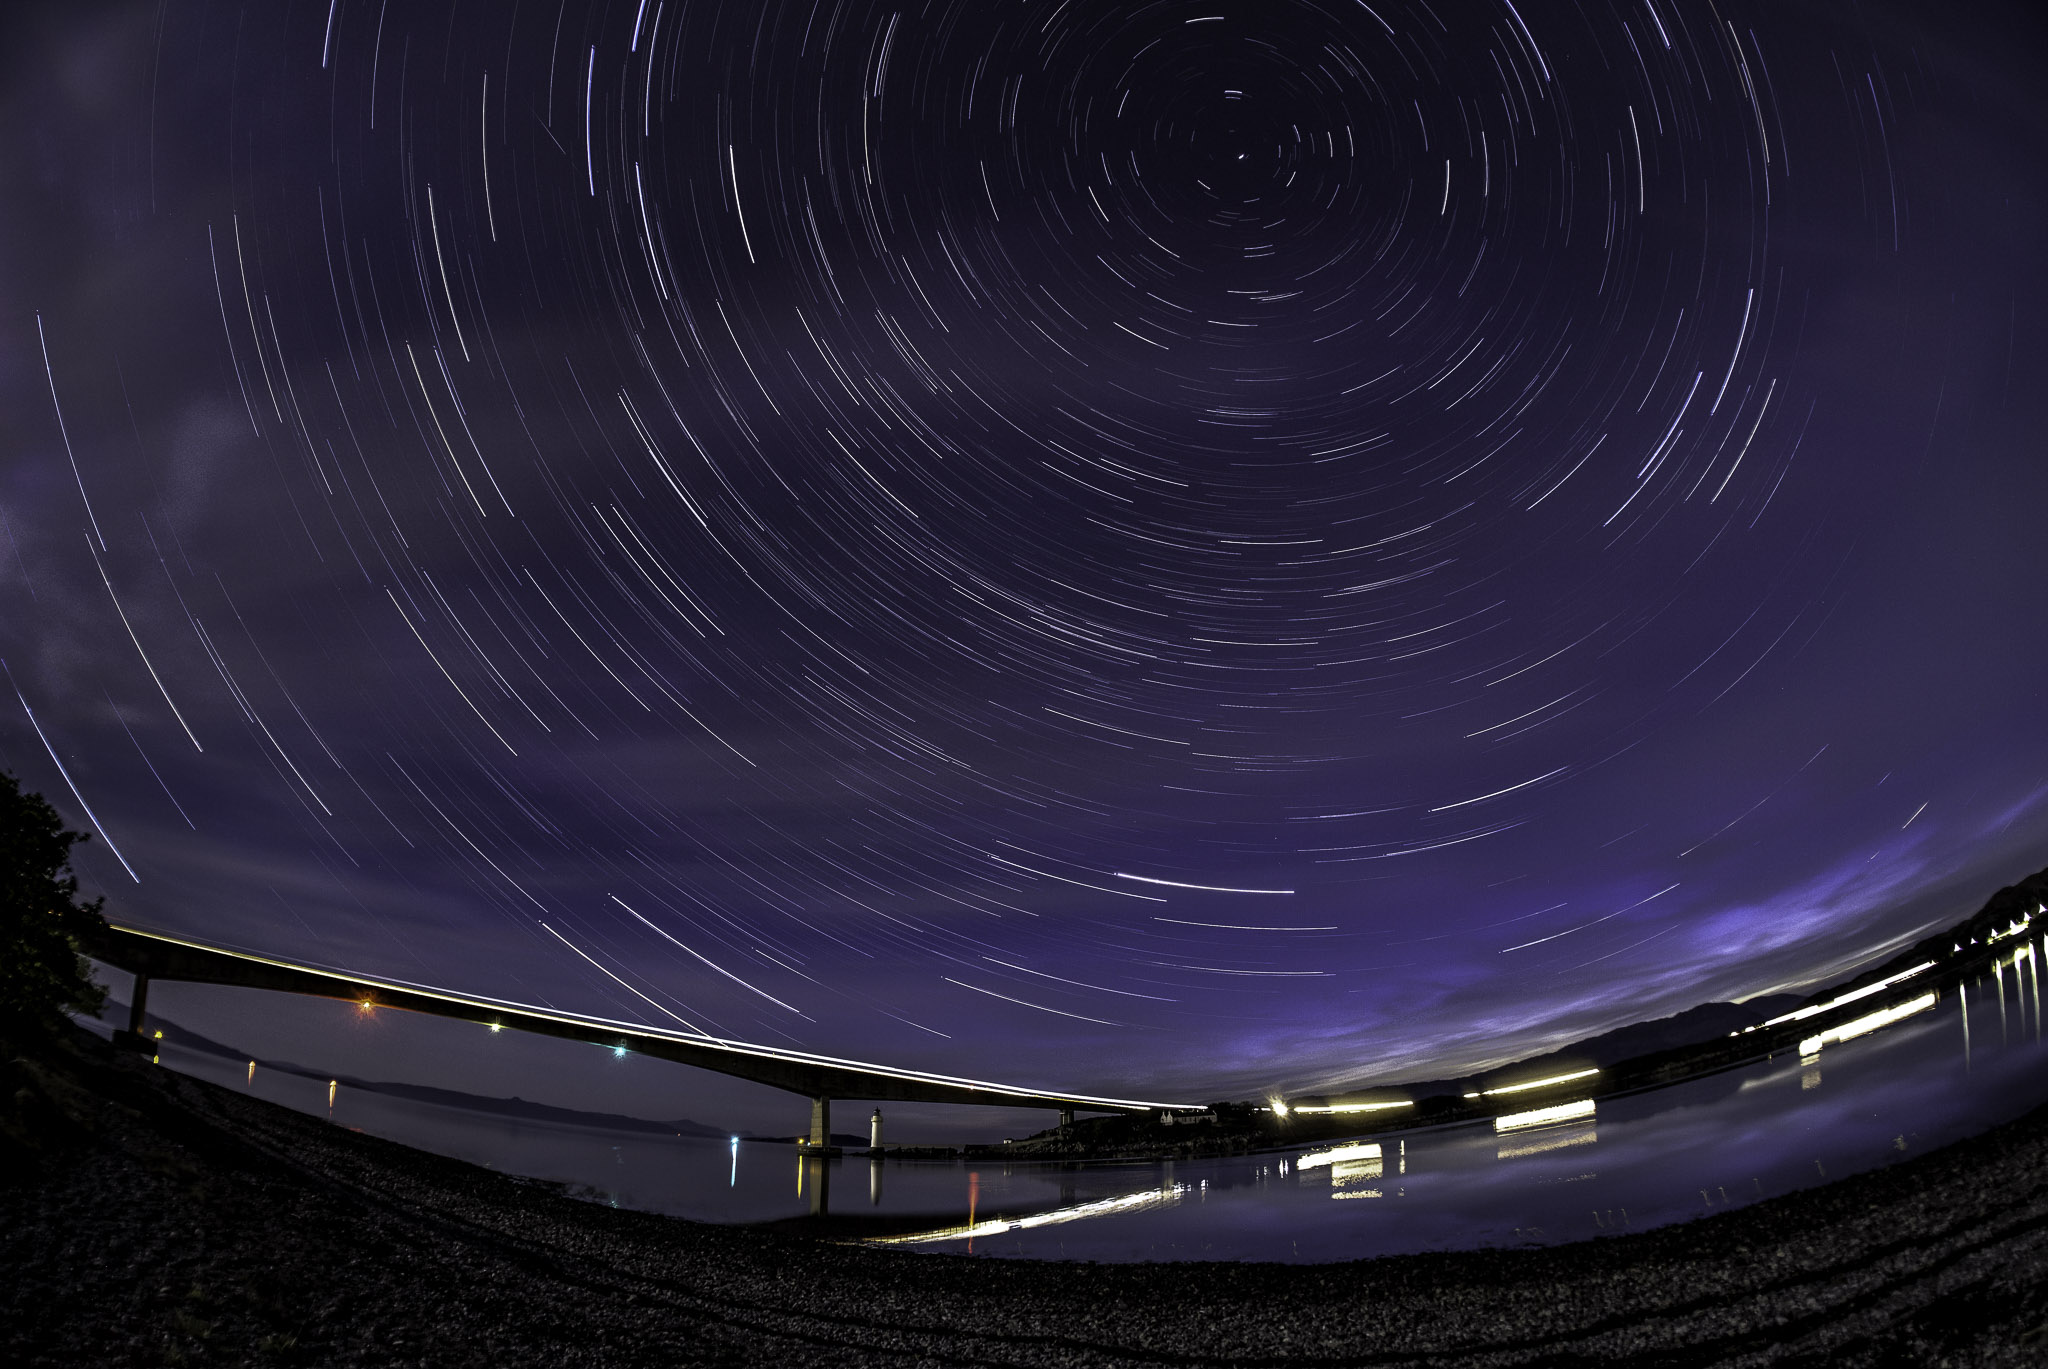 The reason I included the signpost was to give me some idea of how the ambient light works with the starry sky background. Dotted line = plane. Curved track is due the curvature of field caused by fisheye lens. To be honest I hadn't noticed it! LOL My current glasses are rubbish, mind you, what can you expect @ 98 pence for TWO pairs of glasses! Now that is specsavers! One day when I can afford it I plan to get another two pairs of a different spec, that might be better, I don't think these are powerful enough. Sorry to go on and on... Just getting carried away!
____________________ Robert. |
| Posted by jk: Thu Aug 29th, 2019 04:58 | 95th Post |
| If you want proper dark skies without light pollution then I guess you need to go to southern Chile or Hawaii. https://www.lightpollutionmap.info/#zoom=0.8786276236983241&lat=-414578&lon=-20009004&layers=B0FFFFFTFFFFF
____________________ Still learning after all these years! https://nikondslr.uk/gallery_view.php?user=2&folderid=none |
| Posted by Robert: Thu Aug 29th, 2019 06:17 | 96th Post |
| Thanks JK, that's a very handy map, bookmarked already! It confirms my expectation that North West Scotland is the closest I am likely to get to a dark sky. It's just getting there when there are clear skies. 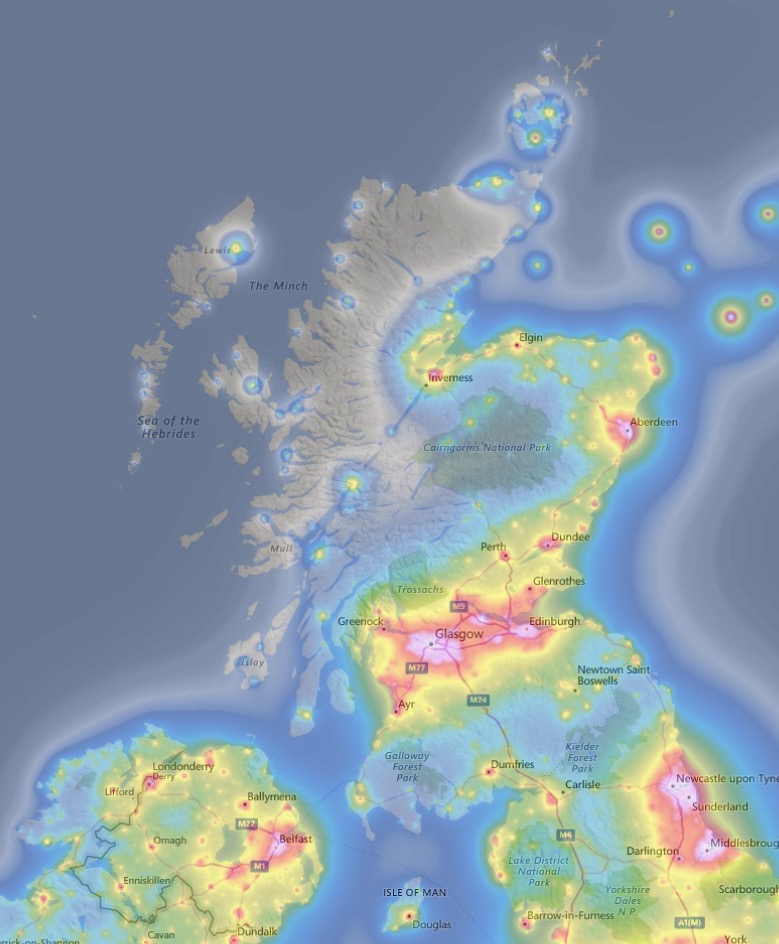 Kielder is affected by Glasgow and Newcastle, quite noticeable on a dark clear night It's my understanding that major cities like Glasgow can pollute the darkness for more than two hundred miles around. In the South West Lake District National Park where I am lucky enough to live, just North of Barrow, we have green to grey rating. As you can see from the first image in my last set, the Sellafield nuclear plant (Seascale, or Calder Hall), the whiter patch to the left, is a powerful source of light pollution, from just one plant, albeit a very large one. The more orange patch to the right is Whitehaven and Workington. It's interesting to see that the West coast of the Isle of Mull seems to have a good rating... That's 'only' 320 miles from here. Mmmm.
____________________ Robert. |
| Posted by jk: Thu Aug 29th, 2019 15:23 | 97th Post |
| Teeheeeheee, how about getting above the clouds with a trip to Scafell Pike? Actually if you were cunning just drive to Wasdale Head hotel/pub and go into the field that is on the path to Scafell/ Scafell Pike and set up there. Good refreshments available on tap!
____________________ Still learning after all these years! https://nikondslr.uk/gallery_view.php?user=2&folderid=none |
| Posted by Robert: Thu Aug 29th, 2019 15:49 | 98th Post |
jk wrote:The motor will drive well off the powerpack that you made for use for your Nichai UV light. Double utility.I have re-opened the UV lamp powerpack, while I could adapt it, it's main feature is the LED Driver in which which you guided me in the construction. I would have to completely re-design the internal circuitry, it works and is reliable. I don't want to mess with it. However, I have had an idea... Now the D3 is no longer my front line camera, I could use D3, EN-EL4 batteries and connect to them via the Chinese charger you sent with the D3. By removing the charging circuitry from the charger module and connecting a cable directly to the battery output terminals I could mount it on the back of the Astro Mount controller, or mount it in a small white box with the controller so I could use some of my EN-EL4 batteries to power the Astro Mount. Perhaps include a small switchable 3 Watt instrument bulb to provide heating for the battery. They seem to suffer badly from the cold and this rig will very likely be used in the cold more than in the warm. If not the EN-EL4 batteries, I have another good set of three 18650 cells sitting on the shelf in front of me from my dismantled D1 batteries. 
____________________ Robert. |
| Posted by jk: Thu Aug 29th, 2019 16:11 | 99th Post |
| I cant remember now if your 18650 batteries are tagged cells or ones like normal AA batteries with spring connections. A single 18650 will power a LED bulb for many hours. 18650 battery is rated at 3.4-3.7volts. To power your Astromount motor you need 12-25volts I think. This is the equivalent of about 5 of the 18650 batteries (18v) in series. You need three batteries only if you need 10-12volts Note: series, not parallel. So for 6 cells you can have two independent power supplies. However since the light will only be used occasionally then you can use 5 batteries in series but tap into the first battery only of the series for your light.
____________________ Still learning after all these years! https://nikondslr.uk/gallery_view.php?user=2&folderid=none |
| Posted by Robert: Thu Aug 29th, 2019 16:54 | 100th Post |
| The Vixen Astro Mount motor is rated at 5 Volts. The controller has a voltage stabiliser chip which can accept up to 36 Volts and reduce it to 5. The excess voltage is absorbed by a primitive galvanised steel heat sink, might be better replaced with aluminium or copper. My spare 18650 cells are tagged but one tag on one cell had broken off, the spot welds have failed. I would not attempt to re-attach it by soldering. The other two cells could have their tags removed so I could end up with three un-tagged cells, which could be recharged individually in an individual cell (as opposed to bundled cells) 18650 charger. Another possibility occurs to me, I have a good supply of Makita 18 Volt professional power tool batteries, I could easily get a broken drill or other suitable tool and cannibalise the battery mount. These batteries have capacities of 3Ah and 4Ah, well more than enough to power the Astro Mount for days, weeks even! Why, oh why, are all these batteries different. The cells inside are largely the same, as are the voltages, yet each manufacturer has their own proprietary style of attachment and termination.
____________________ Robert. |
| Posted by jk: Thu Aug 29th, 2019 17:17 | 101st Post |
| Ok probably best to use pack voltage of 7.2 volts made by a pair of cells in series. I know that the different manufacturers' use different voltages but the worst part is finding ways of connection to these different batteries. Each seems to have their own proprietary connection mechanisms.
____________________ Still learning after all these years! https://nikondslr.uk/gallery_view.php?user=2&folderid=none |
| Posted by Robert: Mon Jul 20th, 2020 04:33 | 102nd Post |
| We are currently blessed with Comet Neowise which is just about visible to the naked eye low in the Northern sky, just to the East of Ursa Major. Last night was the first opportunity to see it due to almost continuous night time cloud cover since I became aware of the Comet. Neowise is scheduled to peak it's presence about the 25th July. Here is my first attempt to photograph it, about 2am BST 20 July 2020. Nikon D800, Nikkor 300mm f/2.8 wide open, 15 seconds, ISO 800.  Click here to comment on this image. If the weather permits I would like to try again, it would be nice to include a terrestrial subject as foreground but at lease I have managed one image of our visitor. Edit: Since posting the image I notice the graduation of light around the comet is poor, I hope to post again with a decent graduation, I exported a JPEG from the TIFF output of Photoshop due to space considerations but perhaps it wasn't high enough quality?
____________________ Robert. |
| Posted by Eric: Mon Jul 20th, 2020 08:37 | 103rd Post |
| That's an excellent capture Robert. Most of the shots I've seen on line have significant terrestrial subject matter included (ie wider angle). As a result, the comet is a small dot and smudge against a large plain sky ...which helps it stand out more I guess.
____________________ Eric |
| Posted by jk: Mon Jul 20th, 2020 10:30 | 104th Post |
| This image on the Fuji-X forum (also on her Flickr) is the best I have seen. Original here... https://live.staticflickr.com/65535/50119671932_b637ddfb62_h.jpg 
____________________ Still learning after all these years! https://nikondslr.uk/gallery_view.php?user=2&folderid=none |
| Posted by Robert: Mon Jul 20th, 2020 11:24 | 105th Post |
| Interesting image... No movement in the stars but there are no waves in the water either... My guess is the stars have been pasted in, if an astro mount had been used the terrestrial highlights would have shown trails. Is the blue at the lower edge of the comet CA? I am guessing so. I will reprocess the image but I now wish I had made the exposure as an NEF, I had forgotten I had set the D800 in JPEG mode because I have been doing time-lapse.
____________________ Robert. |
| Posted by Robert: Mon Jul 20th, 2020 11:28 | 106th Post |
Eric wrote:That's an excellent capture Robert.Thanks Eric, The first one I saw was Stone Henge, that was what alerted me to the presence of the comet. I usually try to include a terrestrial feature but it isn't always easy. I wonder what it's like in Wasdale, with Gable and Scafell in the foreground. It's a fair drag up there to discover it's not high enough in the sky.
____________________ Robert. |
| Posted by jk: Mon Jul 20th, 2020 12:25 | 107th Post |
| The exposure of the image I posted a link to was ISO1600, f2.8, 8secs.
____________________ Still learning after all these years! https://nikondslr.uk/gallery_view.php?user=2&folderid=none |
| Posted by Robert: Mon Jul 20th, 2020 12:58 | 108th Post |
jk wrote:The exposure of the image I posted a link to was ISO1600, f2.8, 8secs.At 8 seconds I would expect elongated stars, mine was 15 seconds, admittedly with a longer lens...
____________________ Robert. |
| Posted by jk: Mon Jul 20th, 2020 13:14 | 109th Post |
Robert wrote:At 8 seconds I would expect elongated stars, mine was 15 seconds, admittedly with a longer lens...She used a 14mm lens on an APS-C sensor so quite a difference in focal length.
____________________ Still learning after all these years! https://nikondslr.uk/gallery_view.php?user=2&folderid=none |
| Posted by Robert: Mon Jul 20th, 2020 15:14 | 110th Post |
jk wrote:She used a 14mm lens on an APS-C sensor so quite a difference in focal length.Ah, OK I accept that explains it. It seemed to be closer than an ultra wide and rectilinear thrown in. Perhaps I should try the 16 fish... It's looking cloudy again tonight. I was gearing up to nip up to Wasdale. ☹ï¸
____________________ Robert. |
| Posted by Robert: Sun Sep 20th, 2020 16:01 | 111th Post |
| Not Wasdale! This time just yards from home, Christopher persuaded me to get a photo of the Moon setting. It's waxing at present, last night we watched it set a little earlier, soon after the sunset. Not having used the D800 since May, except for a brief attempt with a comet, I struggled with the settings and couldn't find infinity on the 24-120 f4 lens, it focuses a tad past infinity and that is something of a pain. After eight attempts to home in on a half decent exposure the Moon was about to disappear below the horizon I had to accept what I had. 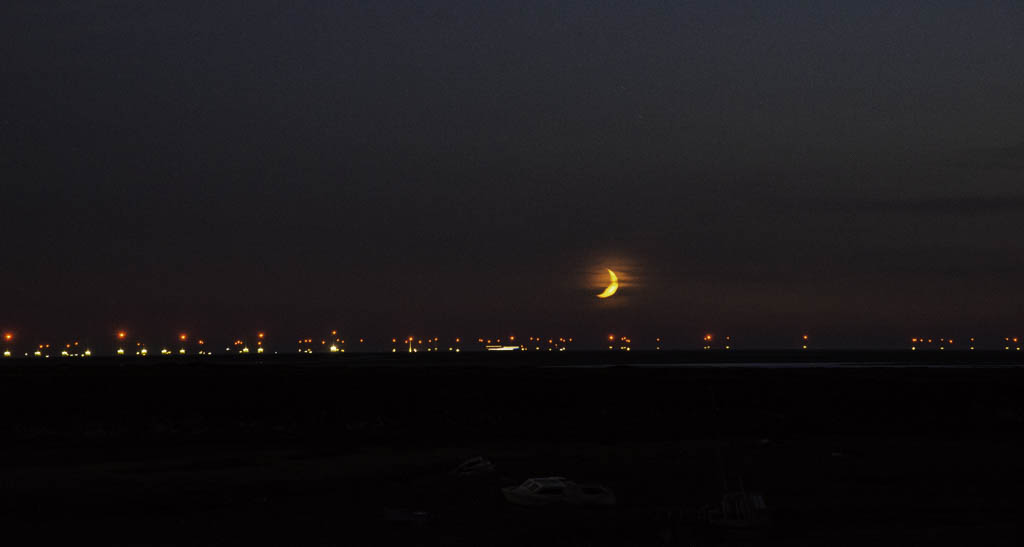 Click here to comment on this image.
____________________ Robert. |
| Posted by Eric: Mon Sep 21st, 2020 03:47 | 112th Post |
Robert wrote:Not Wasdale! This time just yards from home, Christopher persuaded me to get a photo of the Moon setting. It's waxing at present, last night we watched it set a little earlier, soon after the sunset.Very nice unusual shot. I would sell that lens to the European Space Agency...they are struggling to see beyond our galaxy let alone beyond infinity.
____________________ Eric |
| Posted by Eric: Thu Oct 15th, 2020 03:19 | 113th Post |
| Moonrise over Byron Bay, NSW. Location, Location....Lens Length
____________________ Eric |
| Posted by jk: Thu Oct 15th, 2020 04:04 | 114th Post |
| Going to have to try this out with my PhotoPils and my 1000mm f11 mirror lens. I have seen these photos before but never had a chance to use the technique. I will do stills not video!
____________________ Still learning after all these years! https://nikondslr.uk/gallery_view.php?user=2&folderid=none |
| Posted by jk: Thu Oct 15th, 2020 04:08 | 115th Post |
| Robert, does the lens get less sharp when you shoot a distant point and use focus past the infinity mark? Lens theory says it shouldnt matter as parallel rays are parallel (e.g. notional infinity source).
____________________ Still learning after all these years! https://nikondslr.uk/gallery_view.php?user=2&folderid=none |
| Posted by Robert: Fri Oct 16th, 2020 08:37 | 116th Post |
| Replying from my iPhone so brief (for once!) Yes it's worse when focusing beyond infinity. I think it's because of internal focusing. My 300f/ 2.8 does something similar.
____________________ Robert. |
| Posted by chrisbet: Fri Oct 16th, 2020 11:25 | 117th Post |
jk wrote:Robert, does the lens get less sharp when you shoot a distant point and use focus past the infinity mark?That does not sense to me - surely if the lens goes beyond infinity in terms of its focussing, then parallel rays will be focussed to a point which is not in the sensor plane?
____________________ If it is broken it was probably me .... |
| This is topic ID = 1677 | ||
| Nikon DSLR Forums > Photography > Photography Projects > Night Sky Photography | Top | |
Users viewing this topic |
||
Current theme is Blue
| A small amount of member data is captured and held in an attempt to reduce spammers and to manage users. This site also uses cookies to ensure ease of use. In order to comply with new DPR regulations you are required to agree/disagree with this process. If you do not agree then please email the Admins using info@nikondsl.uk Thank you. |
Hosted by Octarine Services
Copyright © 2008-2024 Data 1 Systems
Page processed in 0.8587 seconds (72% database + 28% PHP). 630 queries executed.
Copyright © 2008-2024 Data 1 Systems
Page processed in 0.8587 seconds (72% database + 28% PHP). 630 queries executed.